❌

Vue normale

Reçu avant avant-hiercloud

AWS Weekly Roundup: Claude Fable 5.1 on AWS, Amazon Linux 2027 preview, AWS Certified AI Business Strategist, and more (September 7, 2026)

7 septembre 2026 à 16:24

Last week, Claude Fable 5.1 became available on AWS. According to Anthropic, Claude Fable 5.1 delivers frontier intelligence for ambitious tasks across coding, scientific research, and enterprise workflows. Claude Fable 5.1 is built for long-running, high-stakes work that runs for hours and spans many applications. It can own more of a software project on its own, handling features across an entire codebase, code review, and performance work over extended sessions.

Anthropic has designated Fable 5.1 a Covered Model, a category of Claude models that carry additional data retention, safety review, and access policies wherever they’re offered. Claude Fable 5.1 is subject to data retention for up to 30 days and human review by Amazon personnel, with a new aws_review data retention mode. In this mode, AWS retains your prompts and outputs for human safety review within the AWS boundary. The provider_data_share mode is legacy, and Amazon Bedrock does not share your data with the model provider. In addition, Enterprise Frontier Safeguards (EFS), built in partnership between AWS and Anthropic, will let eligible customers use Covered Models while keeping their data in a cloud environment they control.

You have two ways to access Claude Fable 5.1: Amazon Bedrock and Claude Platform on AWS. To learn more, see the Claude Fable 5.1 model card on Amazon Bedrock and Claude Platform on AWS.

Last week’s launches
Here are some launches that got my attention:

  • Amazon Linux 2027 (AL2027) in public preview: AL2027 is the next version of the Amazon Linux operating system. It runs on kernel 7.1+, purpose-built for cloud-native workloads on AWS with performance, scale, and security in mind. Built on AL2023’s baseline, AL2027 is designed for customers who need a secure, stable, and AWS-native operating system running web applications, databases, containerized microservices, AI/ML workloads, and large-scale infrastructure.
  • Amazon EC2 R9g and R9gd memory-optimized instances: These instances are powered by AWS Graviton5 processors, delivering the best price performance for memory-intensive workloads running on Amazon EC2. R9g and R9gd instances deliver up to 25% better compute performance compared to AWS Graviton4-based R8g and R8gd instances. They are up to 30% faster for databases, up to 35% faster for web applications, and up to 35% faster for machine learning. To learn more, read Daniel’s blog post.
  • AWS Lambda SnapStart for container image functions: Lambda SnapStart is an opt-in capability that makes it easier for you to build highly responsive and scalable applications without provisioning resources or implementing complex performance optimizations. Previously, SnapStart was only supported for managed runtimes (Python, .NET, and Java). You can now use SnapStart for container images to reduce startup times from several seconds to as low as sub-second for latency-sensitive workloads such as ML inference and interactive APIs.
  • AWS Agent Registry now generally available: AWS Agent Registry provides a private, governed catalog and discovery layer for agents, tools, skills, MCP servers, and custom resources within your organization. In addition to the capabilities launched in preview (manual and URL-based record creation, approval workflows, semantic and keyword search, and AWS CloudTrail audit trails), Registry now adds new enterprise features. To learn more, visit the AI Blog post.
  • Amazon Redshift now supports Apache Iceberg v3 tables: You can read from and write to Apache Iceberg v3 tables in your data lake of Amazon Redshift. With this launch, Amazon Redshift introduces support for default column values, row lineage, and deletion vectors. Amazon Redshift’s Graviton based provisioned and serverless clusters support the new v3 format. To learn more, visit Apache Iceberg v3 features in Redshift.

For a full list of AWS announcements, be sure to keep an eye on the What’s New with AWS page.

Other AWS news
Here are some additional projects and news items you may find interesting:

  • AWS named a Leader in the 2026 Gartner Magic Quadrant for Strategic Cloud Platform Services: For the 16th consecutive year, Gartner has recognized AWS as a Leader in the 2026 Gartner Magic Quadrant for Strategic Cloud Platform Services, and once again placed AWS highest on the Ability to Execute axis. We believe this recognition reflects our commitment to delivering the broadest and deepest set of cloud capabilities from infrastructure and AI to security and operations, so you can build, innovate, and scale with confidence.
  • AWS Certified AI Business Strategist: This new certification targets professionals who evaluate, champion, and scale AI initiatives in their organizations: line-of-business leaders driving adoption across their teams, sales professionals articulating AI value to customers, consultants guiding client strategy from experimentation through production, program managers aligning AI investments to business outcomes. Beta exam registration opened September 1, 2026, with exam delivery beginning September 29.
  • Agentic Security: Detection and Response at Machine Speed: We believe security should evolve ahead of AI adoption, not behind it. That belief drove our team to collaborate with the SANS Institute on a new chapter in the 2026 Cloud Security Exchange eBook, where we lay out a practical framework for securing agentic workloads at enterprise scale. Our chapter goes deeper on securing agentic workloads, with specific architectural patterns, implementation guidance, and frameworks for security teams at every stage of agentic AI maturity, whether you’re evaluating, piloting, or operating at scale.

For a full list of AWS blog posts, be sure to keep an eye on the AWS Blogs page.

Learn more about AWS, browse and join upcoming AWS-led in-person and virtual events, startup events, and developer-focused events including AWS re:Invent, AWS Summits, and AWS Community Days. Join the AWS Builder Center to connect with builders, share solutions, and access content that supports your development.

That is all for this week. Check back next Monday for another Weekly Roundup!

— Channy
Automate public TLS certificate issuance with ACME support in AWS Certificate Manager

30 juin 2026 à 22:15

If you manage TLS certificates for your applications, you know the challenge: certificates expire, and when they do, your customers see errors or your service goes down. As certificate validity periods get shorter (the Certification Authority (CA)/Browser Forum mandates reduced maximum validity to 100 days starting March 2027, and to 47 days by 2029), manual renewal processes become untenable. You need automation.

Automatic Certificate Management Environment (ACME) is an open protocol for requesting, renewing, and revoking TLS certificates without human intervention. It’s the same protocol behind Let’s Encrypt, and it’s supported by dozens of clients across every platform.

Today we’re announcing ACME support for public certificates in AWS Certificate Manager (ACM). ACM now provides a fully managed ACME server endpoint that works with any ACMEv2-compatible client, such as Certbot, cert-manager for Kubernetes, acme.sh, or any other client you already use. You can issue public TLS certificates from Amazon Trust Services through the standard ACME protocol.

Before today, if you wanted automated certificate management using the ACME protocol, you relied on external certificate authorities alongside ACM, leading to a fragmented visibility experience. Some certificates lived in ACM, others were managed externally with no central dashboard. PKI administrators had limited ability to control who could request certificates or which domains were allowed.

With ACME support in ACM, you can now set up one or more managed ACME endpoint that allows you to centrally manage and monitor ACME certificate usage across your organization.

As a PKI administrator, you get centralized controls that go beyond basic certificate issuance. You can bind IAM roles to ACME accounts for fine-grained access control over which domains each client can request. You can define domain scopes at the endpoint level to enforce organization-wide policies. And you get centralized monitoring and visibility in the same place: AWS CloudTrail logs every certificate request for auditability, Amazon CloudWatch tracks operational metrics, and ACM sends expiry notifications when certificates are approaching renewal. Using ACM, your PKI team can search all certificates, whether issued through the ACM console, an API call, or ACME.

How it works
To get started, you first set up a dedicated ACME endpoint, configure authorization controls using External Account Binding (EAB), validate which domains the endpoint can issue certificates for, and point your existing ACME clients to the new endpoint.

The domain validation step is important: it separates who can set up certificate issuance from who can request certificates. The PKI administrator validates domains once at the endpoint level, using DNS credentials that stay with the admin. Application owners who need certificates never touch DNS. They register with an EAB credential, and the endpoint enforces which domains and scopes they’re allowed to request. This means you can distribute certificate automation broadly across your organization without distributing DNS keys along with it.

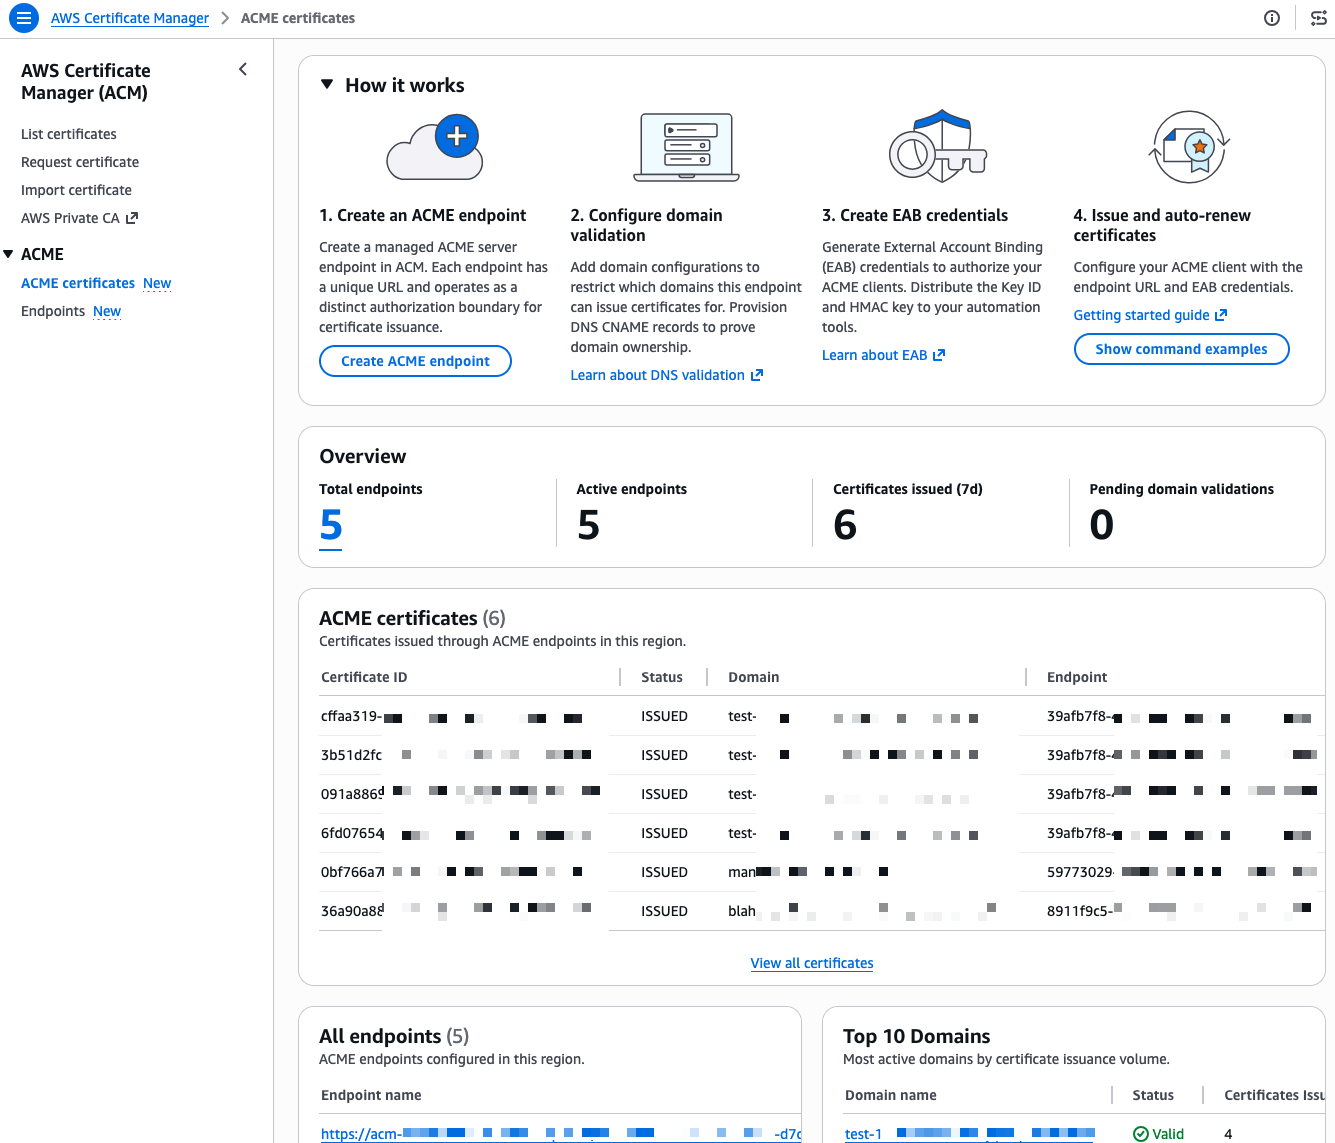
I start this demo from the ACME certificates page in the AWS Certificate Manager console.

ACME Console

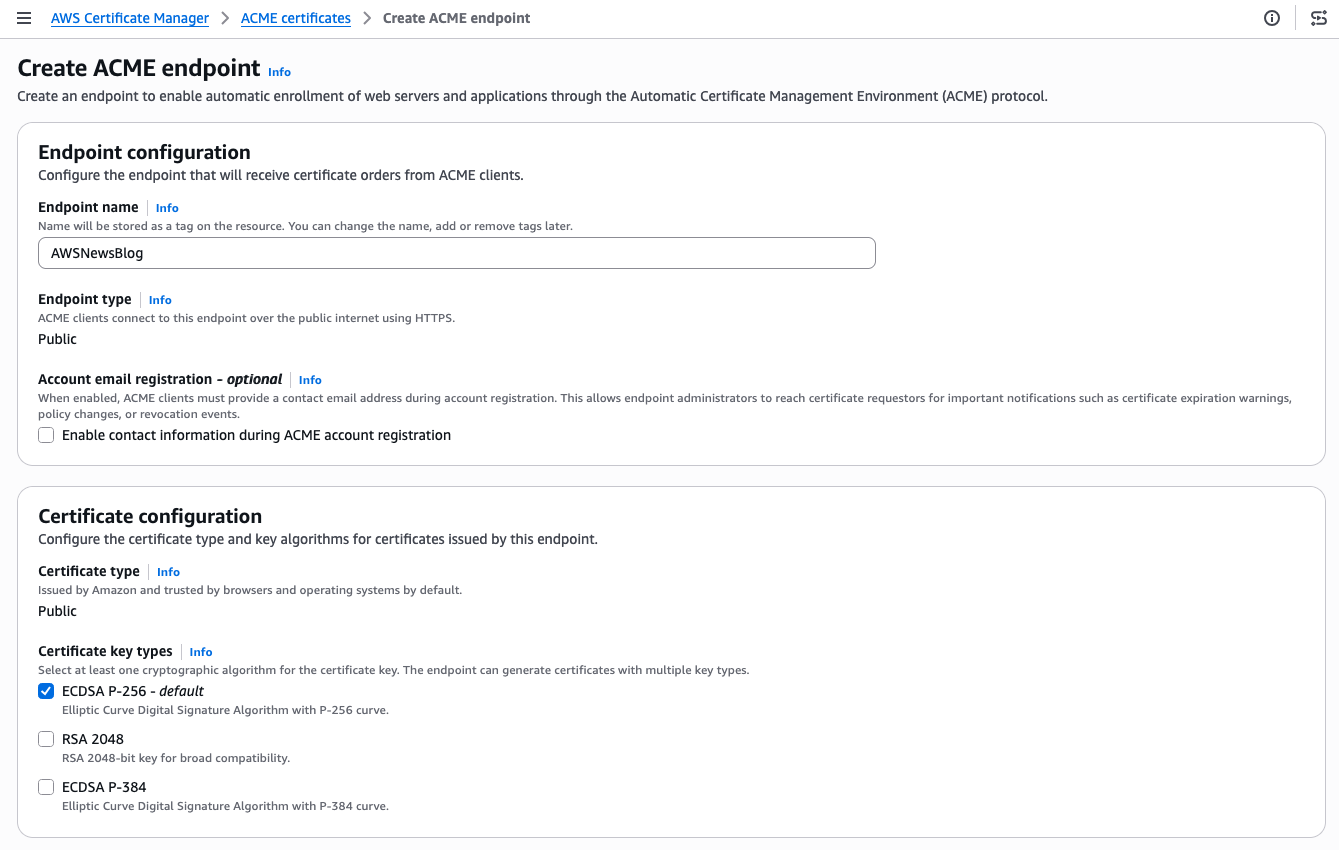
I already have a few endpoints and certificates in this account, I walk you through creating a new one from scratch. First, I select Create ACME endpoint.

ACME - Ceeate endpoint 1

I give my endpoint a name. The Endpoint type is Public. ACME clients will connect over the public internet. The Certificate type is Public. The certificate will be issued by Amazon Trust Services and trusted by browsers and operating systems by default. For the certificate key type, I keep the default ECDSA P-256. RSA 2048 and ECDSA P-384 are also available if your clients require them.

ACME - Ceeate endpoint 2

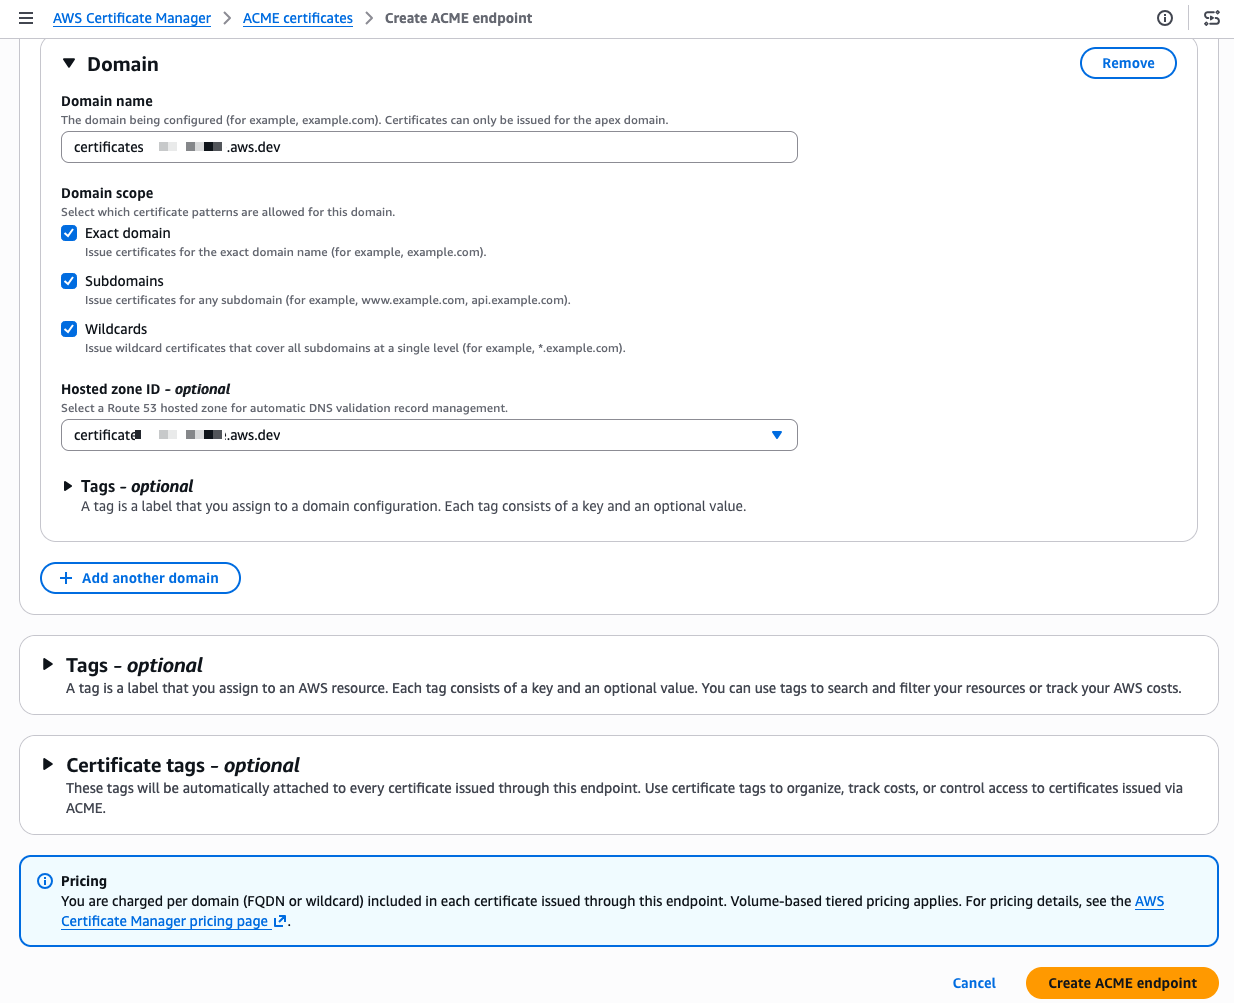
Scrolling down, I configure the domain. I enter my domain name and select the domain scope. The scope controls exactly what certificate patterns your ACME clients are allowed to request for this domain. If I check only Exact domain, clients can only request certificates for that specific domain name. Adding Subdomains allows certificates for any subdomain (for example, api.example.com or dev.example.com). Adding Wildcards allows wildcard certificates (*.example.com). By leaving a scope unchecked, you prevent any client using this endpoint from requesting that type of certificate, even if their ACME request is otherwise valid. For a production endpoint, you might enable only Exact domain and Subdomains while leaving Wildcards unchecked to enforce a stricter security posture.

I also select my Amazon Route 53 hosted zone from the drop down menu. ACM then automatically creates the DNS CNAME records needed for domain validation, so I don’t have to do it manually. When my domain is hosted outside of Route 53, I manually create the provided CNAME record at my DNS provider instead. This is a meaningful difference from typical ACME setups where each client handles its own domain verification independently.

These centralized controls give PKI administrators a single place to authenticate domains, restrict which certificate types (ECDSA or RSA) clients can request, and further limit wildcard issuance. Having these governance capabilities built in means you don’t need to purchase a separate certificate lifecycle management product or invest in building a custom policy layer yourself, both of which come at significant cost and operational overhead.

I select Create ACME endpoint

ACME - DNS configuration

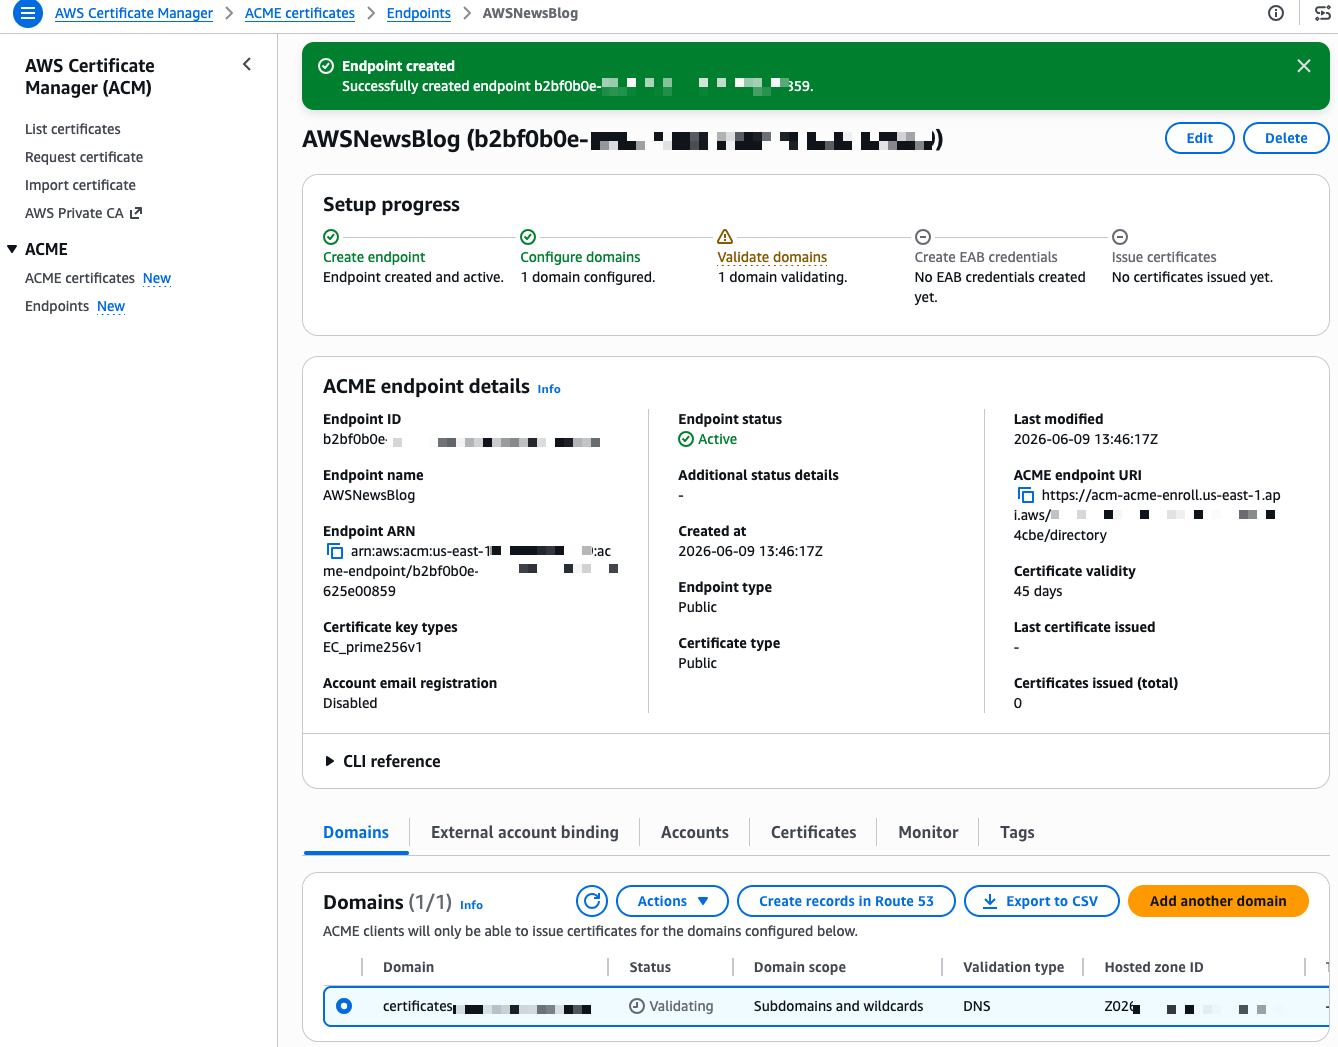
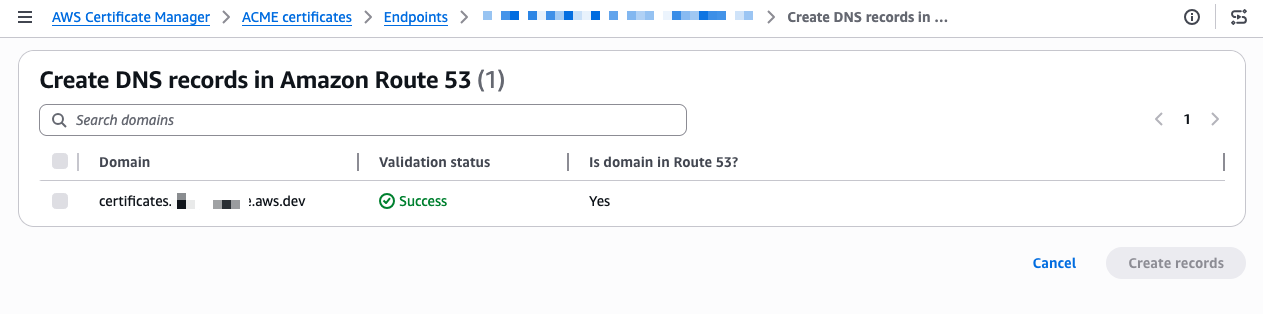
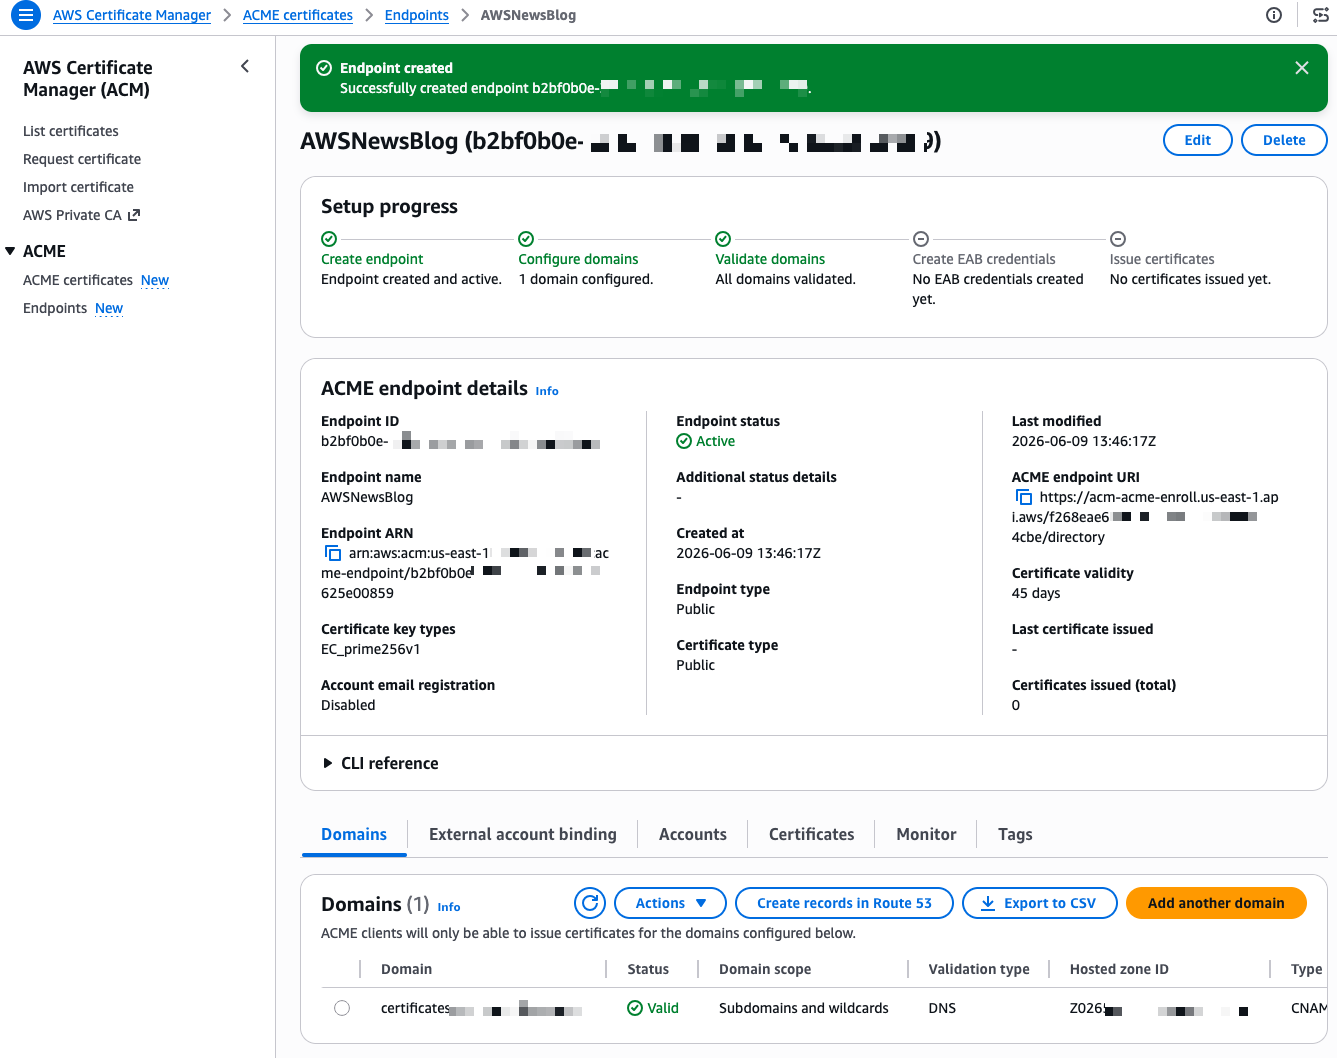
After a few seconds, the endpoint is created. The console shows a Setup progress tracker with the next steps. My domain shows a “Validating” status. The validation method is DNS validation, where ACM verifies that you control the domain by checking for a specific CNAME record. Because I selected my Route 53 hosted zone during creation, I select Create records in Route 53 to let ACM handle the DNS validation automatically.

ACME - DNS successThe validation completes in a few seconds and the status changes to Success.

ACME - External Account Binding 1

Now I need to create External Account Binding (EAB) credentials. EAB credentials are a key identifier and a symmetriceiifcbnurtbikvdfjkuhfnitrbvuihigbgfegvhnucdv

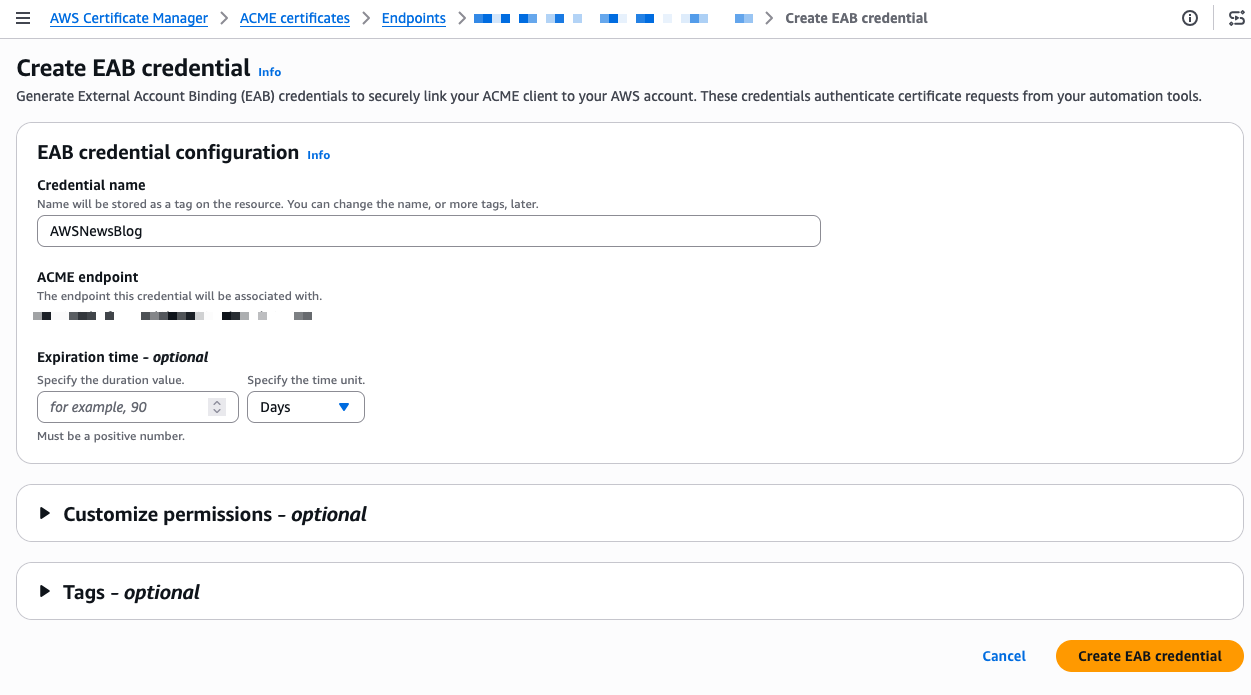
HMAC key that lets your ACME client register an account with the ACME server. Once registered, the client generates its own asymmetric key pair, which is then used to authenticate all subsequent certificate requests. On the endpoint details page, I select the External account binding tab, then select Create EAB. I give the credential a name and optionally set an expiration time, ideally no longer than needed to complete client registration.

ACME - External Account Binding 2

ACME - end of configuration - show key

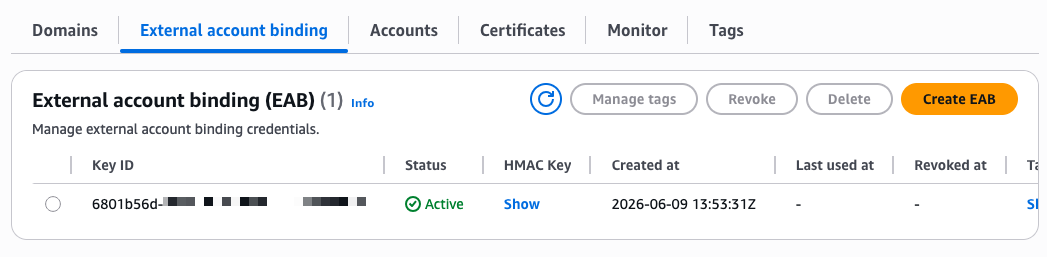
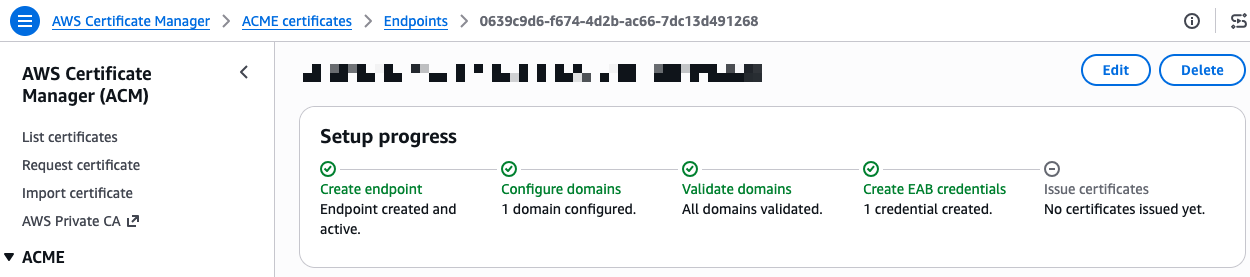
After I select Create EAB credential, the console shows the Key ID and HMAC Key. I note these values because I need them to configure my ACME client. The setup progress now shows four green checkmarks.

ACME - end of configuration - success

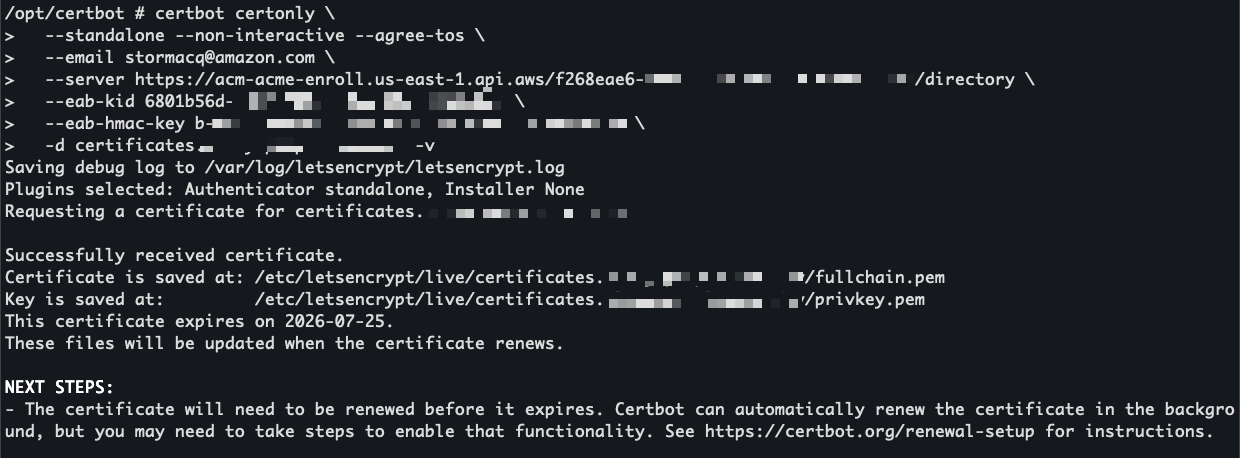
I’m ready to request a certificate. On the endpoint details page, I expand the CLI reference section. The console provides ready-to-use command examples for both Certbot and acme.sh. I copy the Certbot command and run it inside a container using the certbot/certbot image.

certbot certonly --standalone --non-interactive --agree-tos \
    --email <EMAIL> \
    --server https://acm-acme-enroll.us-east-1.api.aws/<ENDPOINT_ID>/directory \
    --eab-kid <EAB_KID> \
    --eab-hmac-key <EAB_HMAC_KEY> \
    --issuance-timeout <ISSUANCE_TIMEOUT> \
    -d <DOMAIN>

I replace the placeholders with my endpoint URL, EAB credentials, and domain name. The --eab-kid and --eab-hmac-key arguments are how Certbot registers with your ACME endpoint using the External Account Binding credentials I generated earlier. Each ACME client has its own syntax for this step, so check your client’s documentation for the exact flags.

Certbot contacts the ACME endpoint and returns a valid certificate signed by Amazon Trust Services.

Certbot to obtain a certificate through ACME

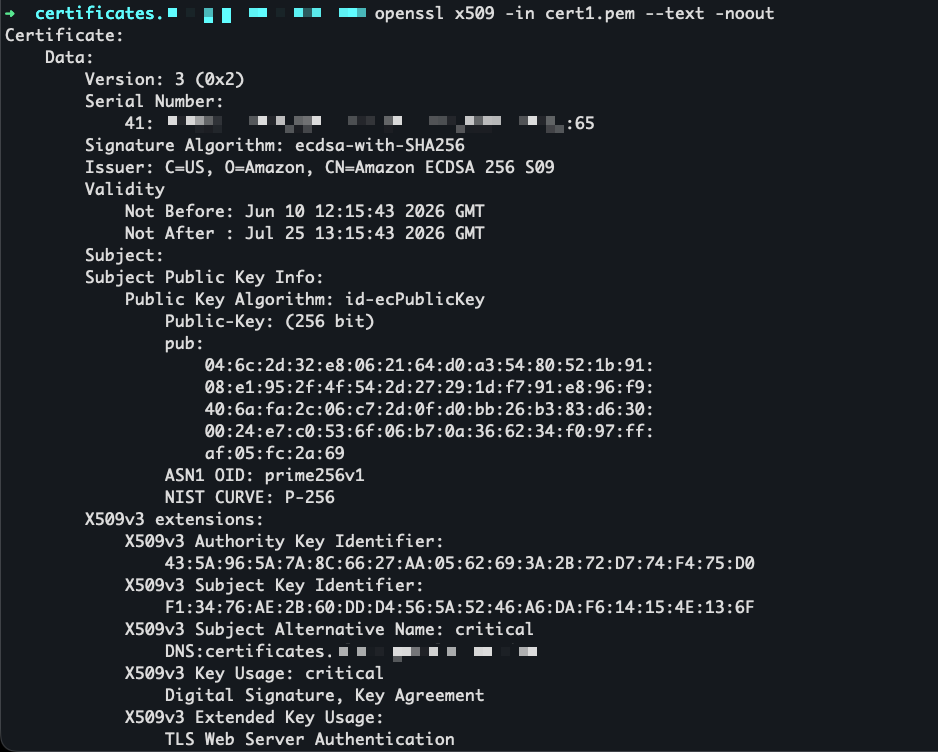
I use openssl to view the certificate before installing it.

openssl to view the certificate

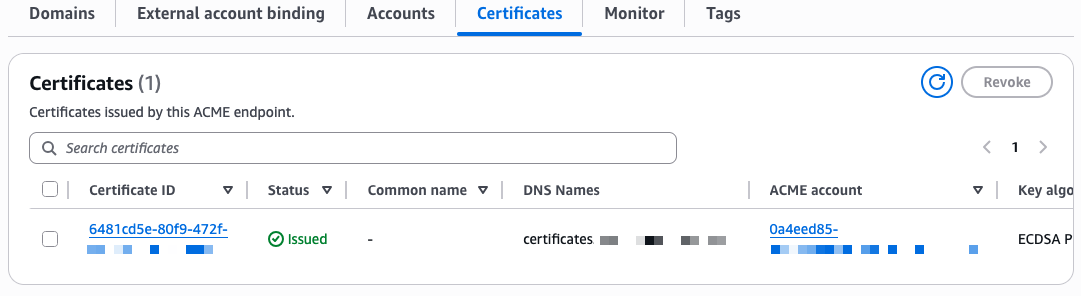
The certificate is now visible in the ACM console under the ACME certificates tab, alongside any certificates issued through the console or API.

Certoficate view in the ACME console

Availability and pricing
ACME support in AWS Certificate Manager is available today in all commercial AWS Regions and will be available in AWS GovCloud (US), the China Regions, and the AWS European Sovereign Cloud partitions at a later date.

Pricing is per domain included in each certificate at the time of issuance, with a different price for fully qualified domain names and wildcards. Volume tiers are calculated based on total domain occurrences across all certificates issued per month in your AWS account. For details, see the ACM pricing page.

To get started, visit the ACM section on the AWS console or read the documentation.

— seb

Update 8/11/2026: EAB uses a HMAC symmetric key, not a HMAC key pair as I originally wrote.

AWS Security Agent adds threat modeling, Kiro power and Claude Code plugin, and more

17 juin 2026 à 16:54

At re:Invent 2025, we previewed AWS Security Agent (now part of AWS Continuum), a frontier agent that proactively secures your applications throughout the development lifecycle across all your environments. You can perform on-demand penetration testing customized to your application, discovering and reporting security risks verified through exploitability testing.

Since the preview, we announced general availability for on-demand penetration testing and the preview of full repository code review that performs deep, context-aware security analysis of your entire codebase.

Today, we’re introducing more features based on customer feedback:

  • Code review updates (Preview): You can now use pull request scanning with remediation, security requirements packs, and simulated validation. New integrations support GitHub, GitLab, Bitbucket, and Confluence.
  • Threat modeling (Preview) : AWS Security Agent analyzes your design documents or application source code, understands the full context of your application architecture and identifies threats with recommended mitigations using the STRIDE framework.
  • Kiro power, Claude Code plugin, and MCP integration: You can run code reviews, generate threat models, and remediate findings directly from your IDE, CLI, or any AI-powered IDE through an open MCP integration, with results surfacing inline without any context switching.

Let’s take a closer look at each launch!

Code review updates
You can now connect to GitLab and Bitbucket in addition to GitHub— supporting both SaaS and self-hosted versions, so you can trigger scans regardless of where code lives. You can also integrate Confluence to reference your existing documentation as context for reviews.

To get started, choose Enable code review or update your code review setting in the Security Agent console.

AWS Security Agent introduces deep, reasoning-based analysis on every pull request as well as full repository to identify complex vulnerabilities that go beyond pattern-matching. It checks against your organizational security requirements and common security risks to catch what other tools can’t. To get started, access the Security Agent web application and run your code review.

You’ll receive fix commits and remediation guidance directly in your GitHub, GitLab, or Bitbucket workflow, while your security teams configure the repositories to be monitored and intervene on critical issues. AWS Security Agent validates findings in simulated environments to demonstrate proof of exploitability. This embeds security expertise across all repositories, reducing security-related delays in the development pipeline.

To learn more about new code review features, visit Create a code review in the AWS Security Agent User Guide.

Design review updates
You can continuously validate your security requirements across every design and code review with managed compliance packs: AWS Well Architected Framework, NIST CSF, PCI DSS, and AWS best practices, or import your own organizational requirements directly from internal documents or Confluence. Every finding maps back to your compliance posture, so teams stay audit-ready as they build.

To learn more, visit the design review documentation.

Threat modeling
AWS Security Agent generates threat models based on your design documentation or code repository, creates and build context about the application, including data flows, architecture, and trust boundaries. It maps out all components of your application, identifies potential threat actors and attack vectors, determines where weaknesses may exist, and prioritizes threats so you know what to address first.

To get started, choose Enable threat model and Connect source code repository in the Security Agent console.

To learn more, visit the threat modeling documentation.

Kiro power and Claude Code plugin for Security Agent
AWS Security Agent introduces a new Kiro power and Claude Code plugin and can be integrated with any AI IDE through an open MCP integration to secure your applications. You can trigger threat models and code reviews directly from your IDE, with results surfacing inline without any context switching.

To get started, install the Kiro power, and run your prompts. The Kiro power uses the AWS Security Agent MCP server. You can get started with the power by asking “Set up AWS Security Agent“. Kiro will check if you have an Agent Space and ask if you would like to use the existing one or create a new one.

With the Kiro power for Security Agent, you can catch vulnerabilities on every pull request as you build and scan an entire repository to surface accumulated risk by asking “Run a full security scan on this repo“. The Security Agent power includes an Agent hook to evaluate if a code review diff scan should be started after the Kiro agent has completed its turn. Before deploying to production, you can run a penetration test from your CLI to find what most scanners miss. Security Agent closes the loop by validating every finding and generating ready-to-implement code fixes.

You can pull the findings back into your development environment by asking “help me remediate my findings“. The Kiro power for AWS Security Agent will download findings to your local workspace, prioritize the most critical finding, and offer to start a bugfix spec session. You can iterate on fixing the findings using their familiar IDE with their existing tooling, steering, powers, and MCP servers.

You can also run threat models through the Kiro power in the IDE by asking “Build a threat model for this application“. The generated threat model is saved to .security-agent/threat_model.md. 

To learn more, visit the Kiro power for Security Agent.

Now available
AWS Security Agent understands the full security context across your software development lifecycle by covering design-time security (design reviews and threat modeling in preview), development-time security (code review in preview), and deployment-time security (penetration testing in GA), in a single, unified agentic offering. To learn more, visit the AWS Security Agent product page and the technical documentation.

These features are now available in AWS commercial Regions where AWS Security Agent is available. For Regional availability and the future roadmap, visit the AWS Capabilities by Region. For detailed pricing information and to access our 2-month free trial offer, please visit the AWS Security Agent pricing page.

Give it a try in the Security Agent console and send feedback to AWS re:Post for Security Agent or through your usual AWS Support contacts.

— Channy

Updated on June 18, 2026 – AWS Agents for DevSecOps, the Claude Code plugin for AWS DevOps Agent and AWS Security Agent is launched.

AWS WAF adds AI traffic monetization capability to help content owners charge AI bots for content access

15 juin 2026 à 22:42

AWS WAF now includes AI traffic monetization capability that gives digital content owners and publishers a way to charge AI bots and agents for access to protected web content directly at the network edge. The capability helps content owners and publishers set per-request pricing by content path, bot category, or verification tier without modifying their origin infrastructure or writing application code. Content owners can define granular access policies per agent type, collect payments in stablecoins to their preferred wallet, and monitor revenue and bot activity from a single dashboard.

AI bot traffic now accounts for more than 50% of web traffic for many content providers, with AI-specific crawlers growing more than 300% year-over-year. Unlike traditional search engine crawlers, which index content and return measurable referral traffic back to publisher websites, AI bots consume the same content to generate summaries and responses in AI interfaces, with little to no traffic sent back to the original source. Publishers bear the infrastructure costs of serving that traffic without the page views, ad impressions, or subscription conversions that typically offset those costs. AWS WAF Bot Control already gives customers visibility into bot activity and the ability to block or rate-limit traffic, but setting pricing and collecting payment from AI agents has not been possible until now. AI traffic monetization is a new Bot Control capability that closes that gap, giving content owners and publishers a way to configure pricing rules directly through the AWS WAF console and collect payments from AI agents through third-party payment integrations, without building custom payment infrastructure or negotiating individual licensing agreements. Payment settlement and verification flows are provided by Coinbase’s x402 Facilitator. Integration with Stripe for direct account payments and Machine Payments Protocol (MPP) support is coming soon.

Getting Started with AI Traffic Monetization
Before configuring monetization, confirm that AWS WAF Bot Control is enabled at Common or Targeted level on the web ACL associated with your CloudFront distribution. Bot Control provides the agent classification that monetization rules depend on. If you have not set this up yet, visit Adding the AWS WAF Bot Control managed rule group to your web ACL documentation. In the AWS Management Console, go to WAF & Shield and choose Protection packs (web ACLs) in the left navigation pane to get started.

A protection pack is the core configuration unit for AI traffic monetization. It defines which content paths are monetized, what each agent verification tier is charged, which payment methods you accept, and what license terms apply. To create one, choose Create protection pack (web ACL).

In Tell us about your app, select one or more app categories that describe your content (for example, Content & publishing systems, E-commerce & transaction platforms, or Enterprise & business applications), and choose an App focus. AWS WAF uses these selections to recommend suitable security protections for your configuration.

In Select resources to protect, choose Add resources to associate regional or global resources such as CloudFront distributions with this protection pack. You can skip this step and add resources later.

In Choose initial protections, select from AWS WAF managed rule packages based on your app category and resource selections. You can also choose individual rules instead of packages.

In Name and describe, provide a name and optional description for the protection pack.

Optionally, expand Customize protection pack (web ACL) to configure additional settings including pricing tiers, payment methods, content scope, and license terms.

When finished, choose Create protection pack (web ACL).

Once your protection pack is in place, review the AI traffic analysis dashboard to understand the impact of AI bot traffic on your content before setting your pricing strategy. In the WAF & Shield console, go to AI traffic analysis in the left navigation pane. Select your protection pack (web ACL) from the dropdown to populate the dashboard.

The AI traffic analysis dashboard breaks down traffic into four categories visible in the bot traffic overview panel: All bot requests, AI bot requests, Verified AI bot traffic, and Unverified AI bot traffic. The dashboard surfaces infrastructure impact metrics including bandwidth consumed, estimated monthly cost, and peak request rates. A per-path heatmap shows which content paths receive the most AI bot activity by hour, giving you the data you need to make informed pricing decisions.

AWS WAF Bot Control classifies over 650 distinct AI bot and agent types including GPTBot, Claude-Web, and Perplexity-Bot, and assigns each a verification tier:

  • Verified: Agent identity confirmed through Web Bot Auth (WBA) Ed25519 cryptographic signature, or sourced from a documented IP range with a known set of user-agents and domain names.
  • Unverified: Agent recognized through user-agent matching, behavioral fingerprinting, and IP reputation, but identity not cryptographically confirmed.

Once you have reviewed your traffic patterns, return to Protection packs (web ACLs), select your protection pack from the list, and choose Configure AI monetization from the right panel to set pricing and access policies. Each protection pack defines the pricing, agent policies, accepted payment methods, and license terms that apply to a defined set of content paths. You can create multiple protection packs and apply different pricing to different content zones within the same distribution. Once created, associate the protection pack with your web ACL by opening the web ACL and choosing Add protection pack.

For each agent verification tier within the pack, you can assign one of six actions: Monetize (return a 402 with pricing), Allow (grant free access), Block (deny access entirely), Count (log without charging), CAPTCHA (present a puzzle to verify a human sender), or Challenge (run a silent check to verify the client is a browser, not a bot).

In the Edit monetization configuration page, configure the following:

Under Payment settlement, select one or more blockchain networks for stablecoin payments. Any wallet address on the supported networks is accepted, whether self-managed or hosted by a wallet provider such as Coinbase. For each network, provide your wallet address and set a Base price per page in USDC. You can add multiple networks using Add network. AWS does not process payments or take a fee on content revenue; disbursement is self-managed or managed by your wallet provider.

When a Monetize rule matches an incoming request, AWS WAF returns an HTTP 402 Payment Required response. The response body contains a machine-readable price manifest in JSON format using the x402 open protocol for machine-to-machine payments. The manifest includes the content price in USDC, accepted blockchain networks such as Base and Solana, the destination wallet address, the maximum payment timeout, and the payment scheme.

Any x402-compatible agent runtime can complete this flow autonomously. The client submits a signed payment authorization on their payment network of choice. AWS WAF verifies it, fetches the content, integrates with third-party facilitator services for settling the payment on-chain, and serves the response.

Note that the Monetize action is supported exclusively for web ACLs associated with Amazon CloudFront distributions. Adding a Monetize rule to a regional web ACL is not supported.

Since the Currency mode toggle is available directly in the monetization configuration page, you can switch between Real and Test mode at any time. Before going live, use test mode on non-production traffic to validate pricing, wallet configuration, and x402 payment flows. Note that test mode still enforces x402 payments, but those payments can be made on testnets such as Base Sepolia or Solana Devnet using test funds obtained from faucets such as faucet.circle.com. To activate test mode, toggle Currency mode to Test in your protection pack configuration. AWS WAF returns real price manifests and runs the full payment flow identically to production on the configured test chain. All events are logged with CurrencyMode: TEST. When satisfied with the configuration, toggle Currency mode back to Real to begin processing real payments.

Once you have switched Currency mode to Real, navigate to AI access monetization in the left navigation pane to track monetization outcomes in real time. Note that the AI access monetization dashboard only reflects activity from real currency mode and does not display test transactions.

The Revenue dashboard shows Total revenue, revenue broken down by Verified bots and Unverified bots, and Avg. per request. The Top revenue sources panel groups earnings by bot category, and the AI access patterns panel ranks content paths by revenue generated. Use the Settlements tab to reconcile payments by provider and review payment method distribution and failed payment attempts.

Now Available
AI traffic monetization is available now for Amazon CloudFront customers at no additional charge beyond standard AWS WAF pricing. The capability is available in all edge locations where AWS WAF web ACLs are associated with Amazon CloudFront distributions.

To learn more about AI traffic monetization, see the AWS WAF Developer Guide.

— Esra

Improve your application resilience with Amazon Cognito multi-Region replication

4 juin 2026 à 00:37

As a developer advocate working with web and mobile application developers, I’ve often heard about the need to maintain consistent user authentication in the unlikely event of a regional service interruption. The increasing use of agentic AI, microservices, automation, and service accounts has sparked a similar need for machine-to-machine authentication. Today, I’m excited to share two important updates to Amazon Cognito: multi-Region replication for improved resilience, and support for customer managed keys for more control encryption control.

Many applications rely on Amazon Cognito to handle user and machine-to-machine authentication, and to manage user profiles. When building for high availability, having consistent data across different AWS Regions is a key approach, and until now, achieving that consistency came with significant challenges. Engineering teams spent significant time building and maintaining custom replication solutions to synchronize configurations across Regions. Manual export and import of user data between Regions created security risks from potential data exposure and introduced opportunities for data inconsistencies. During regional transitions, end users experienced disruptions like forced password resets and re-authentication. For machine-to-machine communications, teams had to create new app clients in the secondary region, which meant reconfiguring their applications and updating OAuth-protected resources to accept access tokens issued by the new regional issuer. These challenges made it difficult to maintain uninterrupted operations across Regions.

With multi-Region replication, Amazon Cognito automatically maintains a synchronized copy of your user data and machine secrets in a secondary AWS Region of your choice. The replication flows in one direction, from your primary Region to the secondary Region. This includes user profiles, credentials, and pool configurations. The secondary Region operates in read-only mode, focusing on maintaining authentication capabilities. Existing sessions continue uninterrupted.

When you need to direct traffic to the secondary Region, your existing users can continue signing in with their existing credentials without disruption, and currently signed-in users remain authenticated because both regions recognize access tokens issued by either region. Multi-Region replication supports all authentication methods, including federated sign-in through social providers (Amazon, Google, Apple, Facebook), Security Assertion Markup Language (SAML) and OpenID Connect (OIDC) integrations, and API authorization flows. This approach maintains availability for both customer-facing applications and machine-to-machine communications in your backend services. While authentication continues without interruption, operations like new user registration or profile updates are not available during failover.

Before configuring multi-Region replication, you must configure a multi-Region customer managed key stored in AWS Key Management Service (AWS KMS) to encrypt your user data at rest. These keys provide consistent encryption across Regions while giving you control over your encryption strategy.

How this works in practice
I start this demo with an existing Cognito user pool in the us-west-2 (Oregon) Region. I want to configure replication to us-east-1 (Northern Virginia). I also have a customer managed key replicated in these two Regions.

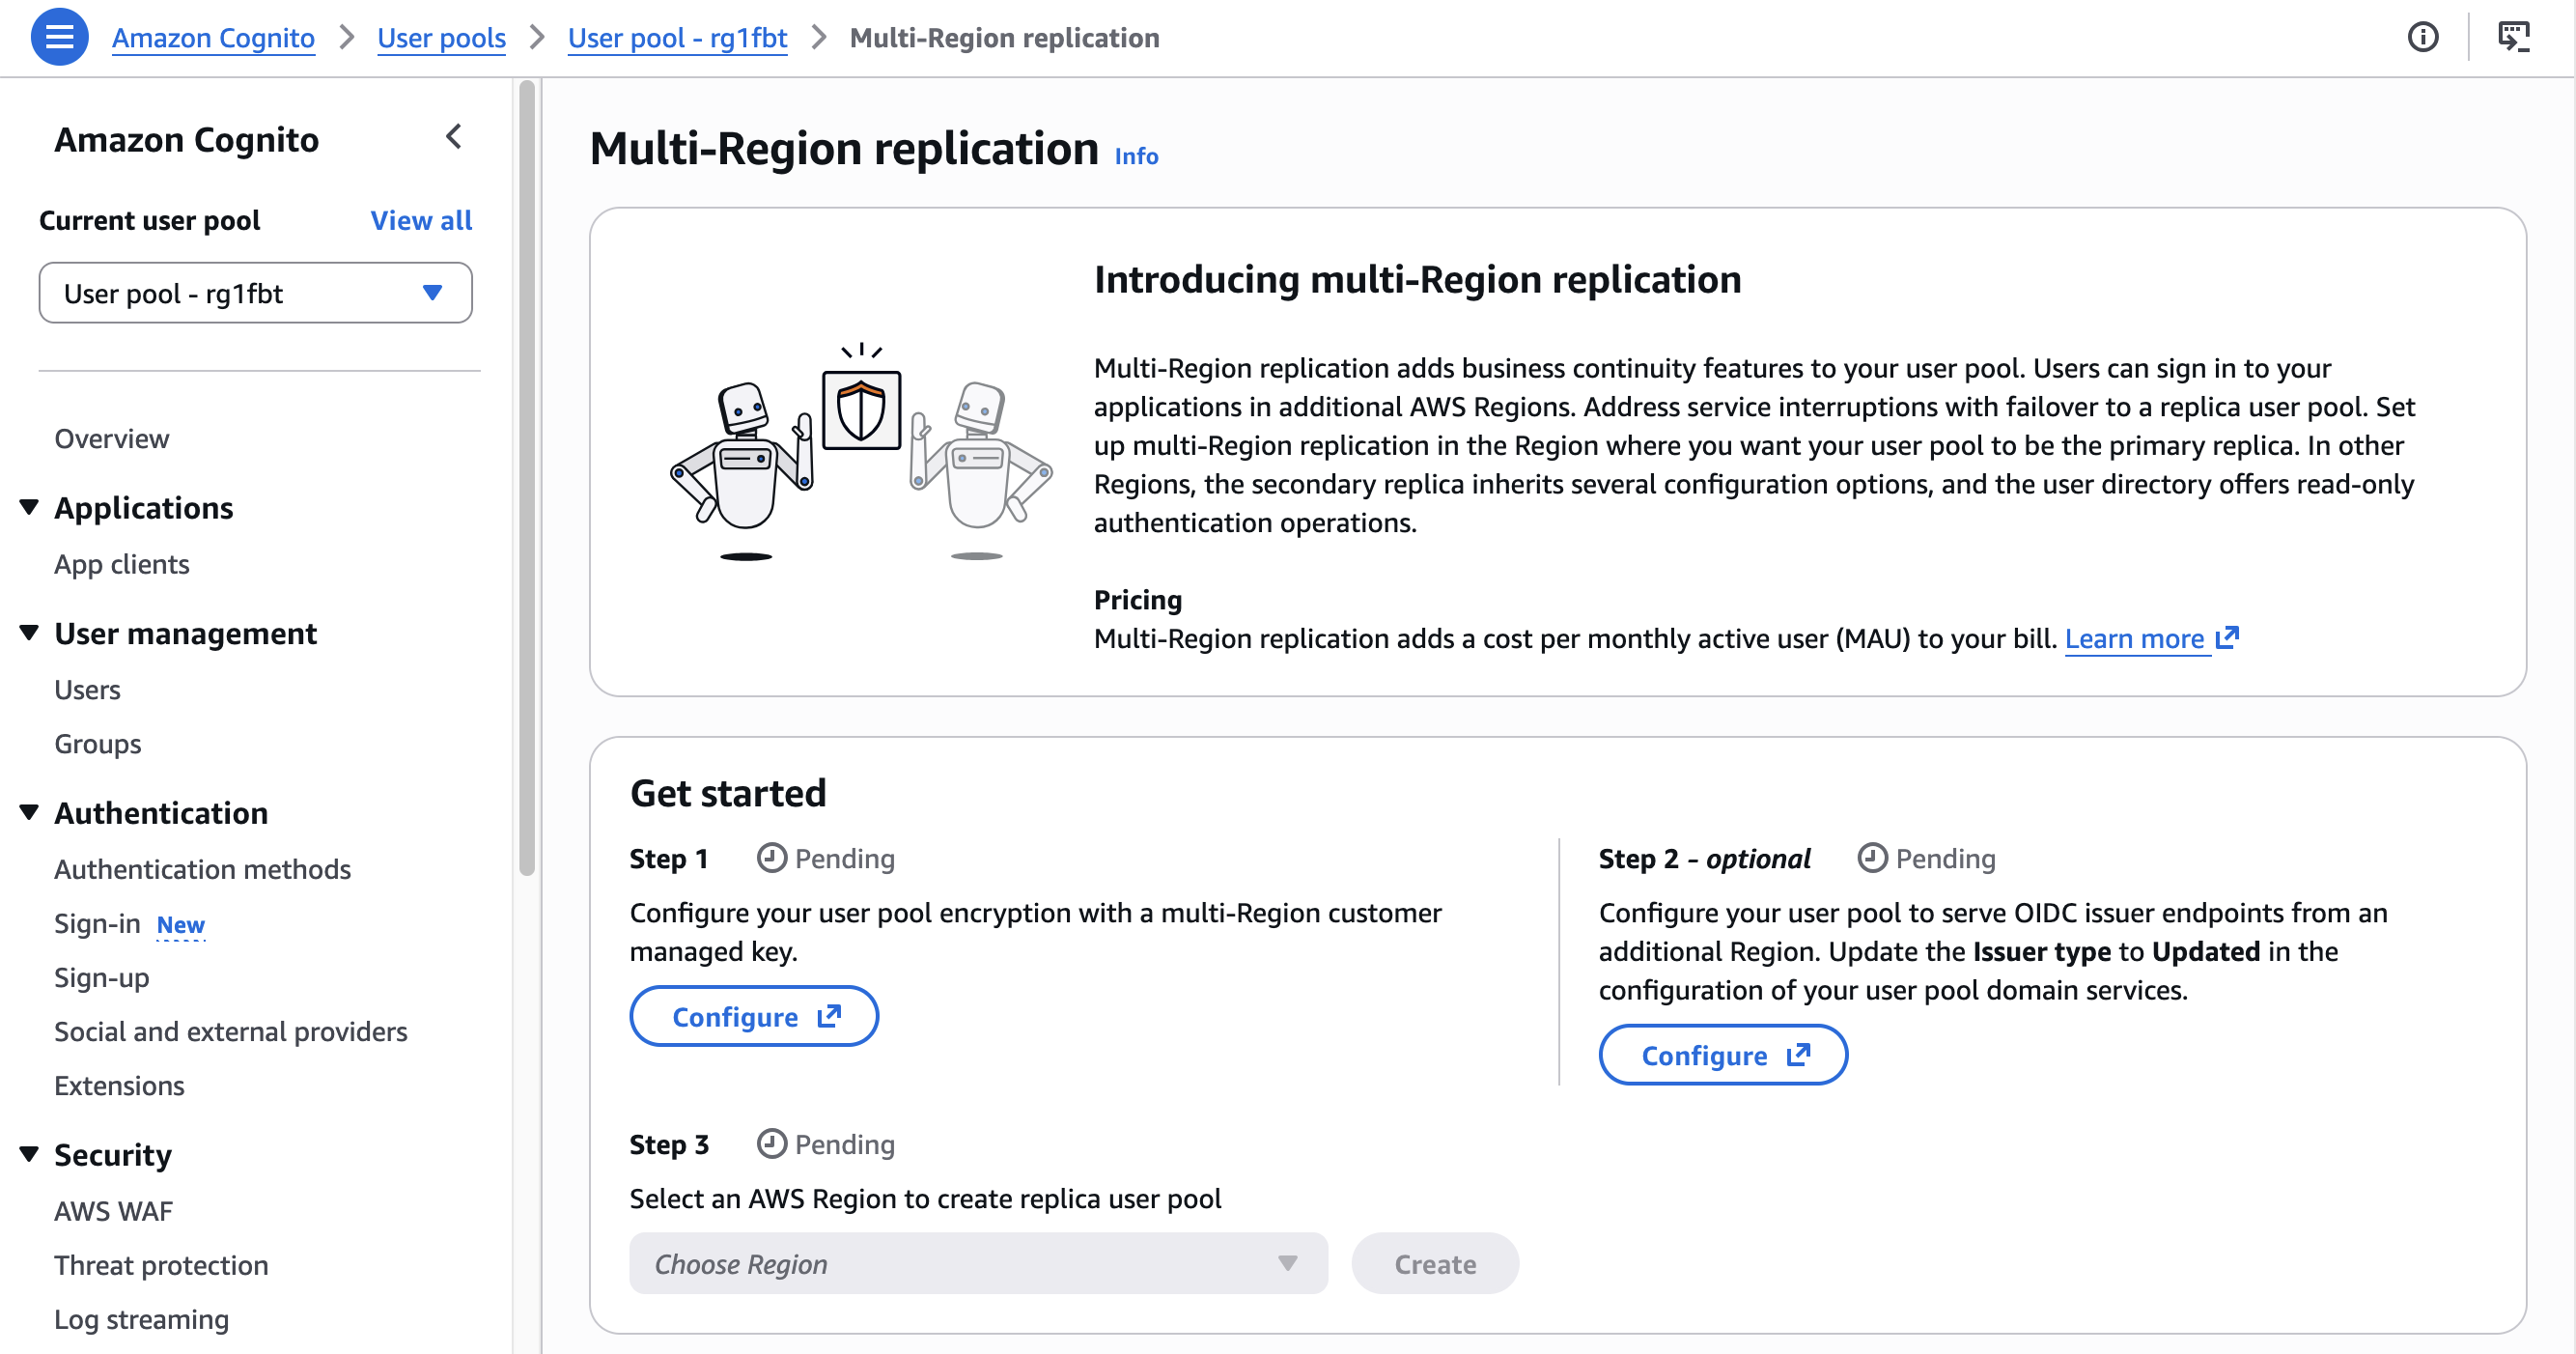
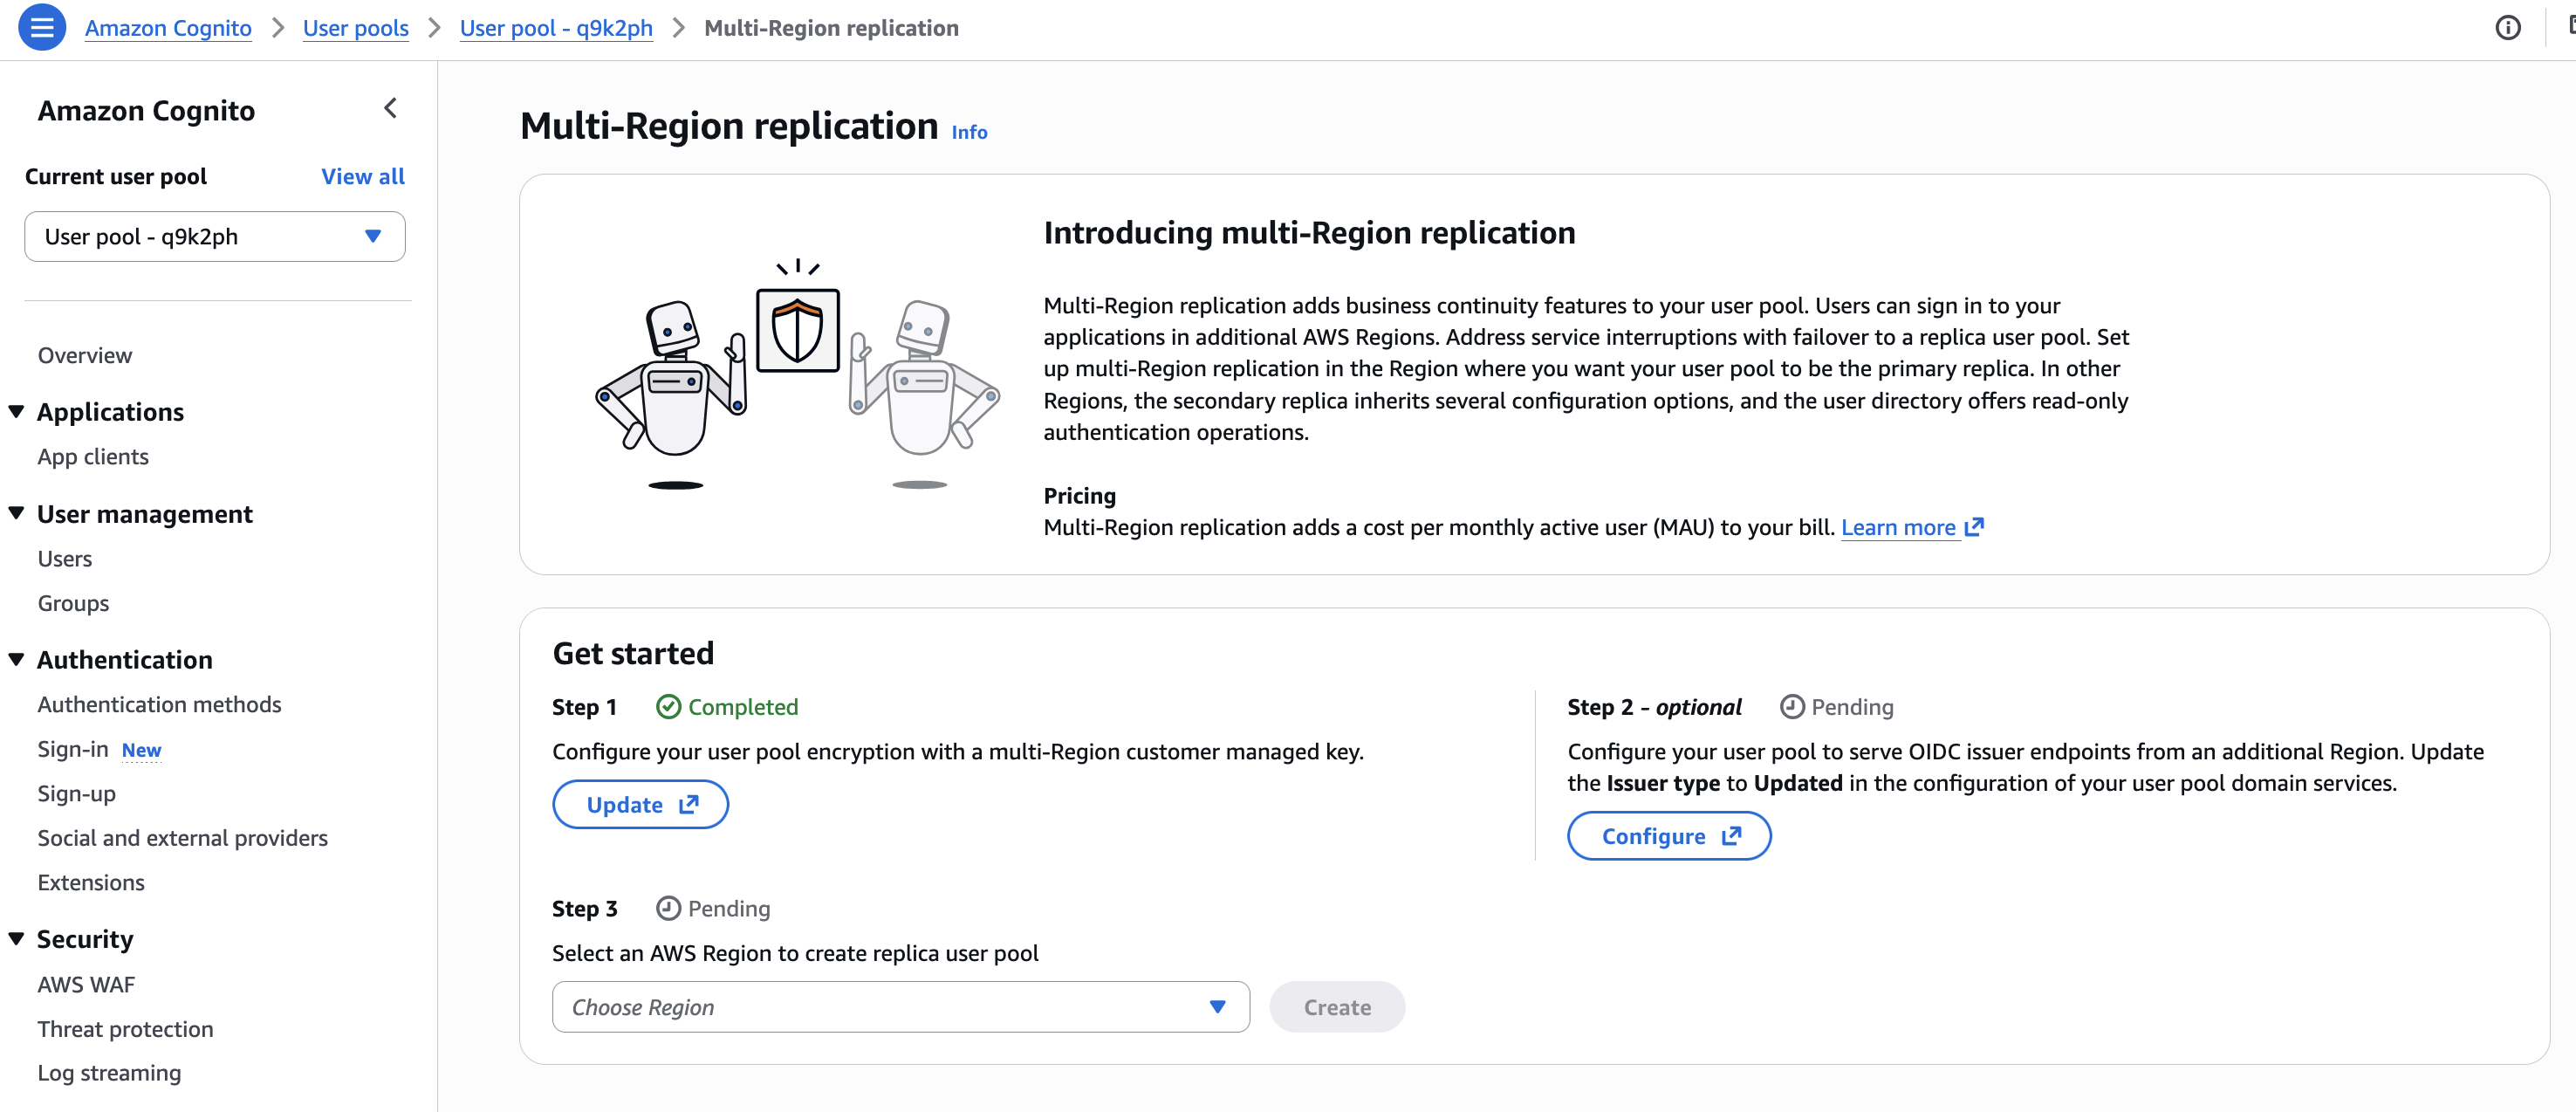
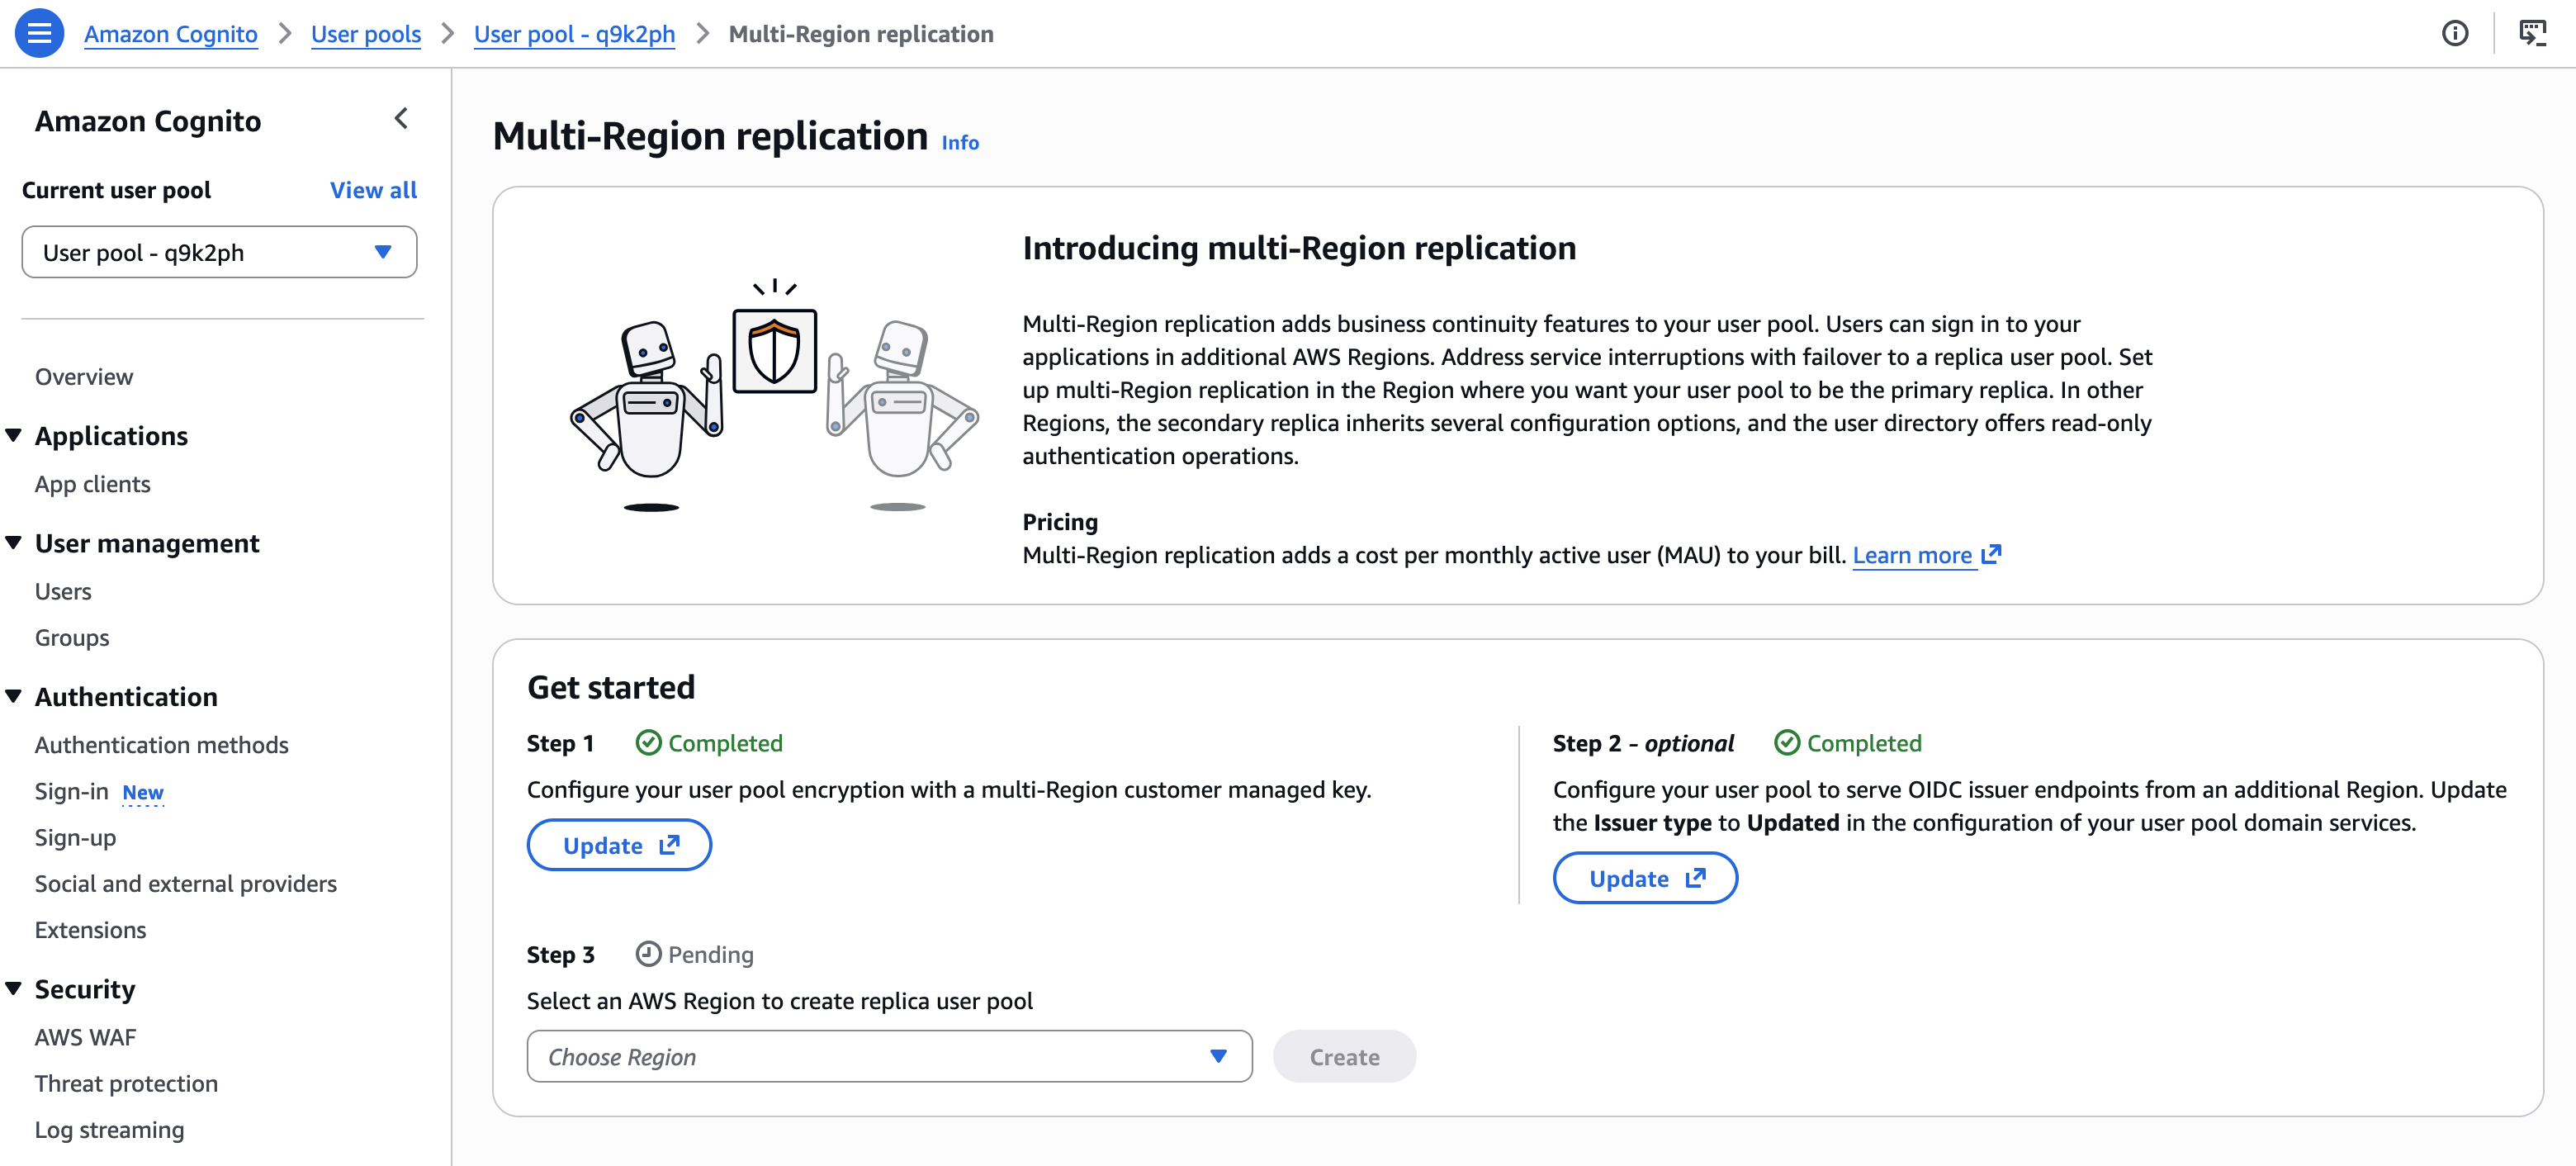
Configuring multi-Region replication is just three steps. The AWS Management Console guides me through the steps: set up a custom key for encryption, configure multi-region OIDC endpoints, and configure the replication itself.

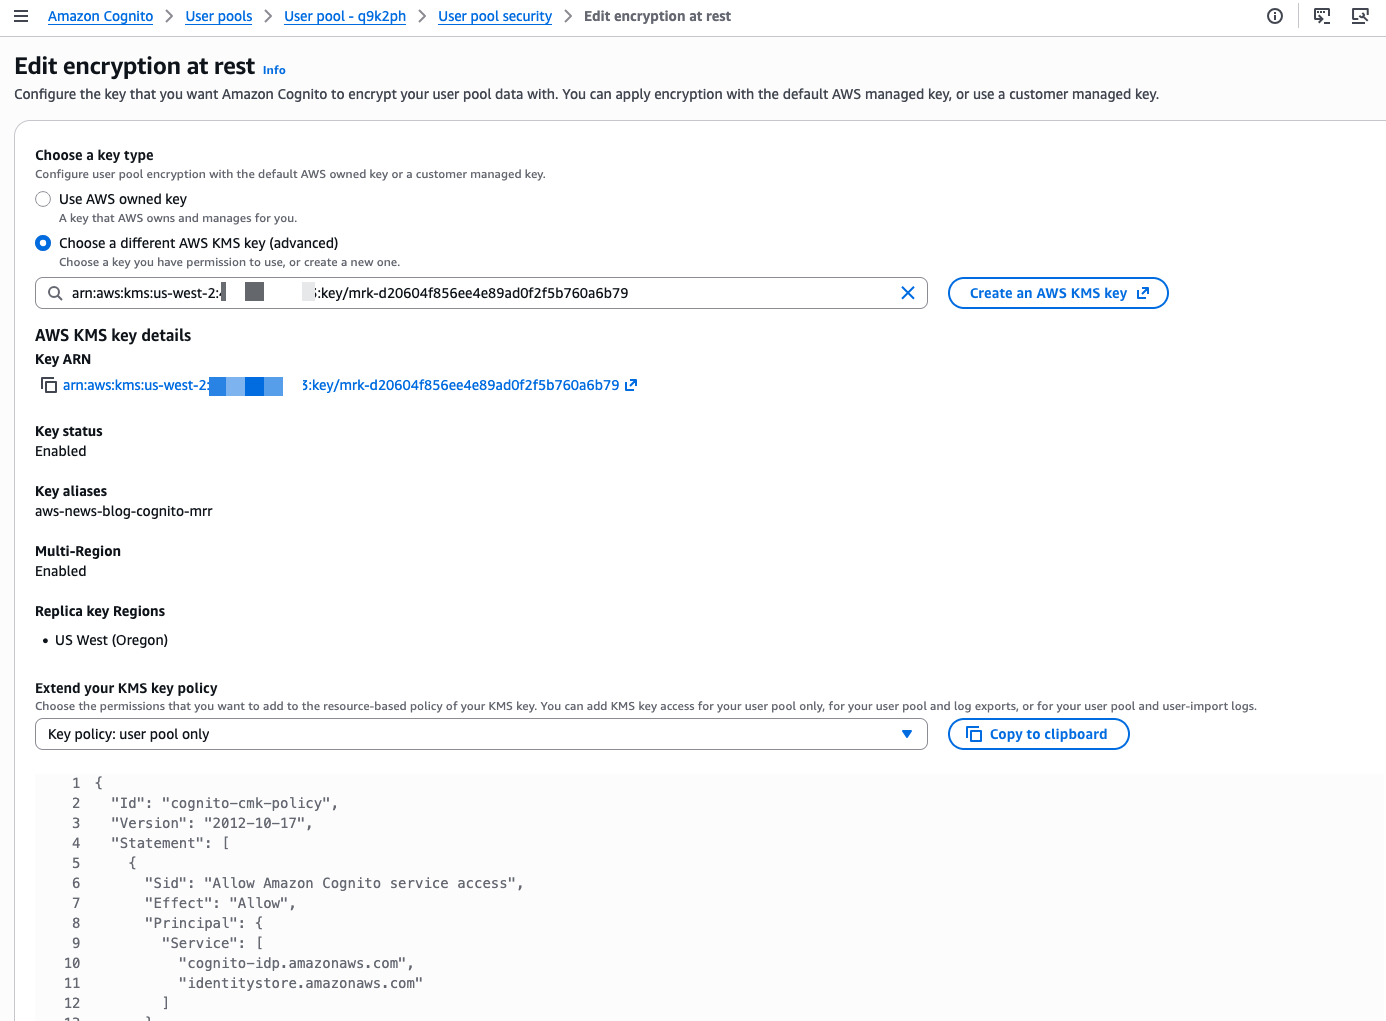
First, I set up a custom AWS KMS key to encrypt the data at rest.

Cognito Multi-Region replication - initial state

I select the custom key I created. I also update the key policy to allow Amazon Cognito to access and use the key. The console shows the correct IAM policy statements to add to my key policy.

Cognito Multi-Region replication - select CMK

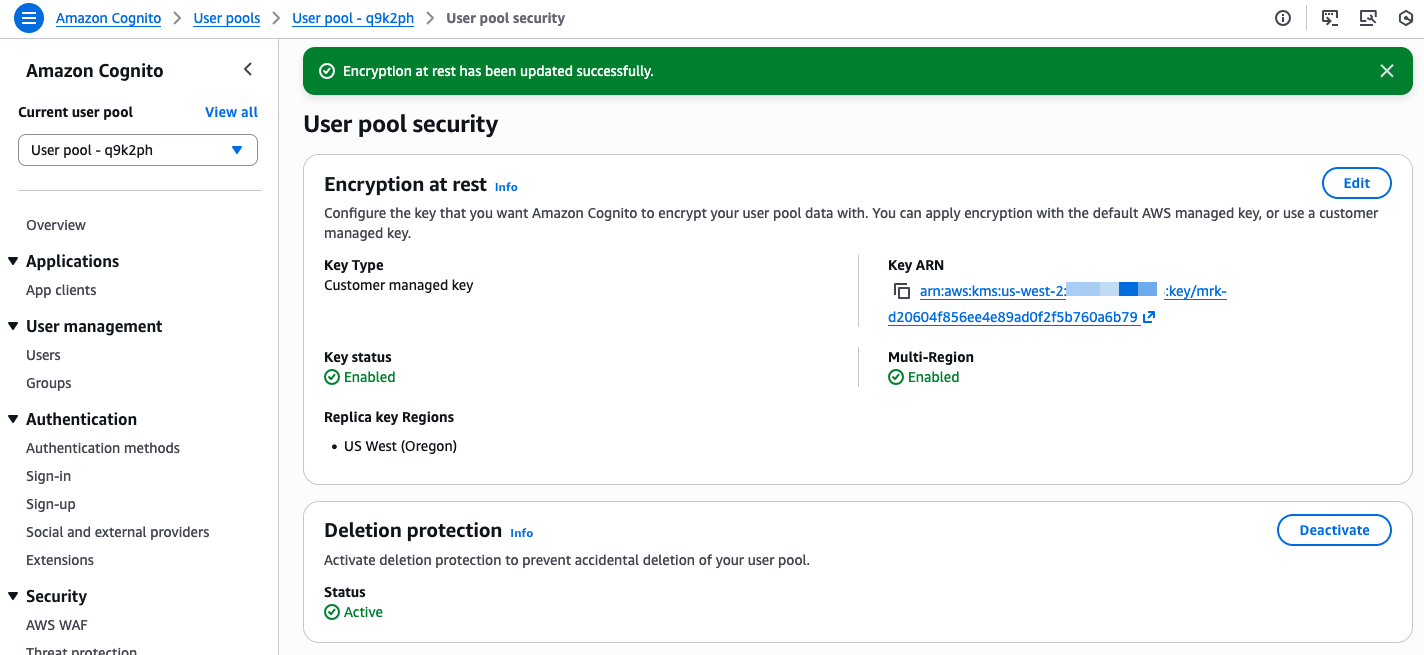
The console confirms when the custom key is selected and correctly configured.

Cognito Multi-Region replication - confirm CMK

Second, I follow the console instructions to configure the OIDC issuer type. On Step 2 – optional, I choose Configure.

Cognito Multi-Region replication - configure multi region OIDC 1

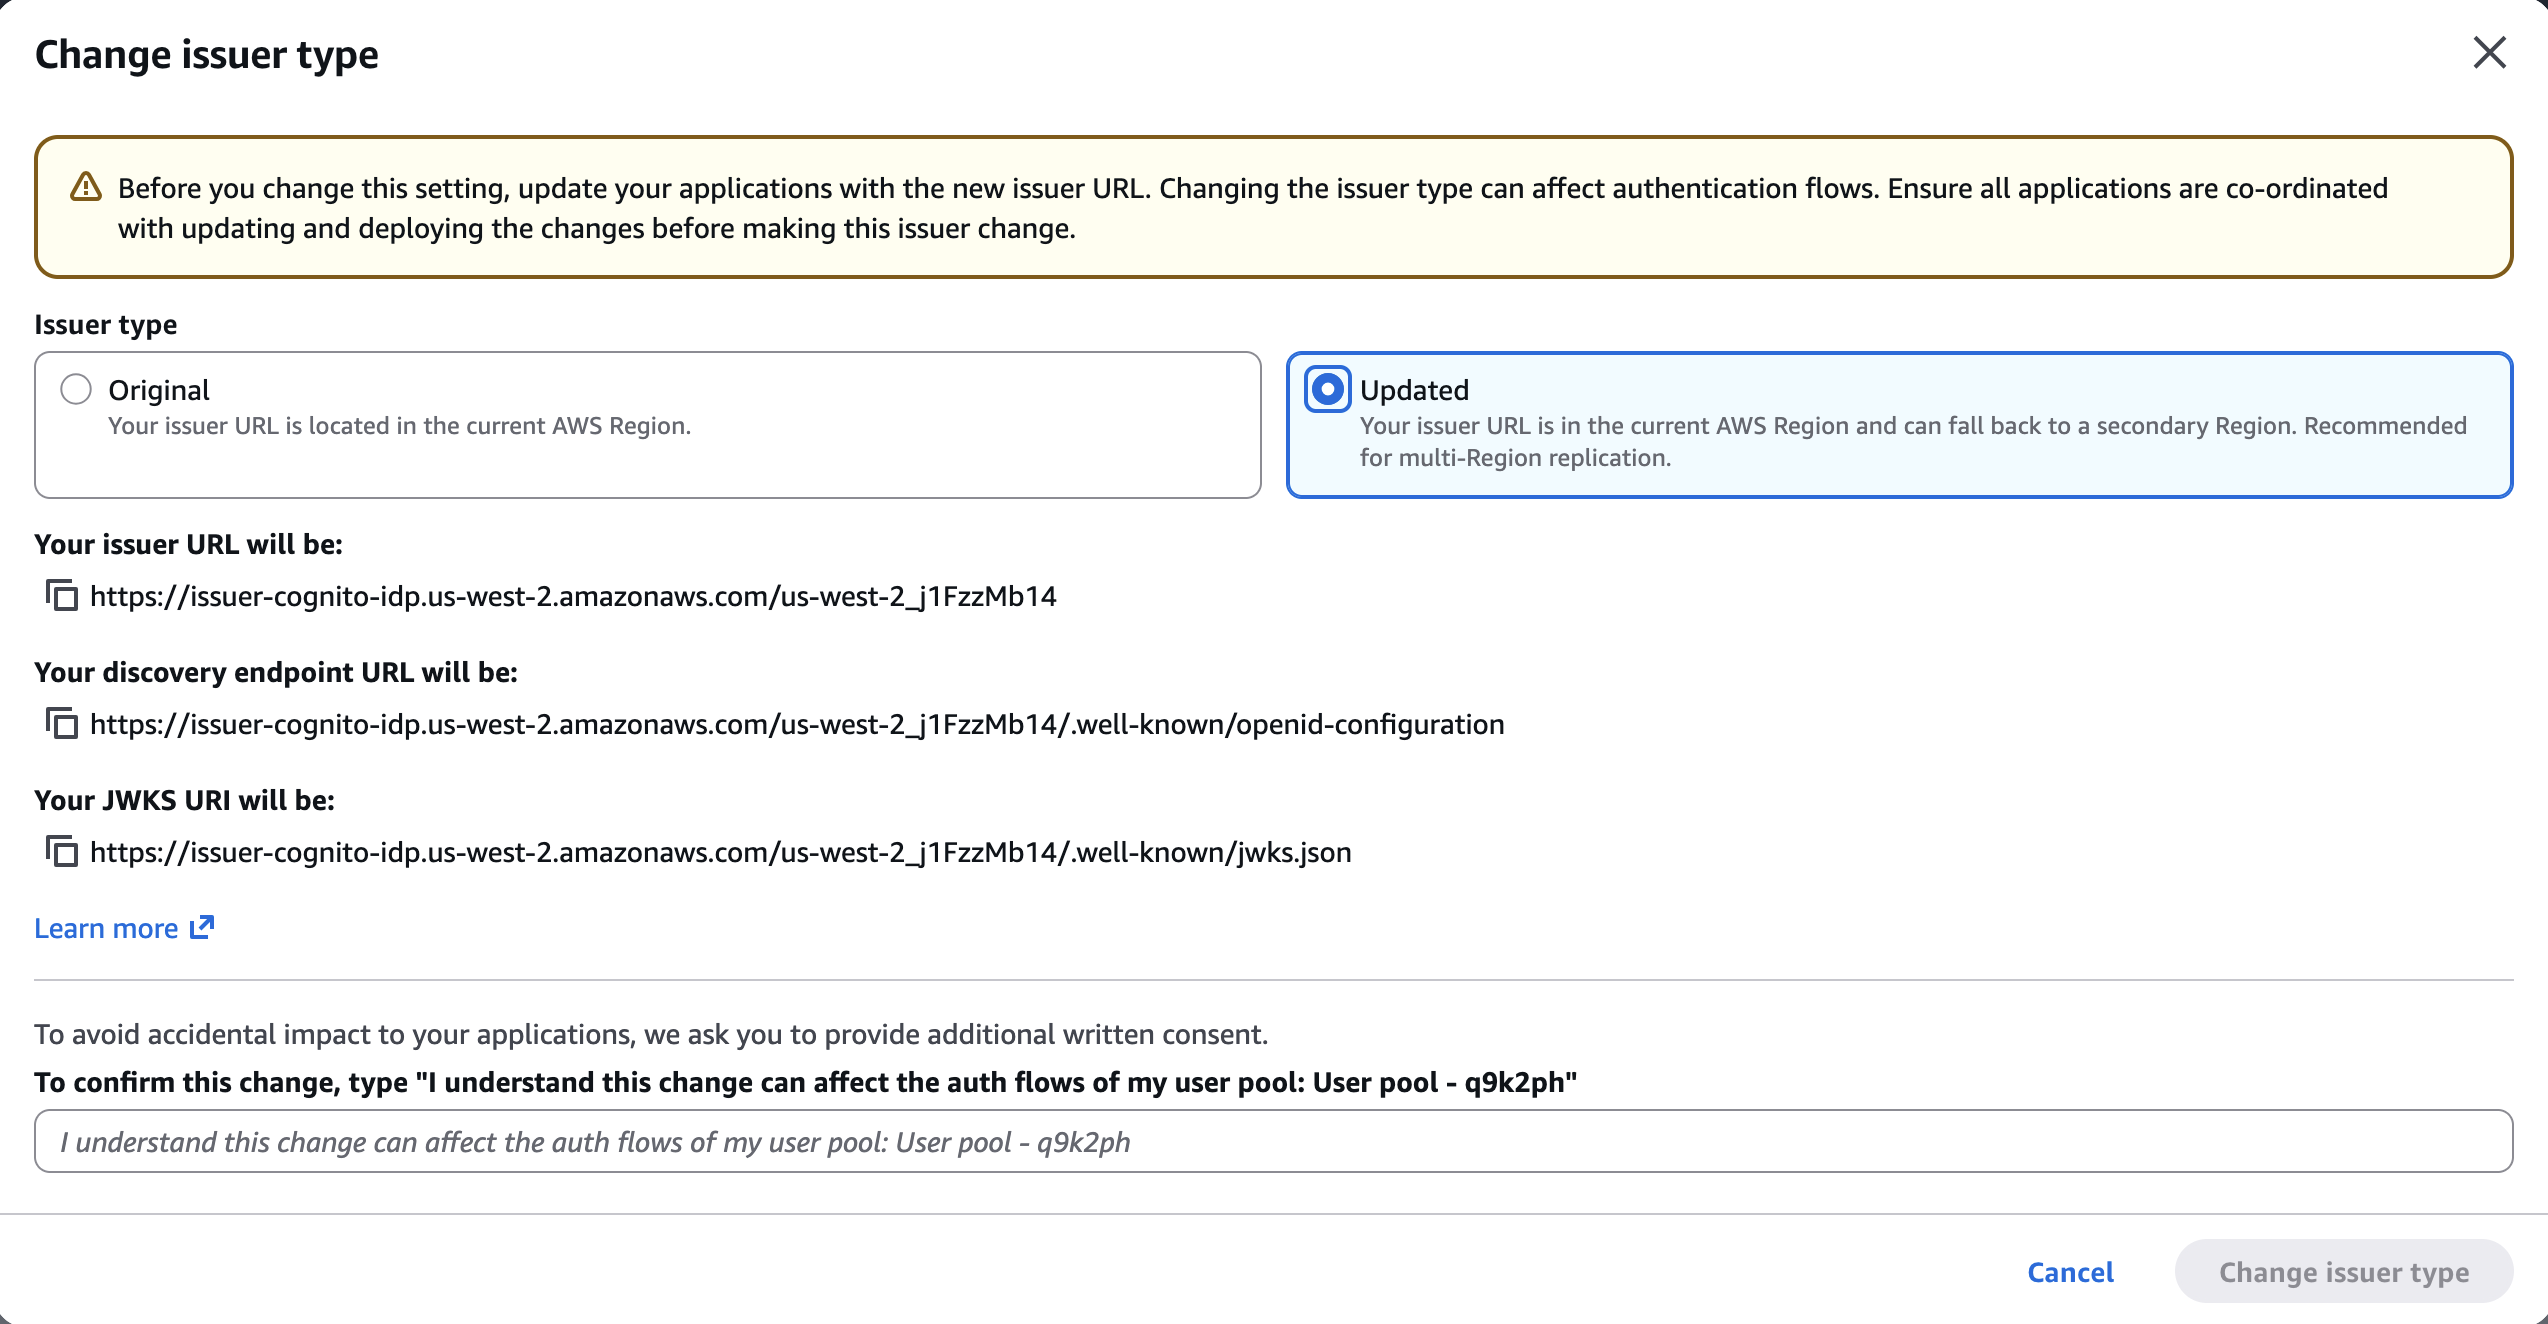
I make sure to update my client applications with these new endpoints. This is a required change that will need a redeployment of server-side applications and an update submission for mobile apps on the App Store and Google Play. If I don’t update the endpoints, my users will experience disruptions because requests to the old endpoints will no longer be routed correctly.

On the next screen, I select Updated. I take note of the new URLs. I confirm the changes and choose Change issuer type.

Cognito Multi-Region replication - configure multi region OIDC 2Finally, I select the target Region for replication. Only Regions where the custom encryption key is replicated are available for selection. After having chosen the target Region, I choose Create.Cognito Multi-Region replication - start the replication process.

The service prepares the replication. The time needed depends on the amount of data in the user pool.

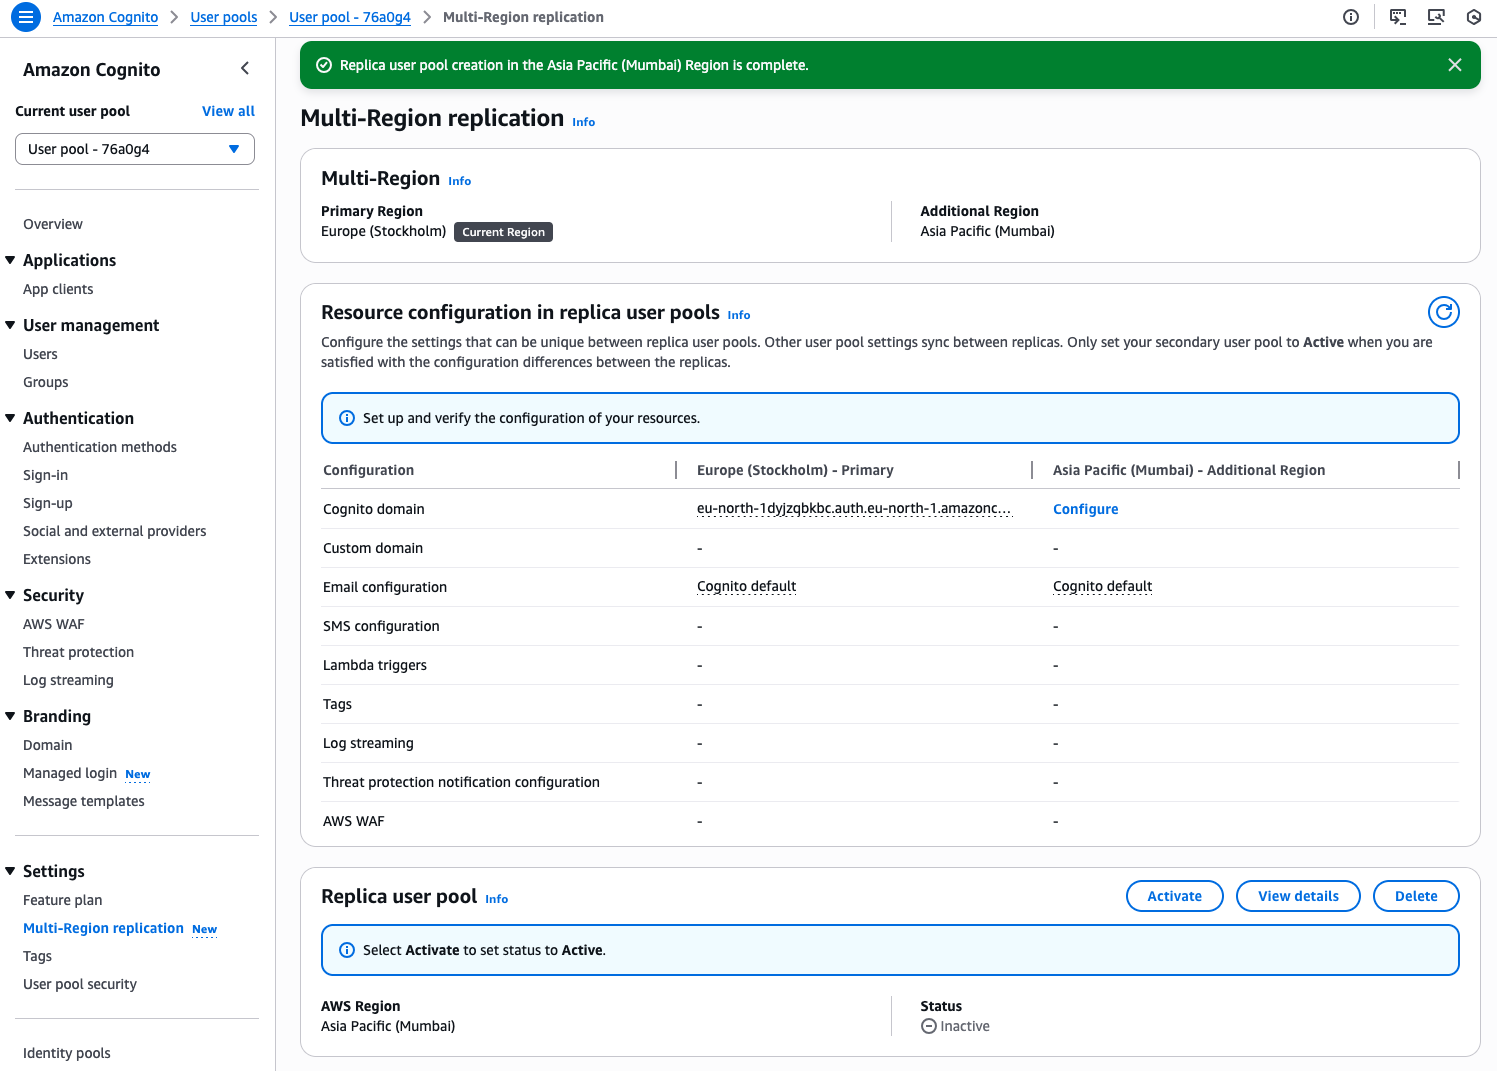
When the replicated user pool is ready, I manually Activate it.

Cognito Multi-Region replication - replication process is complete

The replication status becomes Active. It is ready to direct traffic to the replica.

Cognito Multi-Region replication - active

Additional configurations
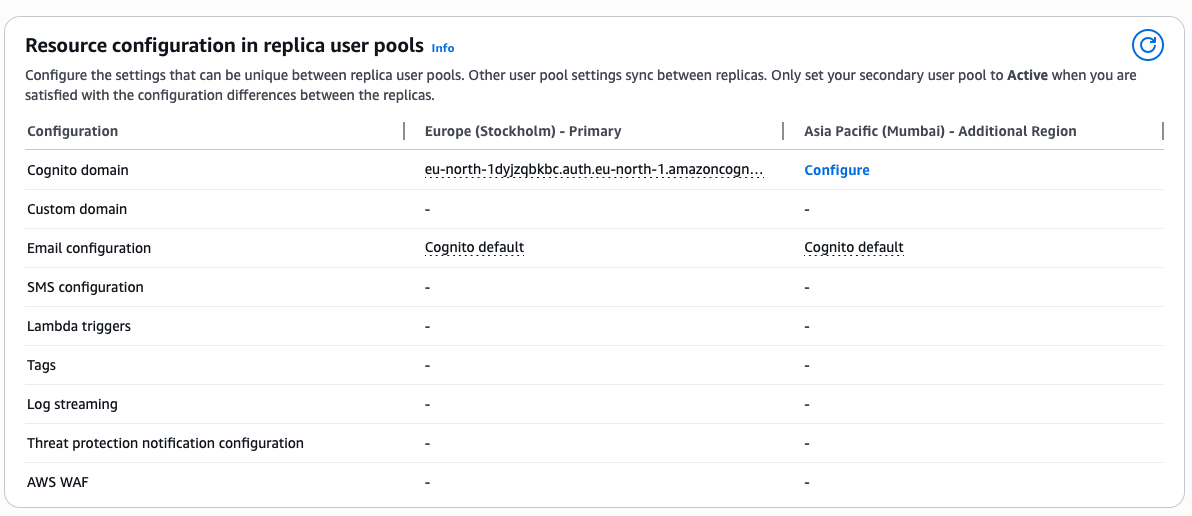
The console helps me to keep track of additional configurations I have to plan. When I’m using Lambda functions for custom authentication flows or SMS or email notifications, I must also deploy and configure these resources in the new Region.

Similarly, log streaming or AWS WAF configuration must be manually configured in the target Region before I start directing authentication traffic to it.

Cognito Multi-Region replication - task list

Health checks and failover
Both primary and secondary regional endpoints remain active and ready to serve your traffic at all times. To monitor system health and manage failovers, you design a strategy that aligns with your application’s specific requirements and security posture. You can implement health checks to monitor the status of authentication services in your primary Region and define criteria for when to initiate failover. These checks might look for error rates, latency patterns, or specific service alerts.

When your monitoring system detects issues meeting your failover criteria, you can redirect traffic to the secondary Region through DNS updates. This approach gives you control over the failover process while maintaining security. Consider testing your failover strategy during off-peak hours by redirecting a small portion of traffic to verify that authentication continues working as expected in the secondary Region.

When using managed login and federation with custom domains, you can also use the built-in traffic routing feature by providing an Amazon Route 53 health check ID.

Pricing and availability
Multi-Region replication is available today as an add-on feature for Amazon Cognito customers using Essentials and Plus tier. For user authentication, the add-on costs $0.0045 per monthly active user per replica Region for Essentials tier customers and $0.006 per monthly active user per replica region for Plus tier customers. For machine-to-machine (M2M) authentication, the add-on is a 30% charge on top of the standard volume-based pricing for successful tokens issued. For detailed pricing information, see Amazon Cognito pricing.

Multi-Region replication is available in the following Regions: US East (Ohio, N. Virginia), US West (N. California, Oregon), Asia Pacific (Mumbai, Seoul, Singapore, Sydney, Tokyo), Canada (Central), Europe (Frankfurt, Ireland, London, Paris, Stockholm), and South America (São Paulo).

Any of these Regions can be used as the source or the destination for the replication.

Support for customer managed keys is available for the Essentials and Plus tiers. It is available in the following Regions: US East (Ohio, N. Virginia), US West (N. California, Oregon), Africa (Cape Town), Asia Pacific (Hong Kong, Hyderabad, Jakarta, Malaysia, Melbourne, Mumbai, New Zealand, Osaka, Seoul, Singapore, Sydney, Thailand, Tokyo), Canada (Central), Canada West (Calgary), Europe (Frankfurt, Ireland, London, Milan, Paris, Spain, Stockholm, Zurich), Israel (Tel Aviv), Mexico (Central), South America (São Paulo), and AWS GovCloud (US-East, US-West)

From my conversations with customers, maintaining business continuity during regional incidents while meeting security requirements is a high priority. Multi-Region replication provides the capability to build more resilient applications without managing complex replication logic yourself. The automatic synchronization of user data and configurations reduces operational overhead while maintaining security.

For customers in regulated industries, the new support for customer managed keys provides additional control over data encryption. You can now use your own encryption keys to protect user data at rest, helping you meet regulatory requirements in industries like healthcare and financial services.

To get started with multi-Region replication and customer managed key encryption, visit the Amazon Cognito console or see the documentation for detailed setup instructions. I look forward to hearing how you use this feature to strengthen your application architecture.

— seb
❌