❌

Vue normale

Reçu avant avant-hier

Runtime instances: persistent compute for production AI agents on Amazon Bedrock AgentCore

7 août 2026 à 00:58

When you move AI agents from prototype to production, the infrastructure challenges multiply. Your agents need to persist state across multi-step workflows that run for hours or days. They need to coordinate with other agents, share context, and sometimes access GPUs for specialized tasks. Amazon Bedrock AgentCore runtime microVMs provide a fully managed environment for invocations that can run for up to 8 hours and support stateful workflows through managed session storage. Some workloads also benefit from dedicated, larger-capacity environments — for example, when agents need to run continuously for multiple days, access GPUs or the underlying OS, or run multiple collaborating agents on the same host.

Today, I’m happy to announce runtime instances, a new complementary compute option in Amazon Bedrock AgentCore Runtime that gives your agents persistent, managed infrastructure purpose-built for complex agent workloads.

What you get
Runtime instances provides AWS-managed EC2 infrastructure where you deploy multiple agents in a single runtime, each with their own dependencies and artifact types. Your agents can collaborate on the same host within shared sessions that persist for up to 14 days. The service supports GPU acceleration for compute-intensive tasks, session stop/restart to save costs during idle periods, and containerized deployments for teams that want to ship independently. For knowledge that needs to survive beyond a session, runtime instances pairs naturally with Amazon Elastic Block Store (Amazon EBS) and AgentCore Memory, which gives your agents long-term recall across sessions and environments.

Before today, if you wanted to keep your agents running for days or they needed GPU access, or multi-agent coordination, you had to build and manage that infrastructure yourself. You provisioned EC2 instances, configured networking, set up session management, handled scaling, and stitched together monitoring. Runtime instances handles all of that for you while integrating with the same AgentCore APIs, identity controls, and observability you already use with AgentCore Runtime microVMs.

A few things that should make agent developers smile: your agents can call each other as tools within a shared session, iterating autonomously until the job is done. You bring any framework (CrewAI, LangGraph, LlamaIndex, Strands) and any model. Packaging is minimal, a @app.entrypoint decorator and a zip file or container image. And if your workflow spans days, hibernate Monday night and resume Wednesday morning with everything intact.

Runtime microVMs and runtime instances are complementary compute options that you can use independently or together through the same AgentCore runtime APIs. A lightweight orchestrator agent on runtime microVM can coordinate and dispatch work to specialized worker agents running on instances. The orchestrator handles API calls, task routing, and result aggregation using runtime microVM’s fast scaling, while workers on Instances perform compute-intensive tasks like code compilation, security scanning, or GUI automation that require persistent state and direct OS access.

Let me show you how it works
I built two agents for this demo: a code writer agent that generates Python code from natural language descriptions, and a code reviewer agent that analyzes the generated code for bugs, security issues, and style improvements. Both agents share the same file system, so the reviewer can read whatever the writer produces without any data transfer or API calls between them.

Here is the code writer (simplified, no error handling):

writer = Agent(
    model="us.anthropic.claude-sonnet-4-5-20250929-v1:0",
    system_prompt=(
        "You are a senior Python engineer. "
        "Given a task, return ONLY a single Python code block — no prose."
    ),
)

@app.entrypoint
def handler(event, context):
    task = event.get("task") or event.get("prompt")
    session_id = getattr(context, "session_id", None) or event.get("session_id")
    session_dir = SHARED_DIR / session_id
    session_dir.mkdir(parents=True, exist_ok=True)

    code = str(writer(task))
    (session_dir / "code.py").write_text(code)

    return {"agent": "writer", "wrote": str(session_dir / "code.py"), "code": code}

Here is the code reviewer agent (simplified, no error handling):

reviewer = Agent(
    model="us.anthropic.claude-sonnet-4-5-20250929-v1:0",
    system_prompt=(
        "You are a strict Python code reviewer. "
        "Given code, return 3 bullet points: bugs, style, suggestions."
    ),
)

@app.entrypoint
def handler(event, context):
    session_id = getattr(context, "session_id", None) or event.get("session_id")
    code_path = SHARED_DIR / session_id / "code.py"
    code = code_path.read_text()
    review = str(reviewer(f"Review this code:\n\n{code}"))

    return {"agent": "reviewer", "read": str(code_path), "review": review}

Each agent is a Python application using Strands Agents with an @app.entrypoint decorator and a model of its choice. I package each one as a zip file. For this demo, I use the AWS Management Console. You can also use the AgentCore CLI, the AWS Command Line Interface (AWS CLI) or infrastructure as code.

Step 1: Create a capacity provider.

A capacity provider defines the EC2 infrastructure your agents run on. In the AgentCore console, I select Runtime in the left navigation, then select the Capacity providers tab and Create capacity provider.

ACI Create Capcity Provider 1

I give it a Name, select Linux (64-bit ARM) as the Operating system, and choose c7g.2xlarge as the Allowed instance types. This gives me 8 vCPUs and 16 GiB of memory, enough for both agents to run comfortably side by side.

Further down, I configure the VPC, subnets, and security groups for network access. Under Storage configuration, I keep the default gp3 volume. Under Service access, I select Create a new service role and let the console create the infrastructure role that manages EC2 instances on my behalf.

I select Create capacity provider and wait a few seconds. The status moves to Active.

ACI Create Capacity Provider 2

ACI Create Capacity Provider 3

Note the capacity provider configuration summary: operating system, instance type, subnets, security group, instance profile, and infrastructure role. Once created, only the description can be edited, so verify your settings before you proceed.

ACI Create Capcity Provider 2

Step 2: Create a runtime and deploy the first agent.

Back on the Runtime page, I select Create runtime. I give it a Name, select Instances as the Compute type, and choose the Capacity provider I created in the previous step.

ACI Create Runtime 1

Under Agent source, I select S3 Source, then Upload to S3. I choose my agent zip file (ACIDemoWriter.zip), set the Language runtime to Python 3.13, and specify agent.py as the Agent entry point. This is the file that contains my @app.entrypoint decorated function. Under Permissions, I select Create default role to let the console provision the IAM role my agent needs.

ACI Create Runtime 2

I select Create runtime and wait for the status to become Ready.

I repeat the same process for my code reviewer agent. I create a second runtime, select the same capacity provider, upload my reviewer agent zip file, and wait for it to become Ready. Both agents now share the same underlying EC2 infrastructure.

AgentCore Runtime Instances - Agent ReadyThe console shows me a View invocation code section with ready-to-use Python, TypeScript, and JavaScript snippets to invoke my agent programmatically. But for this demo, I use the built-in test feature. I select Test on the writer agent’s page.

AgentCore Runtime Instances - Show invocation codeStep 3: Invoke agents and observe collaboration.

The Runtime playground opens. At the top, I see three fields: Runtime agent, Endpoint, and Session ID. The console generates a session ID automatically. I take note of it because I will reuse it with the reviewer agent.

In the Input field, I type a JSON payload asking the writer agent to generate code:

{"prompt": "write a fibonacci suite"}

I select Run. After a few seconds, the Output panel shows the agent’s response. The writer agent generated a Python module with two implementations of a Fibonacci sequence (a list-based function and a generator) and wrote it to /tmp/agentcore-session/ca5ec24d-07f5-4eeb-add1-5ba416bf9eb2/code.py. Notice the session ID in the file path. That directory is the shared file system for this session.

AgentCore Runtime Instances - Invoke code writer agent

Step 4: Invoke the reviewer agent in the same session.

Now I switch the Runtime agent dropdown to ACIDemoReviewer. The important part: I paste the same session ID (ca5ec24d-07f5-4eeb-add1-5ba416bf9eb2) in the Session ID field. This is what connects the two agents.

I type a simple prompt:

{"prompt": "review the code"}

I select Run. The reviewer agent reads the file the writer produced from the shared session directory and returns a detailed code review. It finds no critical bugs but suggests adding type hints, input validation, and simplifying the edge case handling.

AgentCore Runtime Instances - Invoke code reviewer agentThe two agents never exchanged messages or called each other’s APIs. They collaborated through the shared file system that runtime instances provide within a session. You can extend this pattern to any number of agents: a test agent that runs the code, a documentation agent that generates README files, a security agent that scans for vulnerabilities, all sharing the same working directory.

Key details
Here are a few things to know as you get started:

  • Supported OS: Linux (ARM64 and x86_64) at launch.
  • Session persistence: Sessions persist for up to 14 days.
  • Runtimes: Python 3.11-14 with native code support. Container images also supported.
  • GPU: Support for GPU-accelerated instance types.
  • Integration: Uses the same AgentCore APIs, identity, observability, and policy controls as AgentCore Runtime.
  • Pricing: Standard EC2 pricing plus a management fee for AgentCore orchestration.
  • Regions: US East (Ohio, N. Virginia), US West (Oregon), Asia Pacific (Mumbai, Singapore, Sydney, Tokyo), and Europe (Frankfurt, Ireland)

To get started, visit the runtime instance in Amazon Bedrock AgentCore documentation and create your first capacity provider.

— seb
Amazon EC2 C9g and C9gd instances powered by AWS Graviton5 processors are now available

30 juin 2026 à 22:56

When you run compute-intensive workloads like real-time analytics, batch processing, video encoding, scientific modeling, or CPU-based machine learning inference, every percentage point of performance matters. You need instances that deliver higher throughput per vCPU, faster memory access, and more network bandwidth, all while keeping your costs in check.

Today I am happy to announce the general availability of Amazon Elastic Compute Cloud (Amazon EC2) C9g and C9gd instances, powered by AWS Graviton5 processors. C9g instances are compute-optimized and deliver up to 25% higher performance per vCPU compared to previous-generation C8g instances. They feature the fastest memory of any processor instance in the cloud, with DDR5 8800MT/s DIMMs, 5x more L3 cache, and up to 3x higher packet-processing performance compared to Graviton4-based instances. The faster memory and larger caches mean your workloads spend less time waiting on data, translating into higher throughput for in-memory analytics, faster agentic loops, and more responsive real-time applications.

C9g instances are ideal for batch jobs, video encoding pipelines, or distributed analytics that can utilize Amazon Elastic Block Store (Amazon EBS) for storage. It is also a natural fit for agentic AI workloads, where concurrent environments and CPU-bound reasoning steps benefit from Graviton5’s higher core count and larger caches. As AI shifts from answering questions to taking actions, running code, and orchestrating multi-step tasks, the demand for CPU compute is growing, and C9g instances are built for this shift.

Some workloads also need fast local storage alongside that compute power. Choose C9gd when your application benefits from high-speed, low-latency local NVMe SSD storage, for example scratch space during HPC simulations, temporary caches for ML inference, or local buffers for ad-serving engines.

Graviton5-based instances with NVMe instance store volumes also support detailed performance statistics, providing high-resolution I/O metrics, including latency histograms broken down by I/O size, up to 1-second granularity and accessible via Amazon CloudWatch or nvme-cli at no additional cost.

C9g and C9gd instances at a glance
C9g and C9gd instances are available in 11 sizes ranging from medium to 48xlarge, plus a bare metal option. They offer up to 15% higher network bandwidth and 20% higher EBS bandwidth on average across sizes compared to the previous generation, with the largest 48xlarge size delivering up to 100 Gbps of network bandwidth and up to 72 Gbps of EBS bandwidth, a 2x increase.

C9g vCPUs Memory
(GiB)
Network Bandwidth
(Gbps)
EBS Bandwidth
(Gbps)
medium 1 2 Up to 15 Up to 12
large 2 4 Up to 15 Up to 12
xlarge 4 8 Up to 15 Up to 12
2xlarge 8 16 Up to 17 Up to 12
4xlarge 16 32 Up to 17 Up to 12
8xlarge 32 64 17 12
12xlarge 48 96 25 18
16xlarge 64 128 34 24
24xlarge 96 192 50 36
48xlarge 192 384 100 72
metal-48xl 192 384 100 72

C9gd instances add local NVMe SSD storage with up to 30% higher storage performance compared to previous-generation local storage instances.

C9gd vCPUs Memory
(GiB)
Instance Storage
(GB)
Network Bandwidth
(Gbps)
EBS Bandwidth
(Gbps)
medium 1 2 1 x 59 Up to 15 Up to 12
large 2 4 1 x 118 Up to 15 Up to 12
xlarge 4 8 1 x 237 Up to 15 Up to 12
2xlarge 8 16 1 x 474 Up to 17 Up to 12
4xlarge 16 32 1 x 950 Up to 17 Up to 12
8xlarge 32 64 1 x 1900 17 12
12xlarge 48 96 3 x 950 25 18
16xlarge 64 128 1 x 3800 34 24
24xlarge 96 192 3 x 1900 50 36
48xlarge 192 384 3 x 3800 100 72
metal-48xl 192 384 3 x 3800 100 72

Both families are well-suited for high-performance computing (HPC), batch processing, gaming, video encoding, scientific modeling, distributed analytics, CPU-based machine learning inference, and ad serving.

Here are some additional capabilities:

  • Instance Bandwidth Configuration (IBC) lets you adjust the allocation of bandwidth between Amazon EBS and Amazon VPC networking by up to 25%, helping you optimize performance for workloads with specific bandwidth requirements such as databases and caching.
  • ENA Express support for enhanced networking.
  • Up to 128 EBS volumes can be attached to virtual instances.
  • Support for Savings Plans, On-Demand, Spot Instances, Dedicated Instances, and Dedicated Hosts.

Nitro Isolation Engine
Security and isolation are foundational requirements for running workloads in the cloud. Within the Nitro System, the AWS Nitro Hypervisor is designed to isolate instances from each other as well as AWS operators. With C9g and C9gd instances we are raising the bar even further with the Nitro Isolation Engine, an enhancement to the Nitro System, which enforces isolation of instances and harnesses formal verification to provide assurances of isolation with mathematical precision. C9g and C9gd instances are the first set of compute-optimized instance types to feature Nitro Isolation Engine, a purpose built component that is responsible for enforcing isolation between virtual machines, including mediation of all access to virtual machine memory, CPU register state, and I/O devices through a minimal set of APIs.

To learn more about the Nitro Isolation Engine, visit the blog post. For details on the formal verification results, including scope and assumptions, see our technical white paper.

Now available
Amazon EC2 C9g and C9gd instances are now available in US East (Ohio, N. Virginia), US West (Oregon), and Europe (Frankfurt). Additional regions will follow.

You can launch C9g and C9gd instances today using the AWS Management Console, AWS Command Line Interface (AWS CLI), or AWS SDKs. For pricing information, visit the Amazon EC2 Pricing page.

To learn more, visit the Amazon EC2 C9g and C9gd instances page and send feedback to AWS re:Post for EC2 or through your usual AWS Support contacts.

— seb

Editor’s Note: Updated 7/1/2026- Paragraph about Nitro Isolation Engine rewritten for clarity.

Automate public TLS certificate issuance with ACME support in AWS Certificate Manager

30 juin 2026 à 22:15

If you manage TLS certificates for your applications, you know the challenge: certificates expire, and when they do, your customers see errors or your service goes down. As certificate validity periods get shorter (the Certification Authority (CA)/Browser Forum mandates reduced maximum validity to 100 days starting March 2027, and to 47 days by 2029), manual renewal processes become untenable. You need automation.

Automatic Certificate Management Environment (ACME) is an open protocol for requesting, renewing, and revoking TLS certificates without human intervention. It’s the same protocol behind Let’s Encrypt, and it’s supported by dozens of clients across every platform.

Today we’re announcing ACME support for public certificates in AWS Certificate Manager (ACM). ACM now provides a fully managed ACME server endpoint that works with any ACMEv2-compatible client, such as Certbot, cert-manager for Kubernetes, acme.sh, or any other client you already use. You can issue public TLS certificates from Amazon Trust Services through the standard ACME protocol.

Before today, if you wanted automated certificate management using the ACME protocol, you relied on external certificate authorities alongside ACM, leading to a fragmented visibility experience. Some certificates lived in ACM, others were managed externally with no central dashboard. PKI administrators had limited ability to control who could request certificates or which domains were allowed.

With ACME support in ACM, you can now set up one or more managed ACME endpoint that allows you to centrally manage and monitor ACME certificate usage across your organization.

As a PKI administrator, you get centralized controls that go beyond basic certificate issuance. You can bind IAM roles to ACME accounts for fine-grained access control over which domains each client can request. You can define domain scopes at the endpoint level to enforce organization-wide policies. And you get centralized monitoring and visibility in the same place: AWS CloudTrail logs every certificate request for auditability, Amazon CloudWatch tracks operational metrics, and ACM sends expiry notifications when certificates are approaching renewal. Using ACM, your PKI team can search all certificates, whether issued through the ACM console, an API call, or ACME.

How it works
To get started, you first set up a dedicated ACME endpoint, configure authorization controls using External Account Binding (EAB), validate which domains the endpoint can issue certificates for, and point your existing ACME clients to the new endpoint.

The domain validation step is important: it separates who can set up certificate issuance from who can request certificates. The PKI administrator validates domains once at the endpoint level, using DNS credentials that stay with the admin. Application owners who need certificates never touch DNS. They register with an EAB credential, and the endpoint enforces which domains and scopes they’re allowed to request. This means you can distribute certificate automation broadly across your organization without distributing DNS keys along with it.

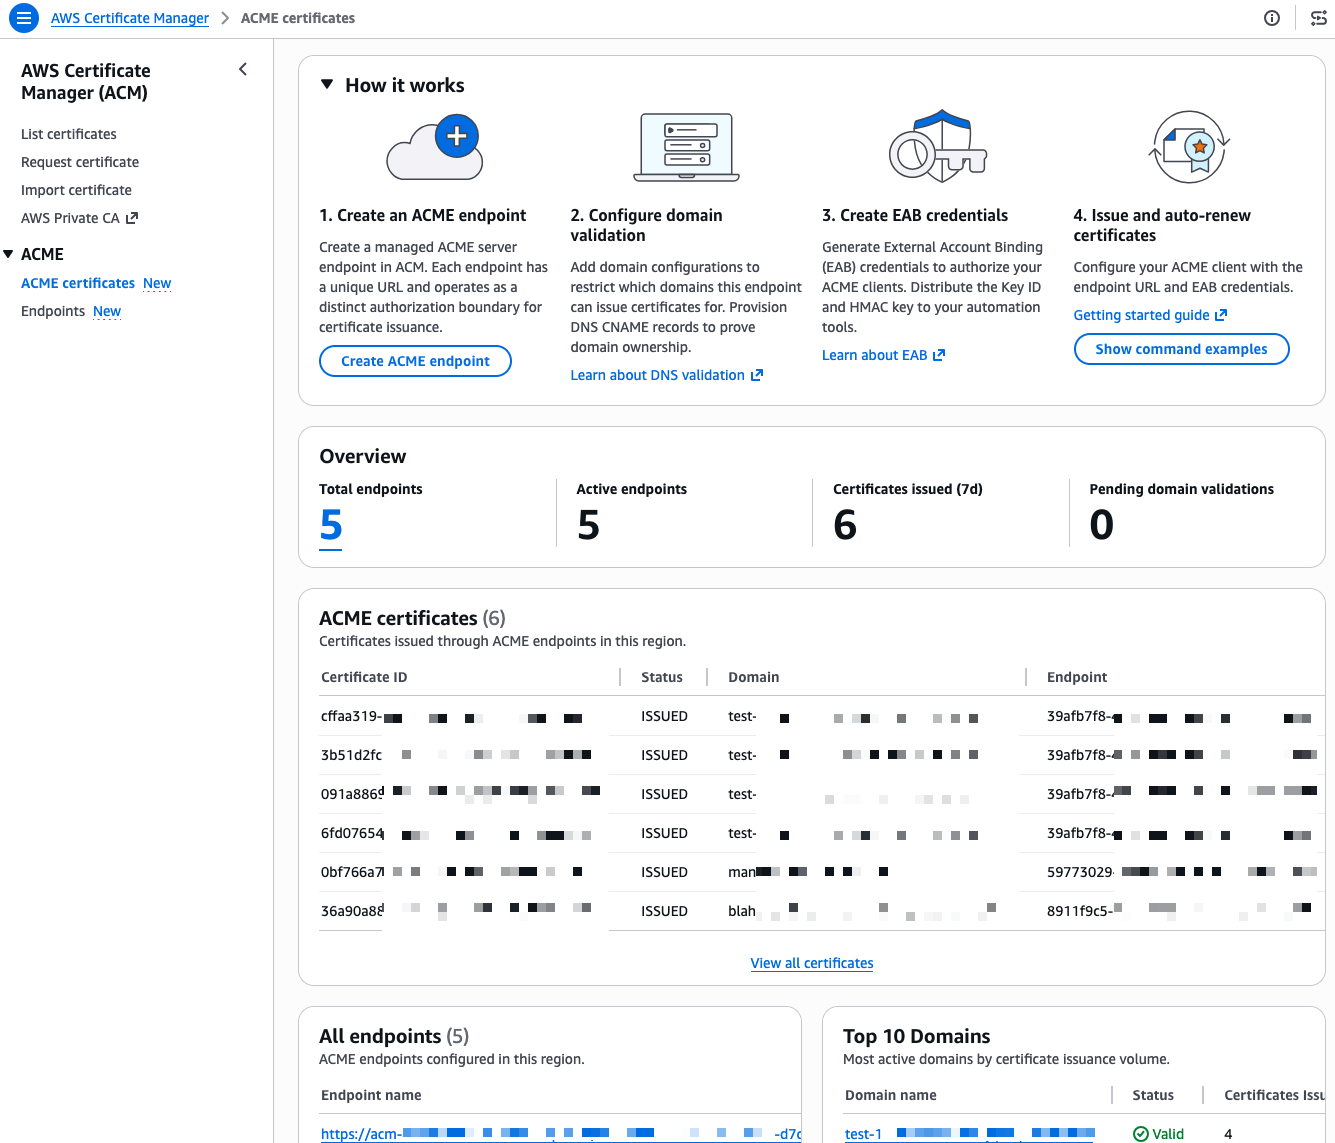
I start this demo from the ACME certificates page in the AWS Certificate Manager console.

ACME Console

I already have a few endpoints and certificates in this account, I walk you through creating a new one from scratch. First, I select Create ACME endpoint.

ACME - Ceeate endpoint 1

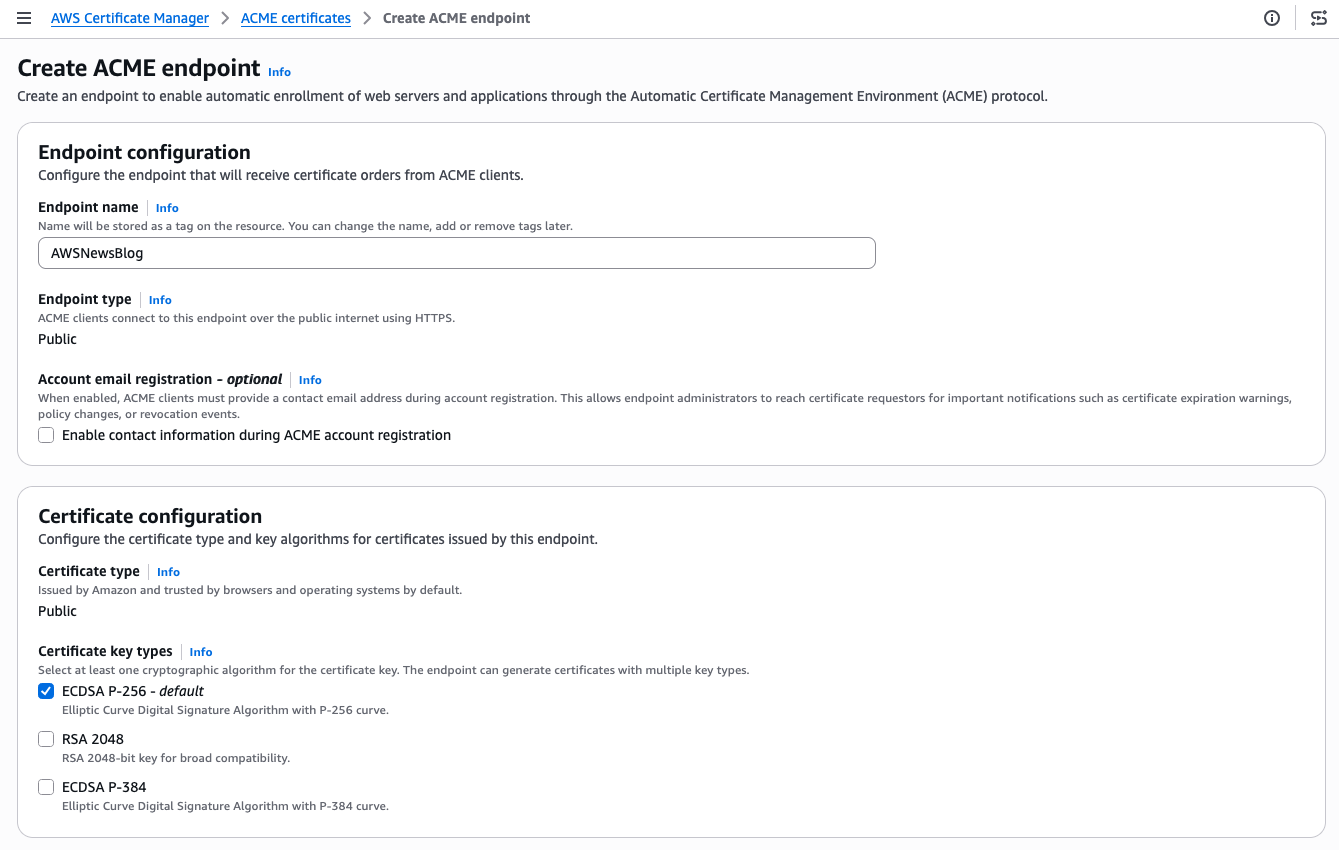
I give my endpoint a name. The Endpoint type is Public. ACME clients will connect over the public internet. The Certificate type is Public. The certificate will be issued by Amazon Trust Services and trusted by browsers and operating systems by default. For the certificate key type, I keep the default ECDSA P-256. RSA 2048 and ECDSA P-384 are also available if your clients require them.

ACME - Ceeate endpoint 2

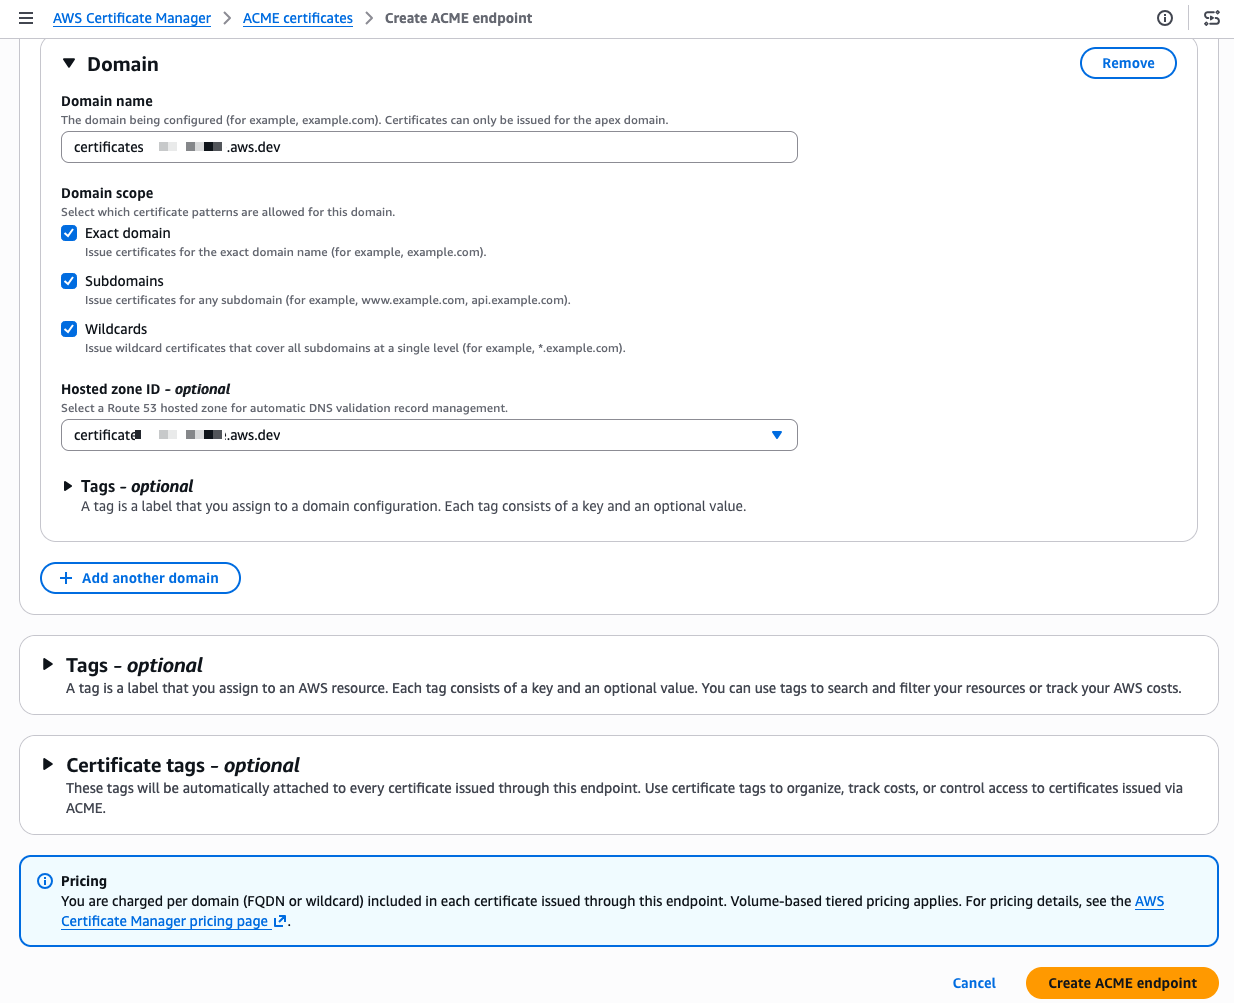
Scrolling down, I configure the domain. I enter my domain name and select the domain scope. The scope controls exactly what certificate patterns your ACME clients are allowed to request for this domain. If I check only Exact domain, clients can only request certificates for that specific domain name. Adding Subdomains allows certificates for any subdomain (for example, api.example.com or dev.example.com). Adding Wildcards allows wildcard certificates (*.example.com). By leaving a scope unchecked, you prevent any client using this endpoint from requesting that type of certificate, even if their ACME request is otherwise valid. For a production endpoint, you might enable only Exact domain and Subdomains while leaving Wildcards unchecked to enforce a stricter security posture.

I also select my Amazon Route 53 hosted zone from the drop down menu. ACM then automatically creates the DNS CNAME records needed for domain validation, so I don’t have to do it manually. When my domain is hosted outside of Route 53, I manually create the provided CNAME record at my DNS provider instead. This is a meaningful difference from typical ACME setups where each client handles its own domain verification independently.

These centralized controls give PKI administrators a single place to authenticate domains, restrict which certificate types (ECDSA or RSA) clients can request, and further limit wildcard issuance. Having these governance capabilities built in means you don’t need to purchase a separate certificate lifecycle management product or invest in building a custom policy layer yourself, both of which come at significant cost and operational overhead.

I select Create ACME endpoint

ACME - DNS configuration

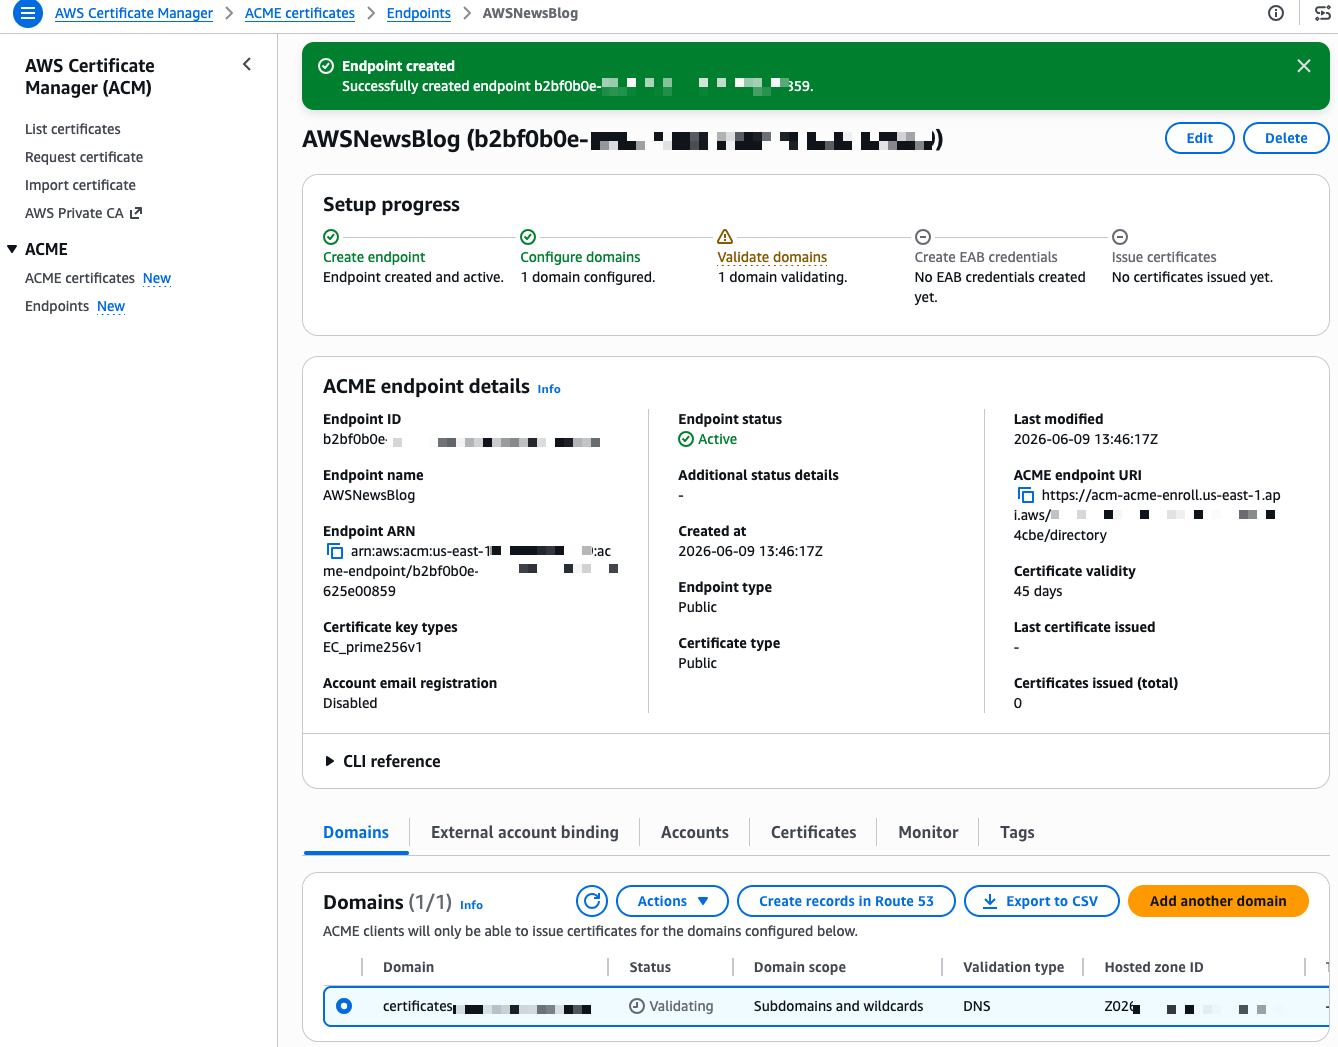
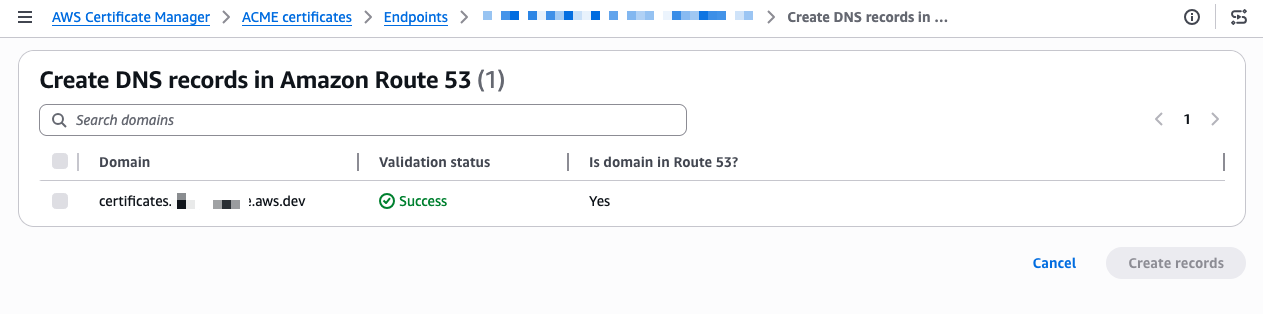
After a few seconds, the endpoint is created. The console shows a Setup progress tracker with the next steps. My domain shows a “Validating” status. The validation method is DNS validation, where ACM verifies that you control the domain by checking for a specific CNAME record. Because I selected my Route 53 hosted zone during creation, I select Create records in Route 53 to let ACM handle the DNS validation automatically.

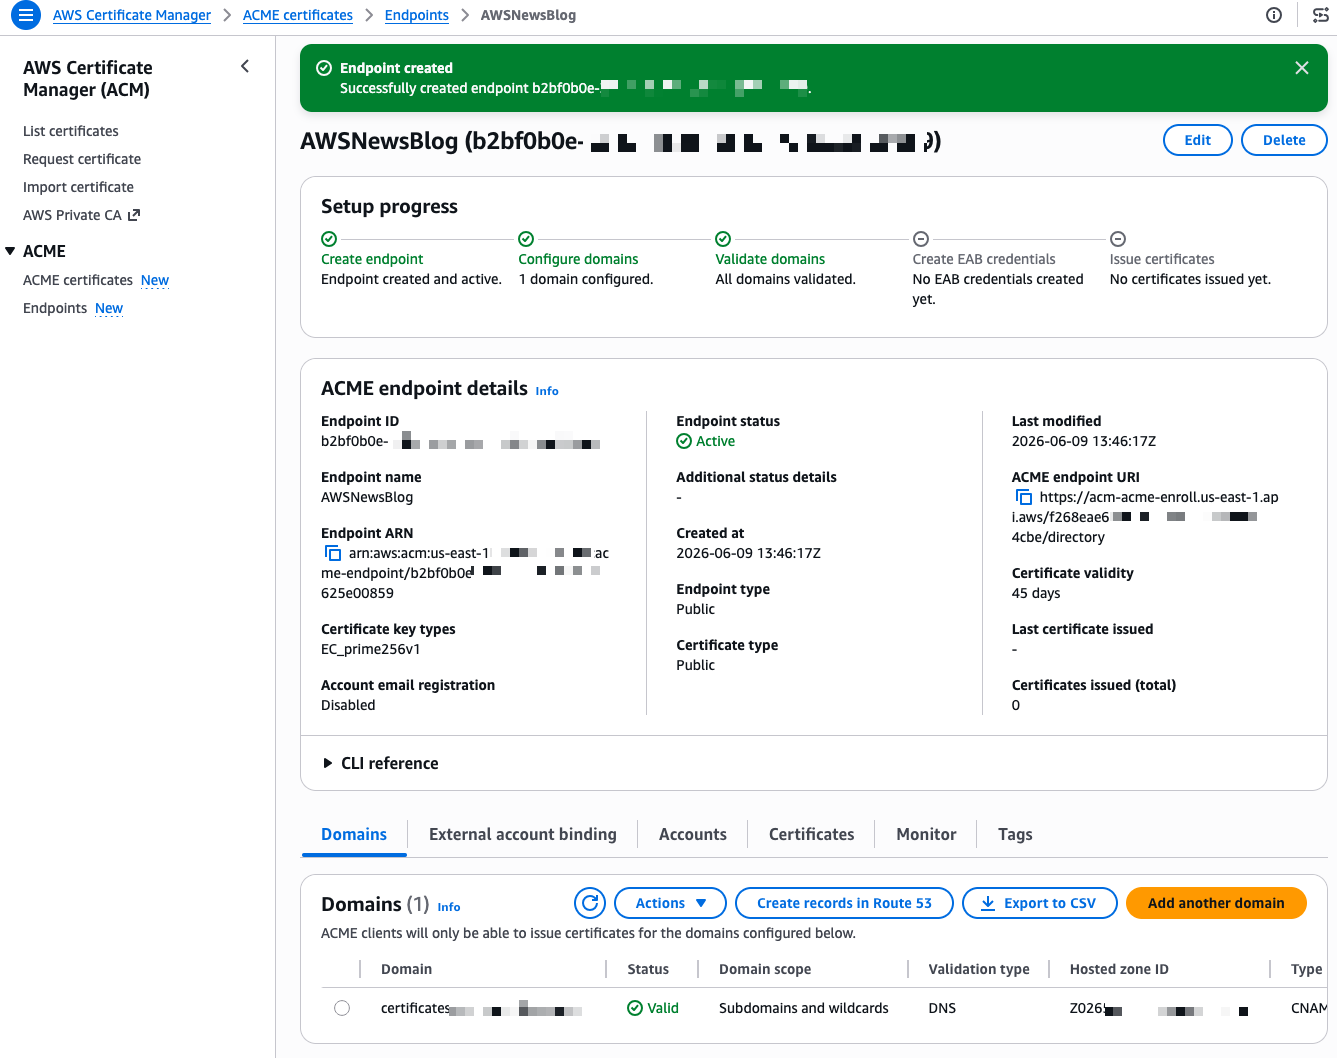
ACME - DNS successThe validation completes in a few seconds and the status changes to Success.

ACME - External Account Binding 1

Now I need to create External Account Binding (EAB) credentials. EAB credentials are a key identifier and a symmetriceiifcbnurtbikvdfjkuhfnitrbvuihigbgfegvhnucdv

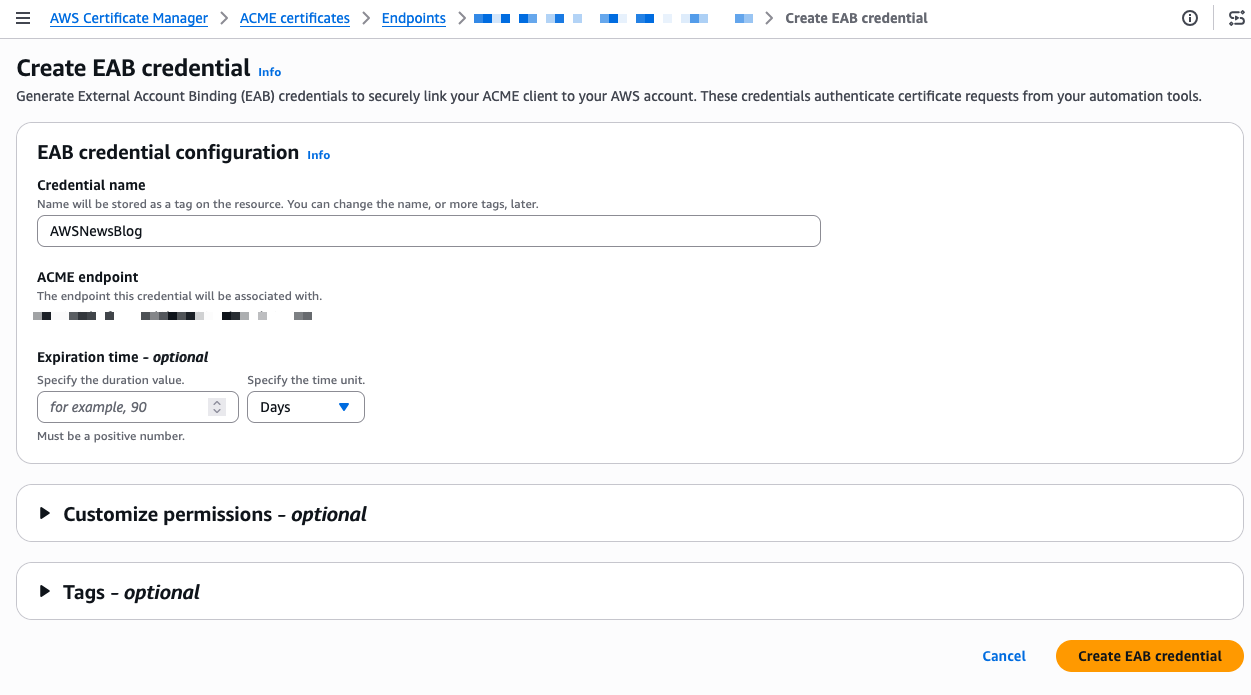
HMAC key that lets your ACME client register an account with the ACME server. Once registered, the client generates its own asymmetric key pair, which is then used to authenticate all subsequent certificate requests. On the endpoint details page, I select the External account binding tab, then select Create EAB. I give the credential a name and optionally set an expiration time, ideally no longer than needed to complete client registration.

ACME - External Account Binding 2

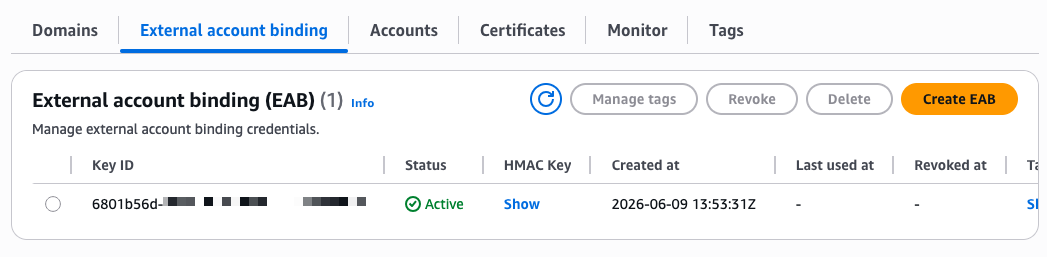
ACME - end of configuration - show key

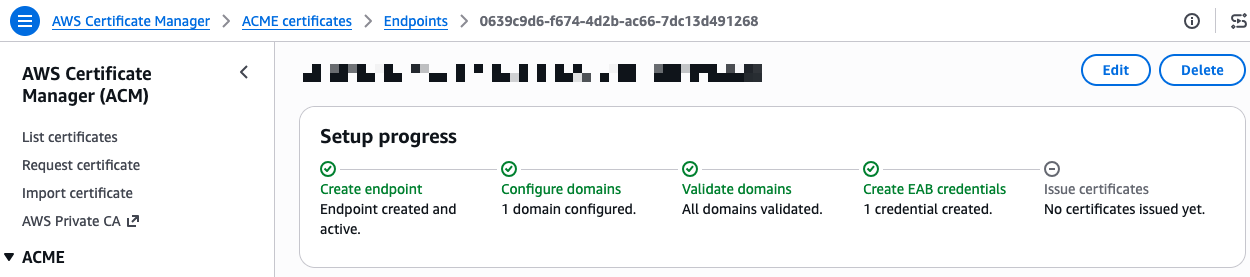
After I select Create EAB credential, the console shows the Key ID and HMAC Key. I note these values because I need them to configure my ACME client. The setup progress now shows four green checkmarks.

ACME - end of configuration - success

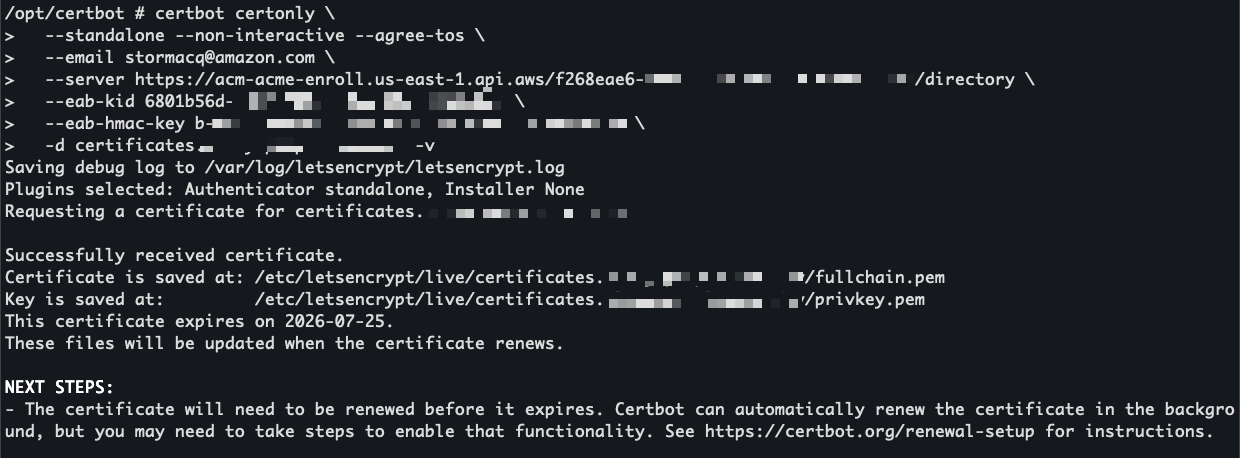
I’m ready to request a certificate. On the endpoint details page, I expand the CLI reference section. The console provides ready-to-use command examples for both Certbot and acme.sh. I copy the Certbot command and run it inside a container using the certbot/certbot image.

certbot certonly --standalone --non-interactive --agree-tos \
    --email <EMAIL> \
    --server https://acm-acme-enroll.us-east-1.api.aws/<ENDPOINT_ID>/directory \
    --eab-kid <EAB_KID> \
    --eab-hmac-key <EAB_HMAC_KEY> \
    --issuance-timeout <ISSUANCE_TIMEOUT> \
    -d <DOMAIN>

I replace the placeholders with my endpoint URL, EAB credentials, and domain name. The --eab-kid and --eab-hmac-key arguments are how Certbot registers with your ACME endpoint using the External Account Binding credentials I generated earlier. Each ACME client has its own syntax for this step, so check your client’s documentation for the exact flags.

Certbot contacts the ACME endpoint and returns a valid certificate signed by Amazon Trust Services.

Certbot to obtain a certificate through ACME

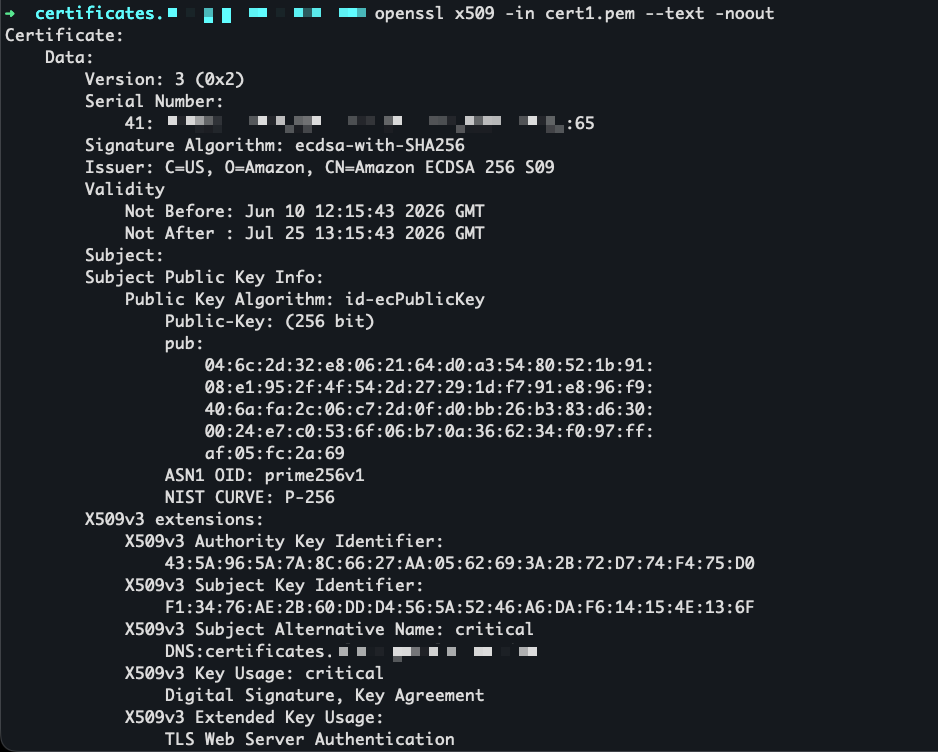
I use openssl to view the certificate before installing it.

openssl to view the certificate

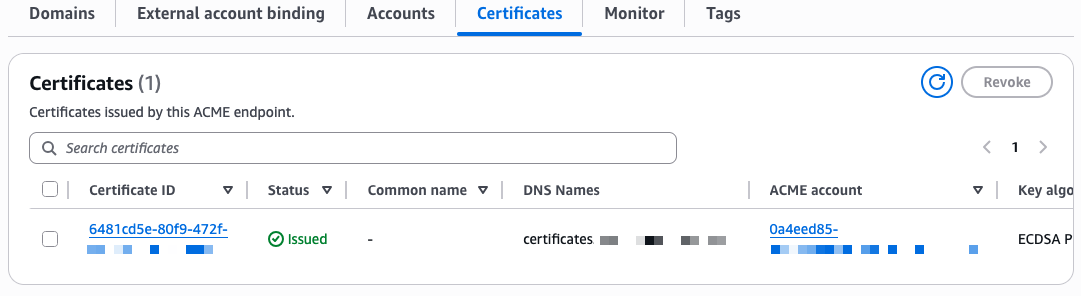
The certificate is now visible in the ACM console under the ACME certificates tab, alongside any certificates issued through the console or API.

Certoficate view in the ACME console

Availability and pricing
ACME support in AWS Certificate Manager is available today in all commercial AWS Regions and will be available in AWS GovCloud (US), the China Regions, and the AWS European Sovereign Cloud partitions at a later date.

Pricing is per domain included in each certificate at the time of issuance, with a different price for fully qualified domain names and wildcards. Volume tiers are calculated based on total domain occurrences across all certificates issued per month in your AWS account. For details, see the ACM pricing page.

To get started, visit the ACM section on the AWS console or read the documentation.

— seb

Update 8/11/2026: EAB uses a HMAC symmetric key, not a HMAC key pair as I originally wrote.

AWS Weekly Roundup: BYOM for Amazon RDS for SQL Server, AWS IoT Device SDK for Swift, and more (June 8, 2026)

8 juin 2026 à 23:27

This week, the AWS IoT Device SDK for Swift reached general availability. As a member of the Swift Server Workgroup (SSWG), this one caught my attention. The SDK brings production-ready MQTT 5 connectivity, Device Shadow, Jobs, and fleet provisioning to Swift developers on macOS, iOS, tvOS, and Linux.

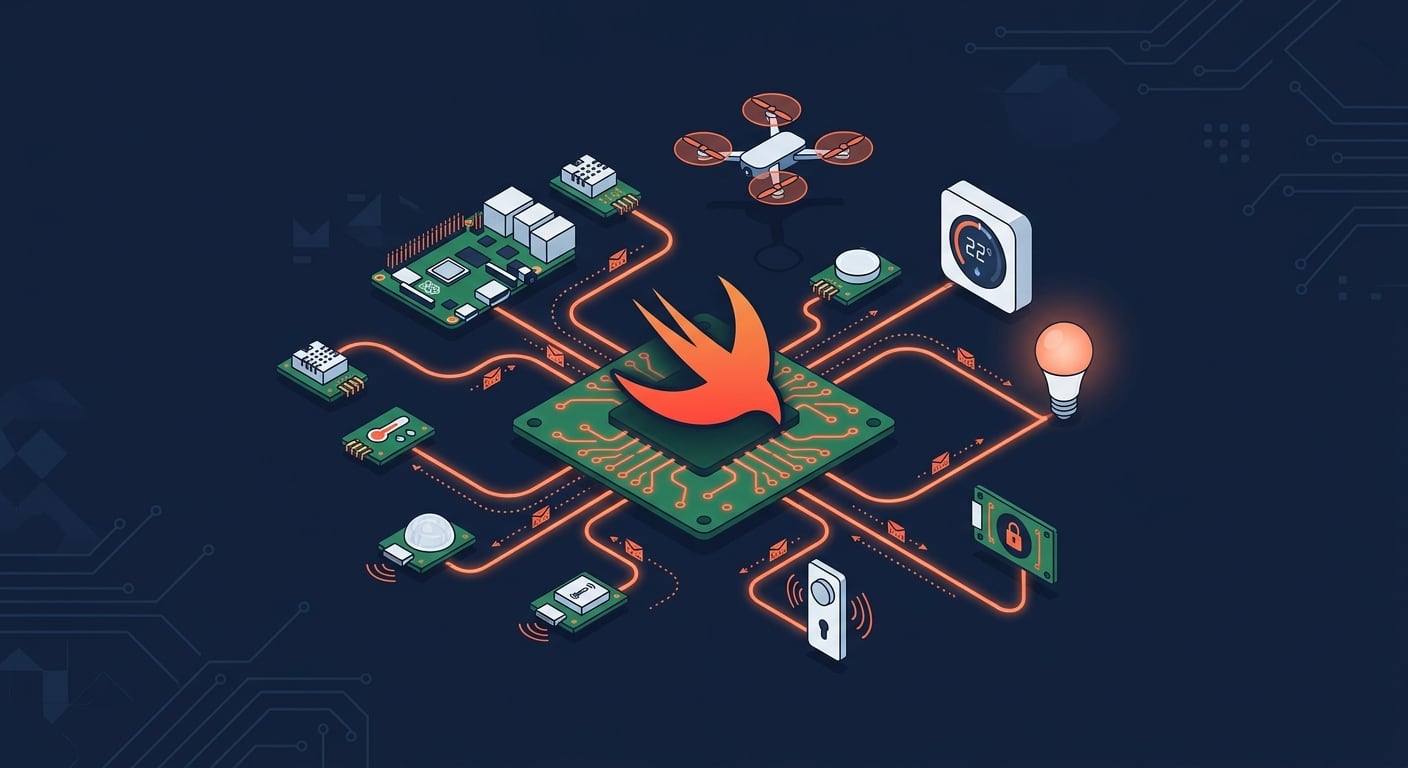
Swift on IoT and Edge devices, an AI generated illustration

I’m curious to see what you will build with it. Swift on the server has matured over the past few years, and now it reaches IoT devices too. This connects to a broader trend of running Swift at the edge. WendyOS, for example, is an open-source operating system for physical AI that offers first-class Swift support for deploying apps to NVIDIA Jetson and Raspberry Pi hardware. Between server-side Swift, IoT, and edge computing, the language is showing up in places that would have surprised most people a few years ago.

Now, let’s get into this week’s AWS news.

Headlines
Amazon RDS for SQL Server supports Bring Your Own Media – Customers who migrate SQL Server applications from on-premises environments can now reuse their existing Microsoft SQL Server licenses, including Software Assurance, through Microsoft’s License Mobility program on Amazon RDS. BYOM is integrated with AWS License Manager for tracking license usage and compliance. Read more.

Amazon Cognito now supports multi-Region replication – You can now synchronize user and machine identity data, including credentials, user pool configurations, and federation setups, to a secondary user pool in a standby Region in near real-time. In the event of a disruption in the primary Region, signed-in users continue accessing their applications without re-authenticating, and registered users can sign in with their existing credentials. Multi-Region replication is available as an add-on for user pools in Essentials or Plus feature tiers across 16 Regions. Read more.

GPT-5.5, GPT-5.4, and Codex from OpenAI are now generally available on Amazon Bedrock – You can now use GPT-5.5 and GPT-5.4 in production workloads on Amazon Bedrock and build with Codex for AI-powered software development, with the same security, governance, and operational controls you already use across AWS. GPT-5.5 is the most capable model from OpenAI, excelling at agentic coding, data analysis, and multi-step autonomous tasks. Codex is available through the Codex App, the Codex CLI, and IDE integrations with Visual Studio Code, JetBrains, and Xcode. Pricing matches OpenAI first-party rates, and usage counts toward existing AWS commitments. Read more.

Last week’s launches
Here are some launches and updates from this past week that caught my attention:

For a full list of AWS announcements, be sure to keep an eye on the What’s New with AWS page.

Upcoming AWS events
Learn more about AWS, browse and join upcoming AWS-led in-person and virtual events, startup events, and developer-focused events as well as AWS Summits and AWS Community Days. Join the AWS Builder Center to connect with builders, share solutions, and access content that supports your development.

That’s all for this week. Check back next Monday for another Weekly Roundup!

— seb

Improve your application resilience with Amazon Cognito multi-Region replication

4 juin 2026 à 00:37

As a developer advocate working with web and mobile application developers, I’ve often heard about the need to maintain consistent user authentication in the unlikely event of a regional service interruption. The increasing use of agentic AI, microservices, automation, and service accounts has sparked a similar need for machine-to-machine authentication. Today, I’m excited to share two important updates to Amazon Cognito: multi-Region replication for improved resilience, and support for customer managed keys for more control encryption control.

Many applications rely on Amazon Cognito to handle user and machine-to-machine authentication, and to manage user profiles. When building for high availability, having consistent data across different AWS Regions is a key approach, and until now, achieving that consistency came with significant challenges. Engineering teams spent significant time building and maintaining custom replication solutions to synchronize configurations across Regions. Manual export and import of user data between Regions created security risks from potential data exposure and introduced opportunities for data inconsistencies. During regional transitions, end users experienced disruptions like forced password resets and re-authentication. For machine-to-machine communications, teams had to create new app clients in the secondary region, which meant reconfiguring their applications and updating OAuth-protected resources to accept access tokens issued by the new regional issuer. These challenges made it difficult to maintain uninterrupted operations across Regions.

With multi-Region replication, Amazon Cognito automatically maintains a synchronized copy of your user data and machine secrets in a secondary AWS Region of your choice. The replication flows in one direction, from your primary Region to the secondary Region. This includes user profiles, credentials, and pool configurations. The secondary Region operates in read-only mode, focusing on maintaining authentication capabilities. Existing sessions continue uninterrupted.

When you need to direct traffic to the secondary Region, your existing users can continue signing in with their existing credentials without disruption, and currently signed-in users remain authenticated because both regions recognize access tokens issued by either region. Multi-Region replication supports all authentication methods, including federated sign-in through social providers (Amazon, Google, Apple, Facebook), Security Assertion Markup Language (SAML) and OpenID Connect (OIDC) integrations, and API authorization flows. This approach maintains availability for both customer-facing applications and machine-to-machine communications in your backend services. While authentication continues without interruption, operations like new user registration or profile updates are not available during failover.

Before configuring multi-Region replication, you must configure a multi-Region customer managed key stored in AWS Key Management Service (AWS KMS) to encrypt your user data at rest. These keys provide consistent encryption across Regions while giving you control over your encryption strategy.

How this works in practice
I start this demo with an existing Cognito user pool in the us-west-2 (Oregon) Region. I want to configure replication to us-east-1 (Northern Virginia). I also have a customer managed key replicated in these two Regions.

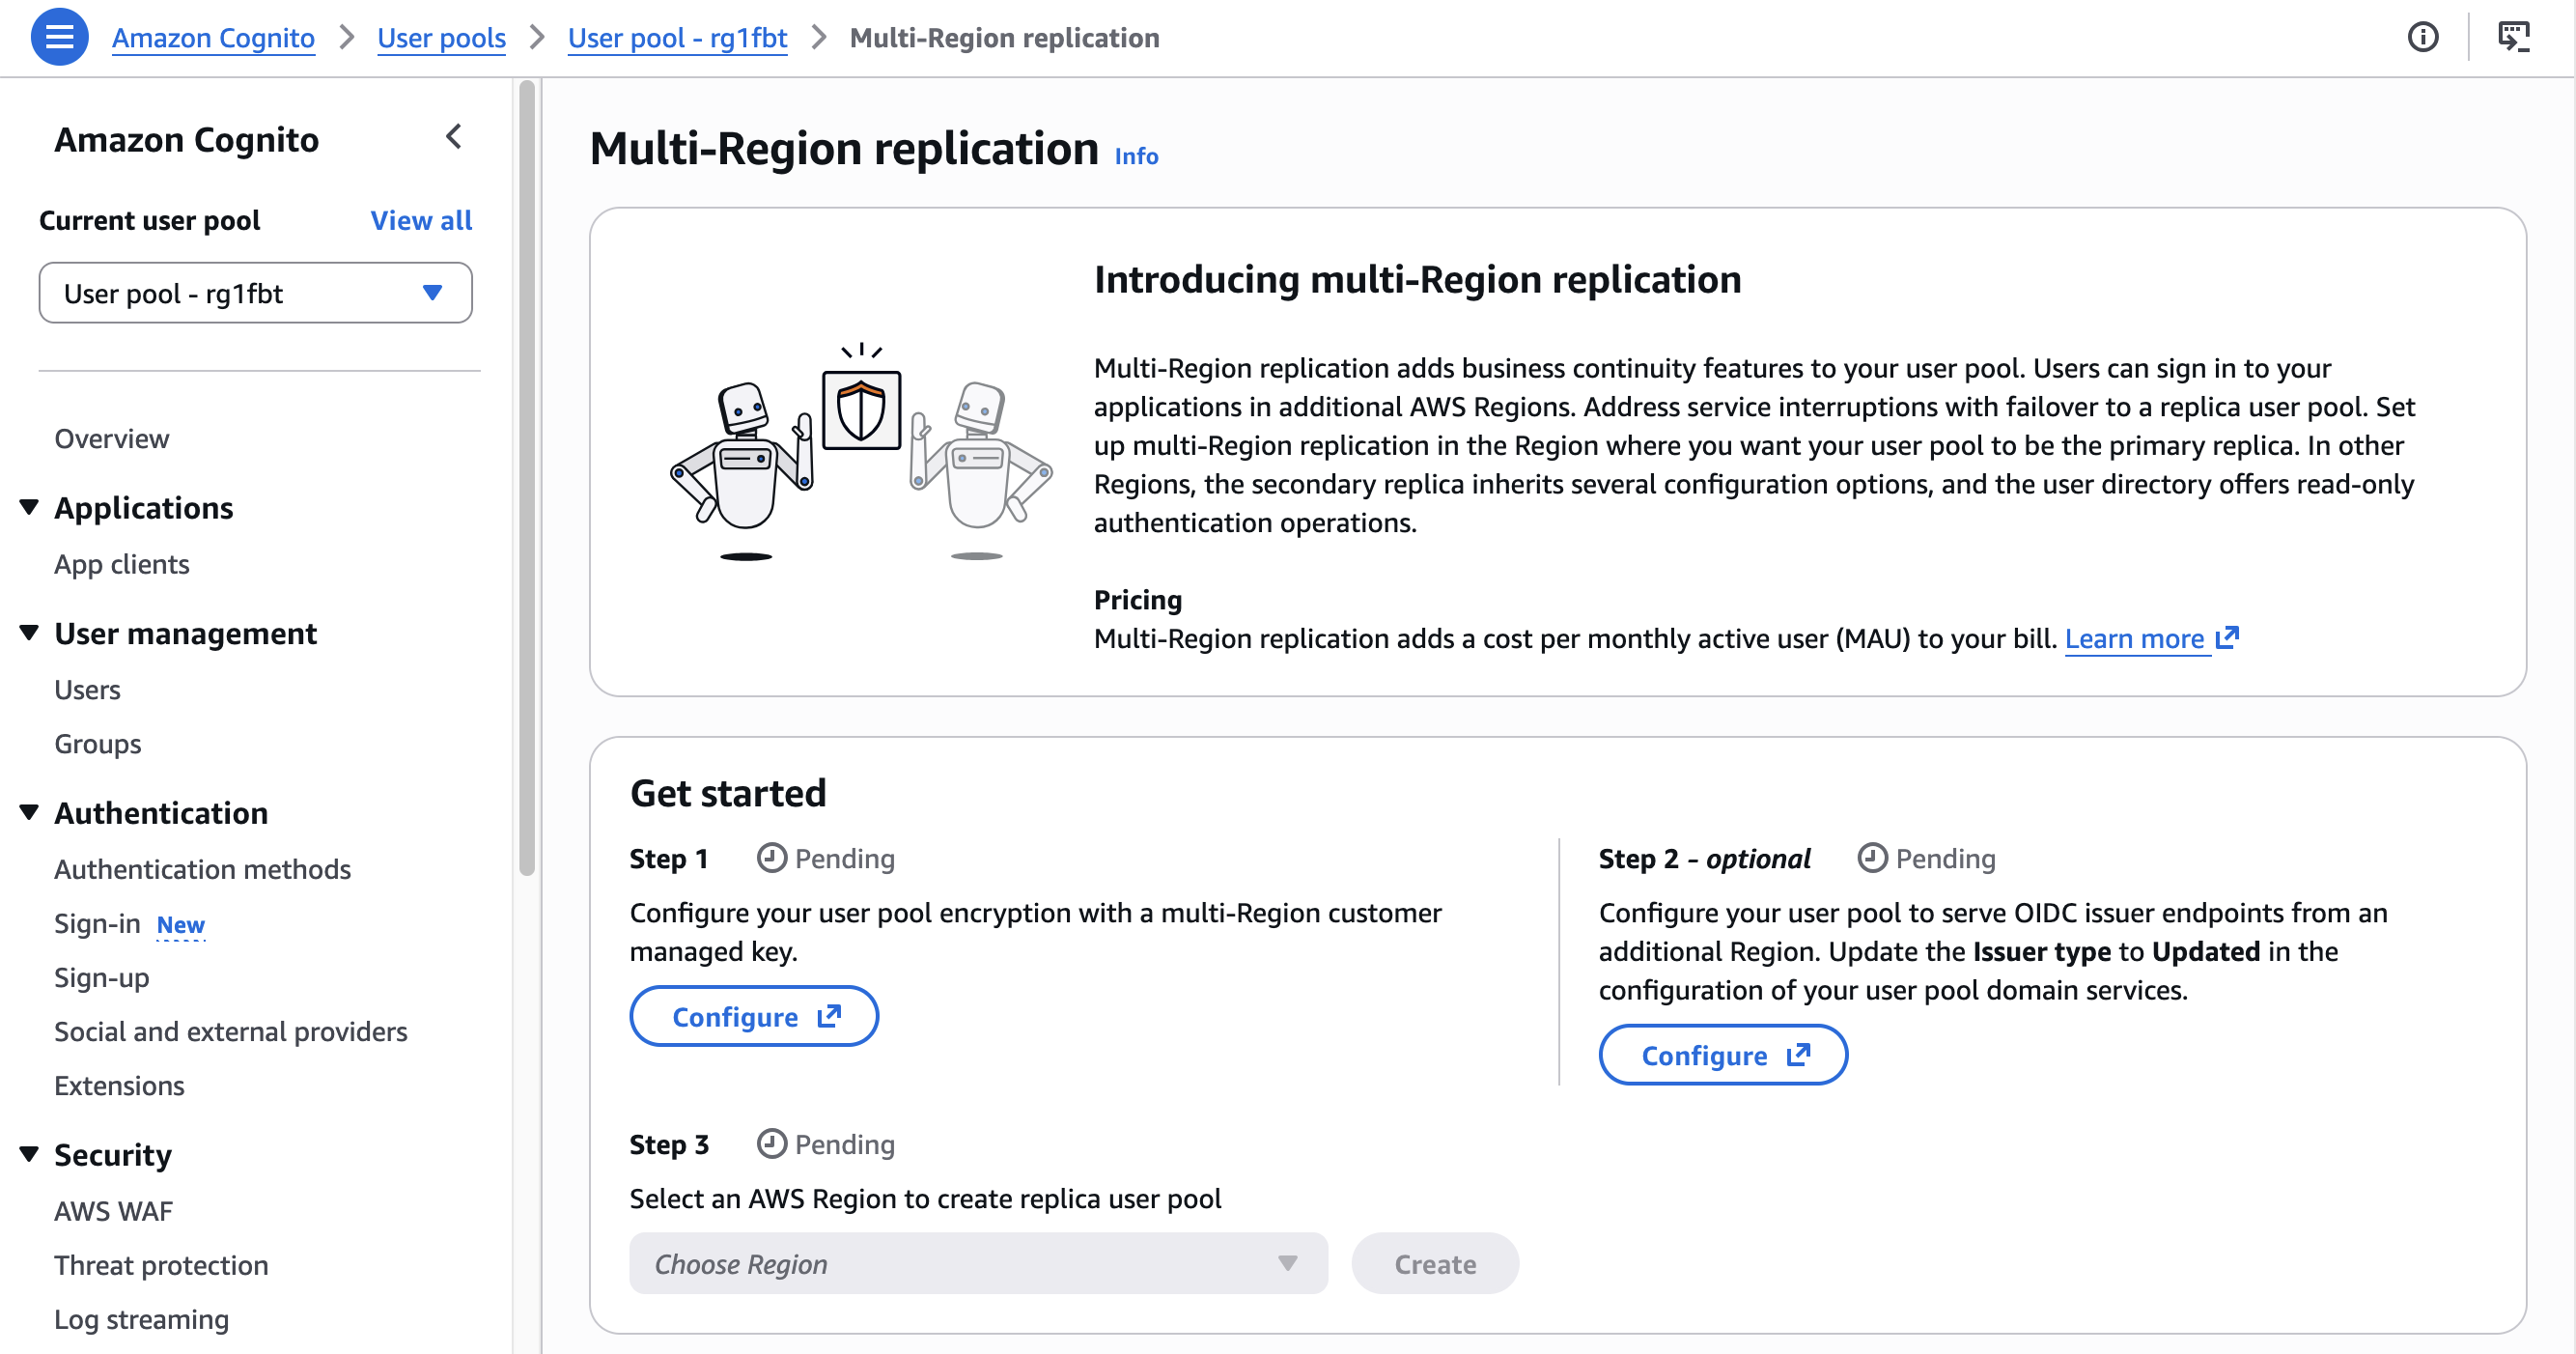
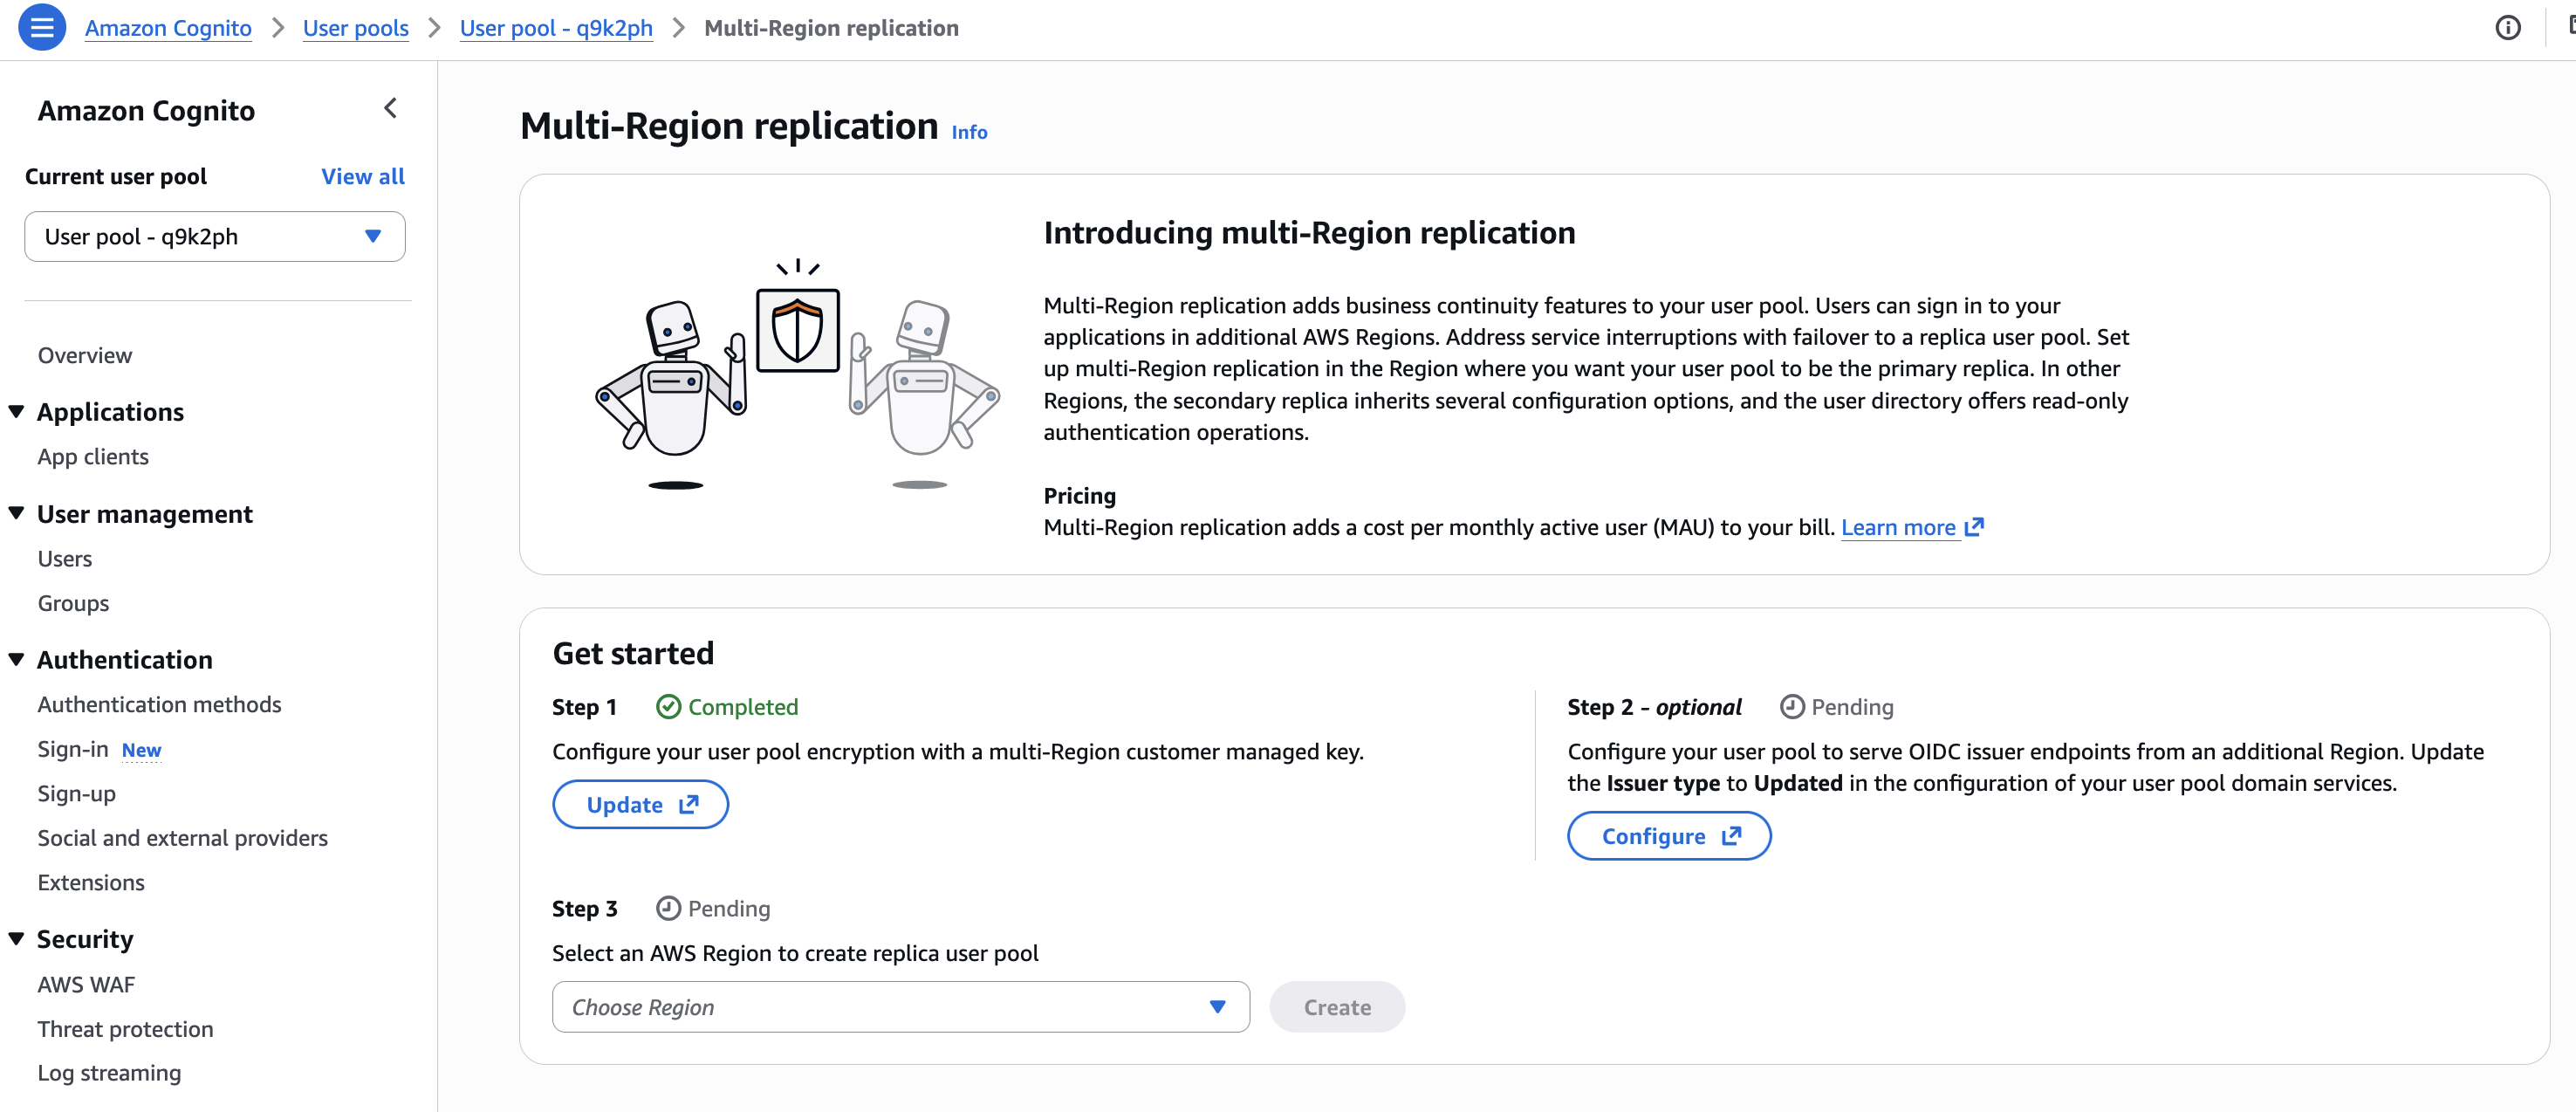
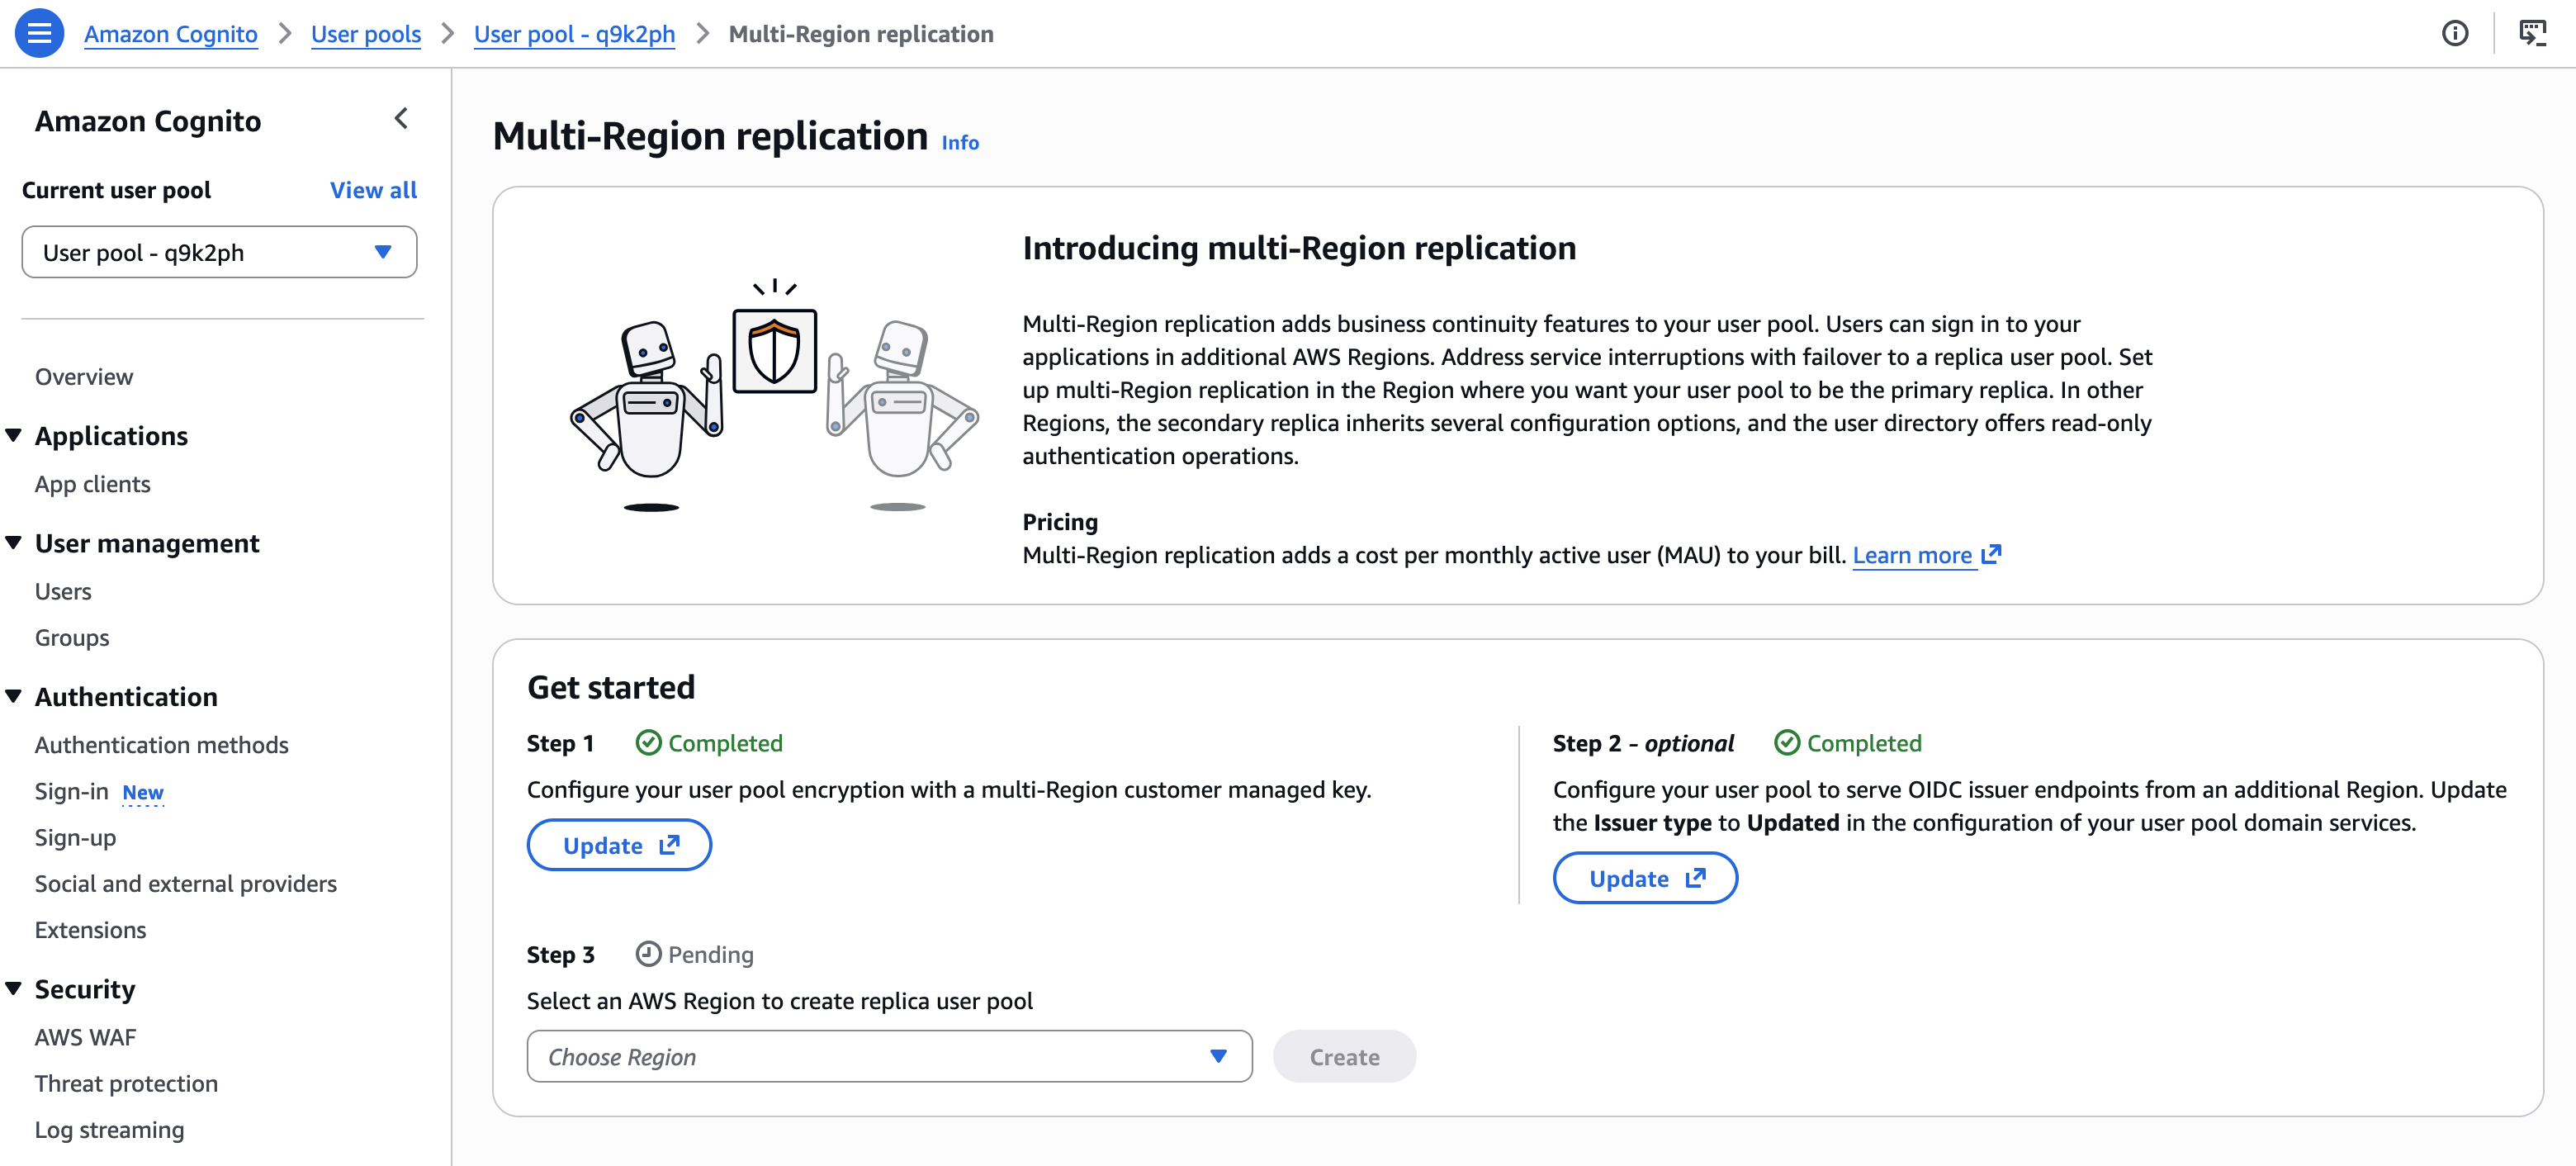
Configuring multi-Region replication is just three steps. The AWS Management Console guides me through the steps: set up a custom key for encryption, configure multi-region OIDC endpoints, and configure the replication itself.

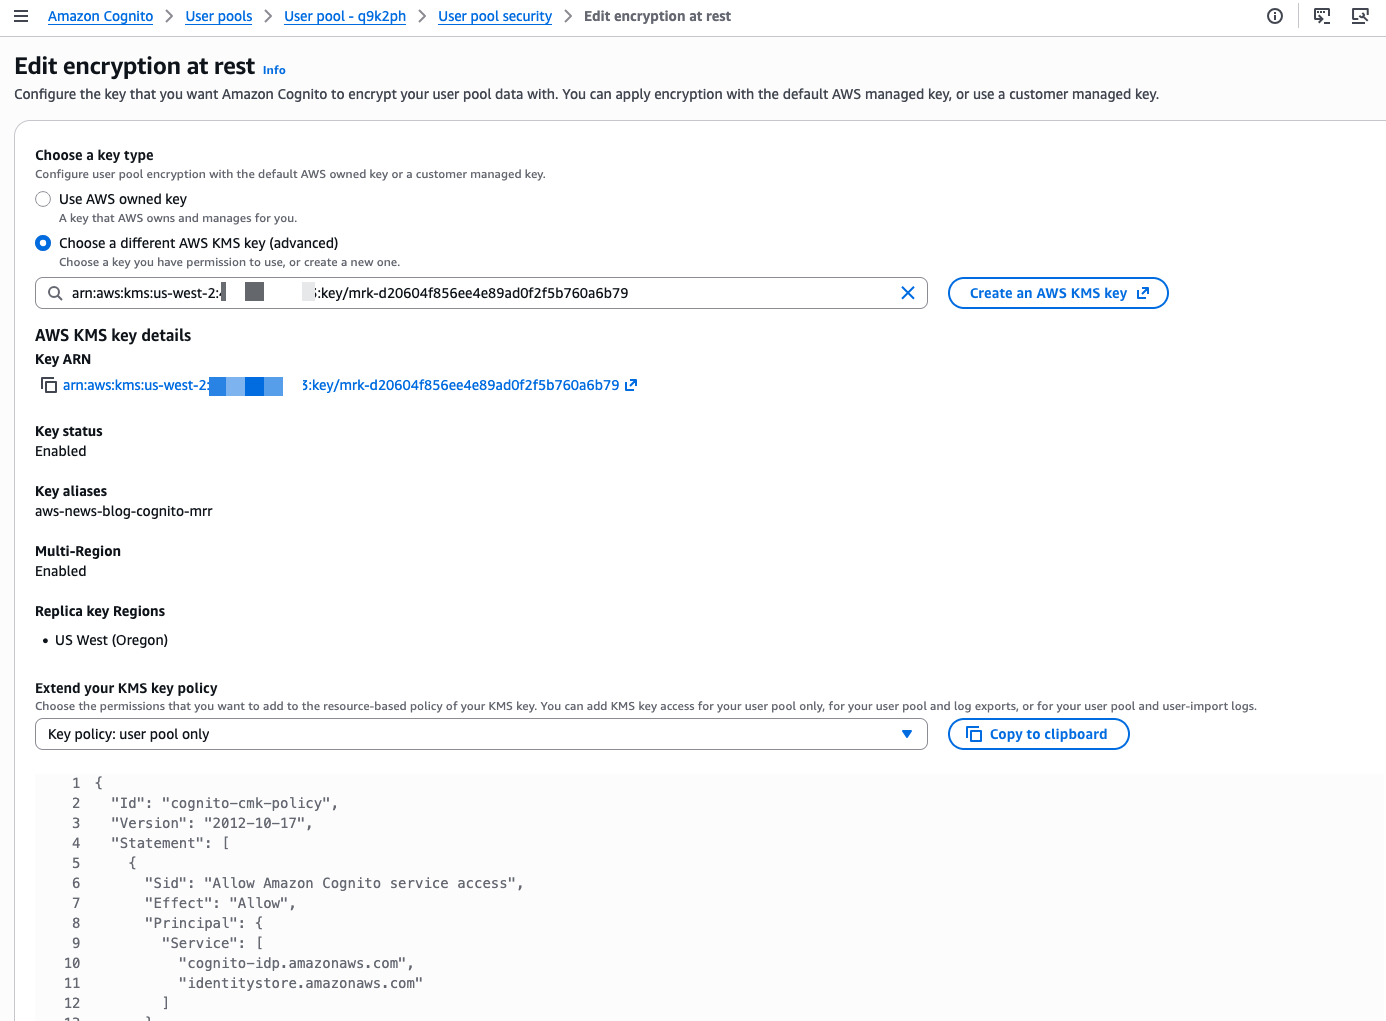
First, I set up a custom AWS KMS key to encrypt the data at rest.

Cognito Multi-Region replication - initial state

I select the custom key I created. I also update the key policy to allow Amazon Cognito to access and use the key. The console shows the correct IAM policy statements to add to my key policy.

Cognito Multi-Region replication - select CMK

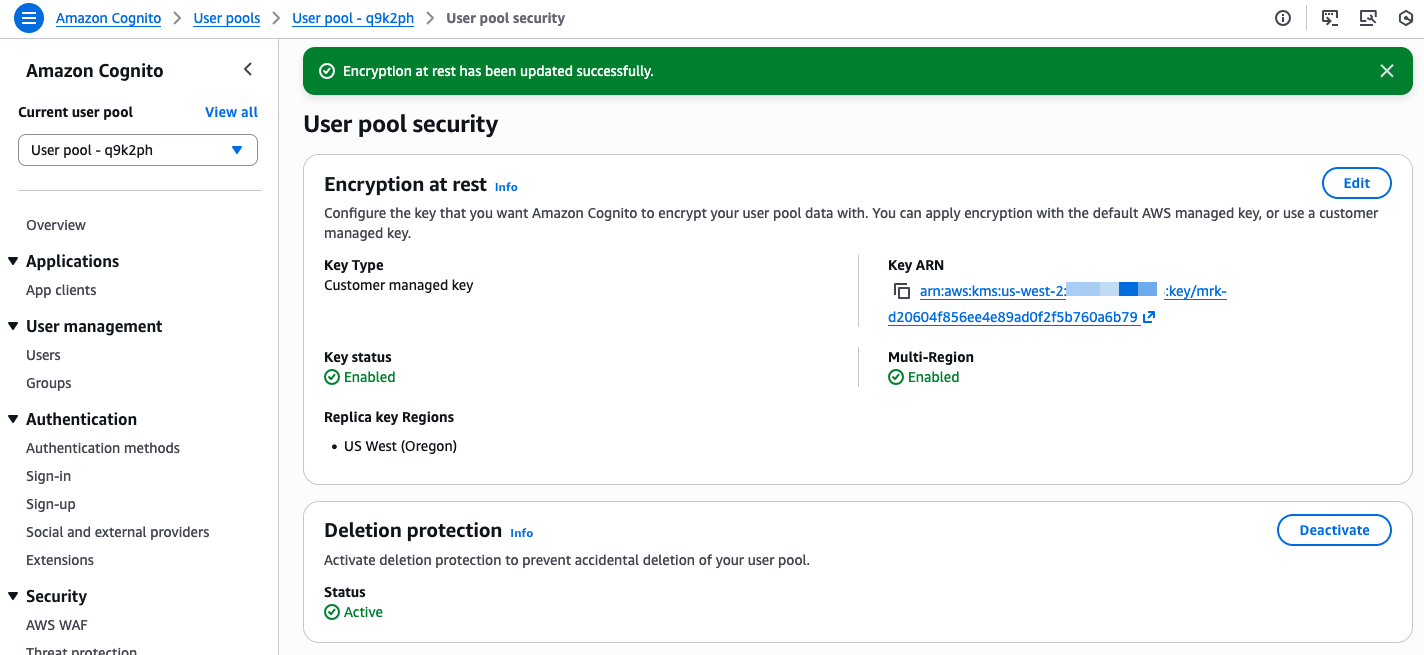
The console confirms when the custom key is selected and correctly configured.

Cognito Multi-Region replication - confirm CMK

Second, I follow the console instructions to configure the OIDC issuer type. On Step 2 – optional, I choose Configure.

Cognito Multi-Region replication - configure multi region OIDC 1

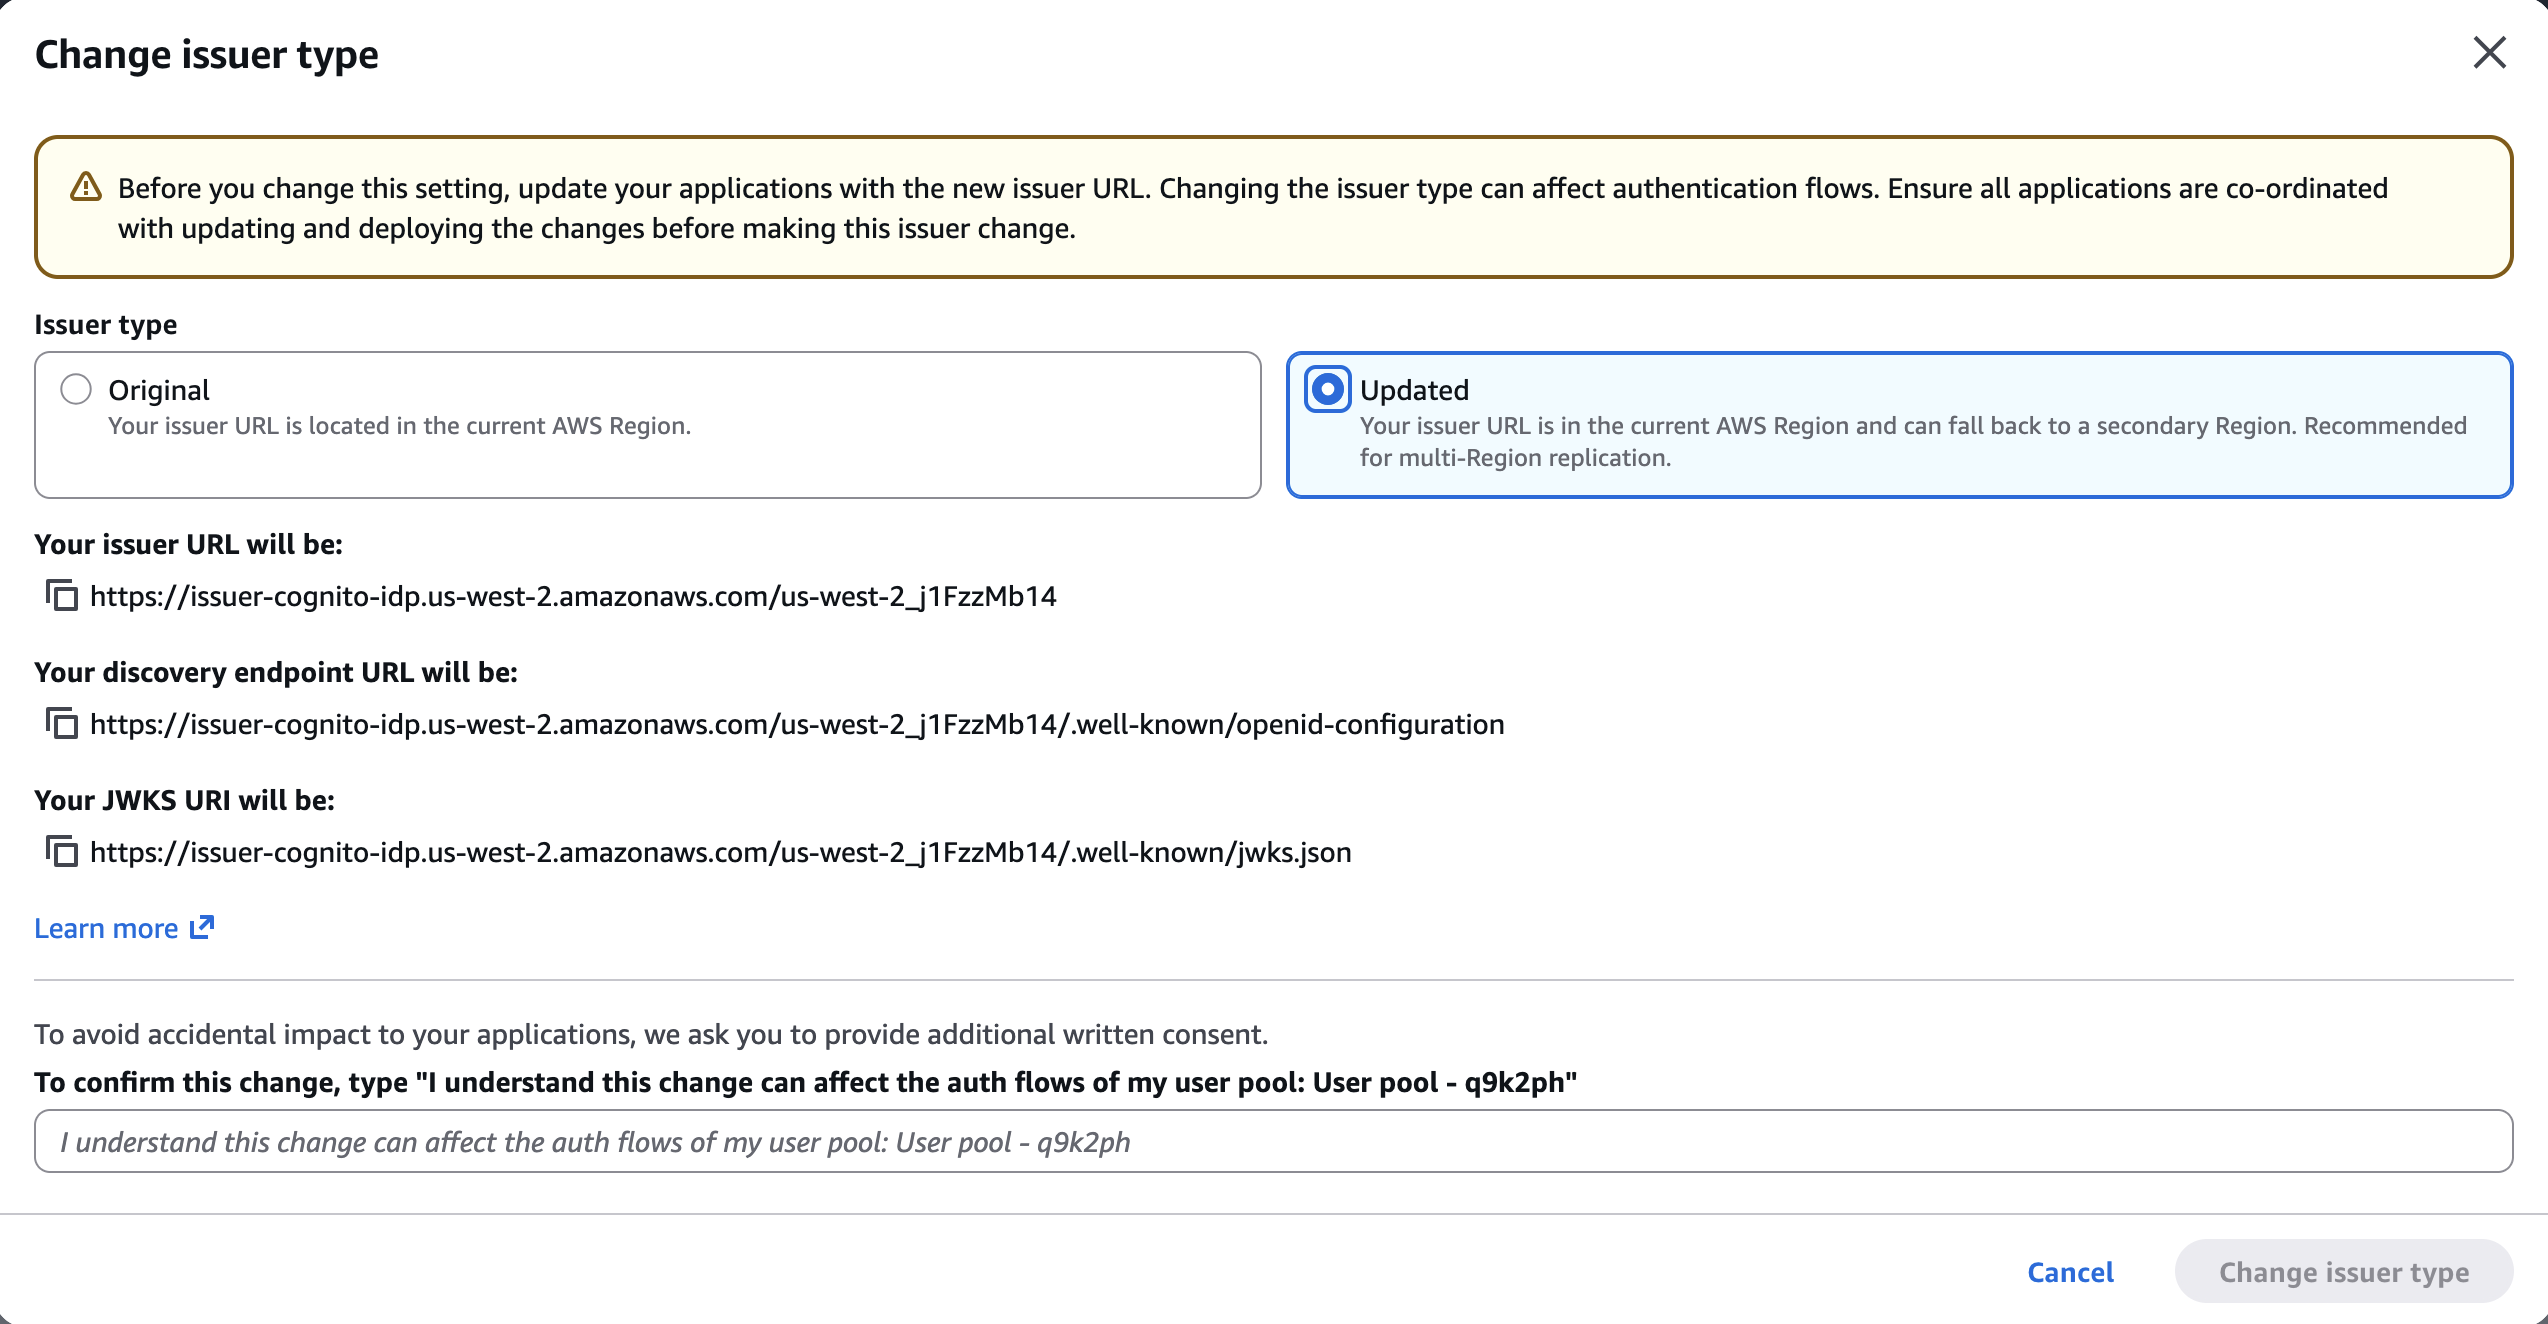
I make sure to update my client applications with these new endpoints. This is a required change that will need a redeployment of server-side applications and an update submission for mobile apps on the App Store and Google Play. If I don’t update the endpoints, my users will experience disruptions because requests to the old endpoints will no longer be routed correctly.

On the next screen, I select Updated. I take note of the new URLs. I confirm the changes and choose Change issuer type.

Cognito Multi-Region replication - configure multi region OIDC 2Finally, I select the target Region for replication. Only Regions where the custom encryption key is replicated are available for selection. After having chosen the target Region, I choose Create.Cognito Multi-Region replication - start the replication process.

The service prepares the replication. The time needed depends on the amount of data in the user pool.

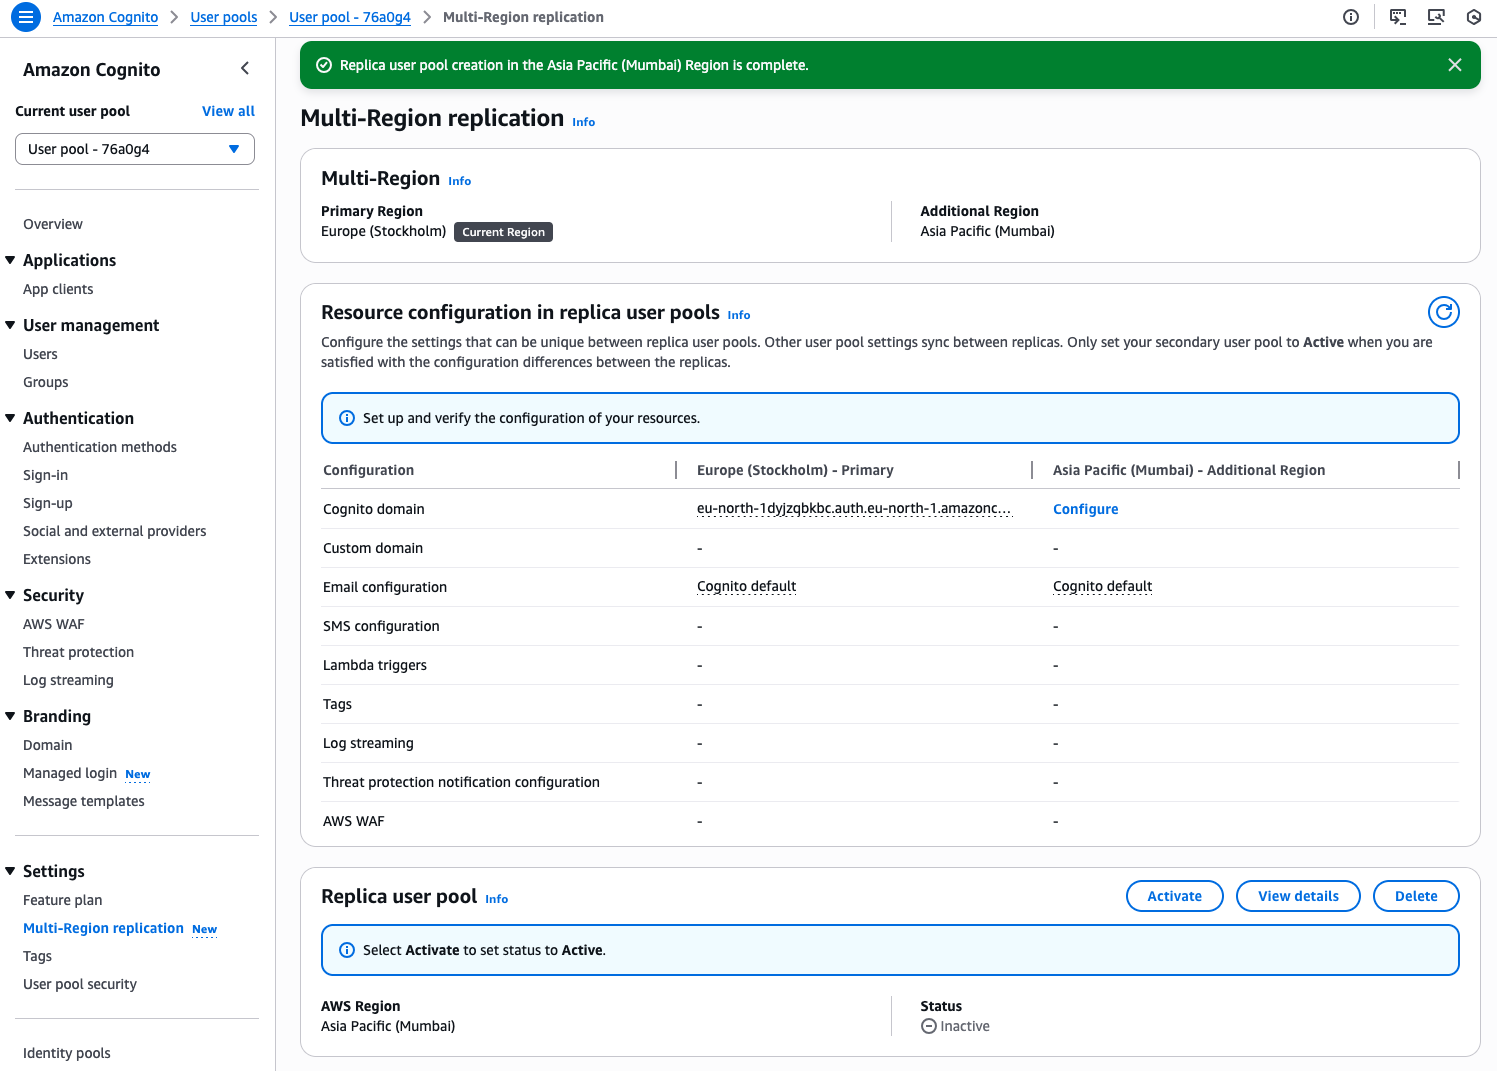
When the replicated user pool is ready, I manually Activate it.

Cognito Multi-Region replication - replication process is complete

The replication status becomes Active. It is ready to direct traffic to the replica.

Cognito Multi-Region replication - active

Additional configurations
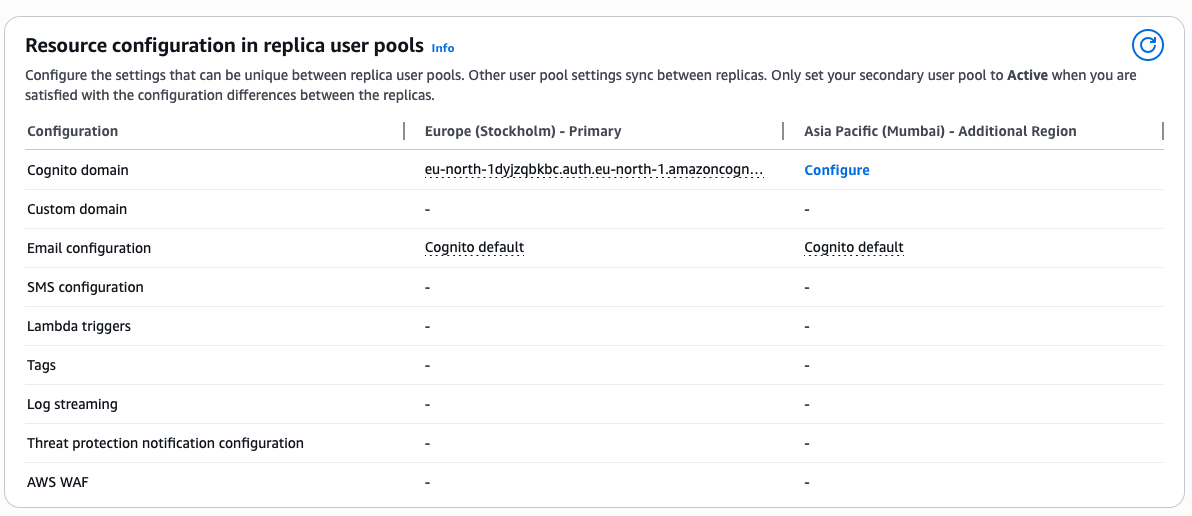
The console helps me to keep track of additional configurations I have to plan. When I’m using Lambda functions for custom authentication flows or SMS or email notifications, I must also deploy and configure these resources in the new Region.

Similarly, log streaming or AWS WAF configuration must be manually configured in the target Region before I start directing authentication traffic to it.

Cognito Multi-Region replication - task list

Health checks and failover
Both primary and secondary regional endpoints remain active and ready to serve your traffic at all times. To monitor system health and manage failovers, you design a strategy that aligns with your application’s specific requirements and security posture. You can implement health checks to monitor the status of authentication services in your primary Region and define criteria for when to initiate failover. These checks might look for error rates, latency patterns, or specific service alerts.

When your monitoring system detects issues meeting your failover criteria, you can redirect traffic to the secondary Region through DNS updates. This approach gives you control over the failover process while maintaining security. Consider testing your failover strategy during off-peak hours by redirecting a small portion of traffic to verify that authentication continues working as expected in the secondary Region.

When using managed login and federation with custom domains, you can also use the built-in traffic routing feature by providing an Amazon Route 53 health check ID.

Pricing and availability
Multi-Region replication is available today as an add-on feature for Amazon Cognito customers using Essentials and Plus tier. For user authentication, the add-on costs $0.0045 per monthly active user per replica Region for Essentials tier customers and $0.006 per monthly active user per replica region for Plus tier customers. For machine-to-machine (M2M) authentication, the add-on is a 30% charge on top of the standard volume-based pricing for successful tokens issued. For detailed pricing information, see Amazon Cognito pricing.

Multi-Region replication is available in the following Regions: US East (Ohio, N. Virginia), US West (N. California, Oregon), Asia Pacific (Mumbai, Seoul, Singapore, Sydney, Tokyo), Canada (Central), Europe (Frankfurt, Ireland, London, Paris, Stockholm), and South America (São Paulo).

Any of these Regions can be used as the source or the destination for the replication.

Support for customer managed keys is available for the Essentials and Plus tiers. It is available in the following Regions: US East (Ohio, N. Virginia), US West (N. California, Oregon), Africa (Cape Town), Asia Pacific (Hong Kong, Hyderabad, Jakarta, Malaysia, Melbourne, Mumbai, New Zealand, Osaka, Seoul, Singapore, Sydney, Thailand, Tokyo), Canada (Central), Canada West (Calgary), Europe (Frankfurt, Ireland, London, Milan, Paris, Spain, Stockholm, Zurich), Israel (Tel Aviv), Mexico (Central), South America (São Paulo), and AWS GovCloud (US-East, US-West)

From my conversations with customers, maintaining business continuity during regional incidents while meeting security requirements is a high priority. Multi-Region replication provides the capability to build more resilient applications without managing complex replication logic yourself. The automatic synchronization of user data and configurations reduces operational overhead while maintaining security.

For customers in regulated industries, the new support for customer managed keys provides additional control over data encryption. You can now use your own encryption keys to protect user data at rest, helping you meet regulatory requirements in industries like healthcare and financial services.

To get started with multi-Region replication and customer managed key encryption, visit the Amazon Cognito console or see the documentation for detailed setup instructions. I look forward to hearing how you use this feature to strengthen your application architecture.

— seb
❌